Full review: The Olympus OM-D E-M5

_8012314 copy
My stealthed-up OM-D. Note lack of strap D rings; these are the clip points from the Crumpler strap.

I did a double take after seeing the teaser images for the OM-D, way back at the start of the year. Olympus managed to make a 2012 camera look like a 1970 one; not only that, why on earth would you need a prism hump for a camera that doesn’t even have a prism? My first impressions of the spec sheet were ho-hum, yet another over-cramped sensor with too many pixels, inside a tiny body. And it wouldn’t fit my workflow, because there was no ACR support of any kind. And what’s with having two cryptic names? Then, after a long wait, and at a camera shop in Singapore looking for some lighting gear, I made the mistake of playing with one. Not only did it not feel plasticky and toy-like as its appearance would suggest, but the camera was also very responsive – in a connected-to-your-synapses-good way that I’ve only felt with the pro Nikons up to this point. I was intrigued.

_8012328 copy
Reach out and touch me. Tilt and capacitative-touch LCD; there’s actually another accessory port under the flash hotshoe for things like GPS, macro LED lights (that look like tentacles), or for a completely bizarre twist, another EVF.

A little more research on reaching home in Kuala Lumpur revealed that the OM-D was not only surprisingly expensive for what it was – D7000 money – but perhaps enough camera that you could use one on assignment and be taken seriously. And whilst a nice idea, the two-part vertical grip both managed to look dinky and defeat the point of having a compact system in the first place.

_5001096 copy
Ladies at lunch. OM-D, 45/1.8 – this has rapidly become my favorite lens for the camera. It’s a little long to use at arms’ length on the Pen Mini, but excellently stealthy on the OM-D.

I admit, following reading a number of excellent reviews on the web, temptation peaked. ACR support was the final straw – one day, it followed me home. (My dealer has a joke about my car washes being very expensive, because while waiting for the car to be ready, I usually drop by; most of the time, I buy something. This was another one of those expensive car washes.) After all, I reasoned that I already had the Pen Mini and excellent 12/2, 20/1.7 and 45/1.8 lenses for Micro Four Thirds, plus there was all of this Leica M glass sitting around and an adaptor. The Pen Mini was surprisingly excellent. How bad could it be?

_5000140 copy
The Kicker. OM-D, 45/1.8

Actually, a lot better than expected. Turns out there’s a very good reason for that prism hump, just not one you’d expect. Aside from the 1.44 million dot EVF, there’s also a five-axis gyroscope – supposedly a world first – inside the camera that controls the matching five-axis moving-sensor stabilization system. I’m not a fan of sensor based systems, because they don’t generally have as much correction power (from an angle of view basis) as lens-based systems for longer lenses, and they tend to do odd things like ‘snap’ back into position once the limits of travel are reached. The OM-D’s system displays a little bit of the latter, but very, very little. And it’s surprisingly effective, too – it activates with a decisiveness I haven’t seen before on a sensor-IS system – but then again I don’t have any lenses over 90mm EFOV, and if I did, I’d probably buy the Panasonic 100-300 which already has lens-based IS built in, giving me the choice of both systems (but not together, as apparently both manufacturers claim they don’t play nice). You still need to give the stabilizer a moment to lock down though, otherwise you might get that unexpected jump.

_5001019 copy
A repost of one of my favorite portraits. OM-D, 45/1.8

And that brings me to the next popular point of contention with the OM-D: the fan noise. Turns out it’s the a combination of the gyroscope and the electromagnets that move the sensor, or keep it in place (if the IS system is off). In fact, you can hear a similar noise in Nikon’s VR lenses when VR is engaged if you listen carefully. I don’t think it’s a big deal, personally. You can only hear it in near-silent environments.

_5000219 copy
A shave and two bits. OM-D, 45/1.8

The OM-D is a tricky body to get a feel for – it’s smaller in person than you’d expect from pictures; it’s a little taller than the E-P3 due to the finder hump, but nowhere near as bulky and unwieldy as the E-P3 with the VF2 viewfinder attached. Ergonomically, this is good and bad news; the camera sits in the hand well, and both exposure adjustment dials fall easily to thumb and forefinger. The arrow keys on the back are still OK, but a little bit of a cramp to reach; the delete button and power switch are both far too low. Moving the power switch to that little empty bit of deck underneath the shutter button would be fantastic – a split second fumble to power the camera on can often cost your the shot. More on this later.

_5000076 copy
Damn you, Magritte. OM-D, Leica 35/1.4 ASPH FLE via adaptor

For the most part, ergonomics are solid. There are plenty of programmable buttons; the two on the top deck (Fn and record), one next to play (Fn) and the arrow pad. The play and Fn buttons are a bit small – perhaps making them pointier and longer might help – I’d be concerned about being able to hit them reliably with gloves, but then again they seem to be fine for bare-handed use. The arrow pad is set to pick focus point by default, and this is the behavior I prefer. You can assign shortcuts like ISO and WB to it, but why bother when there’s the excellent SCP which shows all settings at a glance? Hit the OK key and use your finger to select the setting, then use the front dial to change it.

_5000108 copy
Night Tree. OM-D and 45/1.8. ISO 2000, would you believe?

Oh, I forgot to mention the OM-D has also inherited the touch screen from the E-P3; Olympus has done a good job of making its operation unintrusive so you’re not accidentally shooting with your nose (you can do a touch-to-focus-and-shoot operation when in live view). It’s handy to select focus points quickly, as well as scroll and zoom images – though this behavior is just a little counterintuitive, because I don’t do it on any of my other cameras.

In addition to being hugely customizable, there are several neat touches with the operation of the camera – in playback, the FN1 button next to play zooms into the focus point to the last magnification with two presses: first to enable (after which you can also use your finger to drag the enlarged area box) and another to magnify. Amongst all cameras, only the pro Nikons do this. Better yet, you can skip between zoomed-in images to compare areas of the image using the front command dial. On top of all this, you can even select clipping levels for the shadow/ highlight warning display. Nice.

_5000206 copy
Memorial for a leaf. OM-D, 45/1.8

The OM-D has other functions which I don’t really use, but which might be nice for JPEG shooters like special effects and a form of live curve control using the dials; it isn’t very precise, but it is better than nothing.

Remember I was talking about losing shots to a powered-off camera earlier? There’s a good reason for this: if you leave the battery, it’ll probably be dead after about 300 or so frames because the EVF and LCD appear to be always on, even if the camera is in standby; the LCD might be black but mine at least has a telltale glow. My friends who don’t power off between shots are reporting battery life in this range. I’ve got no problem getting 500 shots out and barely making a dent in the battery (one little segment missing), however. I think I’ve only charged it a handful of times since getting the camera, and never has the battery been fully depleted.

_5001073 copy
Untitled. OM-D, 45/1.8

I think the EVF saves power over the LCD, but then again I’m not entirely sure; there’s a lot of dots on that little monitor. It’s definitely one of the better ones I’ve seen, with a very high refresh rate, low lag, good usability in low light (though oddly the live preview tonality etc doesn’t accurately match the captured image sometimes) and a fine dot pitch. Do I miss my real viewfinder? Yes, but to be honest, I seem to have adapted to this one. And being able to see a quick review of the image you just shot in the finder is great – you don’t have to take your eye away from it to check your composition. Similarly, if you want to shoot discretely at waist level – the tilting LCD is great. I prefer these to the swivel kind that frankly always feel like they’re going to snap off at the hinge point.

_5000222 copy
In praise of tilt screens. OM-D, 45/1.8

In use, the OM-D shows that it was designed by photographers – or at least has had heavy photographer input in most of the engineering decisions. Menus are logical, and settings are mostly easy to find – though it could really use a way of saving settings to an SD card to transfer between multiple cameras (this is a ‘pro’ feature for users of multiple bodies), or reload if somebody plays with yours. It’s solid, and surprisingly hefty for its size – the body is made of magnesium alloy a mix of magnesium alloy, plastic, and some stamped metal (brass?) parts; it’s weather sealed to the same level as the E-5. If you look closely, there are gaskets on every compartment. Although I’ve seen videos of people washing their E-5s, note that the only weather sealed M4/3 lens at the moment is the 12-50 kit lens. All in all, I’m pretty confident that the camera could take a decent beating and survive.

_5000876 copy
Remember this shot from Wesak Day? The camera was already soaked by similar blessings at this point. OM-D, 12/2

The critical thing that makes a good camera, in my mind, is responsiveness. And the OM-D has it in spades. I think it’s the fastest-focusing contrast detect camera out there; it’s noticeably faster than the Pen Mini, which I already thought was pretty speedy. It even shoots at 9fps, in RAW, with no buffer indigestion. Frankly, in good light, with a contrasty subject, it gives my D800E a run for its money. The catch is that you must use the Olympus lenses for this. Despite the supposed openness of the Micro Four Thirds standard, there are definite speed advantages to be had for using a manufacturer’s own lenses on its own bodies.

_5000941 copy
Bulding blocks. OM-D, 45/1.8

There is a catch with autofocus, however. As good as single AF is – I would say easily class leading, and giving most DSLRs a run for their money (with none of the AF alignment problems, because the imaging sensor does the focusing) – continuous AF is a completely different story. Even though Olympus claims that continuous and tracking AF is greatly improved with the OM-D, frankly, it’s unusable. Continuous autofocus can’t seem to anticipate subject motion; it drops after the first frame, and usually comes close but fails to re-acquire the subject. Tracking AF is a similar story; you can see the camera manages to find the subject in the frame and displays this in the finder, but somehow it just fails to move the lens by the right amount to keep up with it. I would personally avoid these two modes, and instead rely on its extremely fast S-AF, low shutter lag, and the higher DOF of Micro 4/3 (for a given FOV and aperture) to save you. In fact, I don’t think I’d use this camera for moving subjects at all; that’s why I still keep the D700 and battery grip around.

_5000653 copy
Holy man. OM-D, 45/1.8. Even at the slow, predictable speed of the moving float, getting this shot was a lucky break.

I haven’t seen any AF errors for single AF, except when there are objects at multiple distances inside the focusing box (whose size can’t be changed) and something other than the intended subject is the most contrasty. It’s also worth noting that because the imaging sensor is used, the AF grid covers almost the entire frame. These are two huge advantages of mirrorless systems that frankly I miss with full frame cameras, whose AF grid usually covers the central third of the frame at best.

All of this usability would be utterly, well, useless, if the image quality didn’t match. The OM-D reportedly uses the same sensor as the Panasonic GX1 I’ve been told by a number of sources that it’s a different sensor; 16MP and 3.63 micron pixel pitch. That’s tiny; the 10MP 1/1.7″ compacts run at about 2.3 microns or so. By comparison, the D7000 and D800E have a 4.88 micron pitch, and the D700/D3, an enormous 8.5 microns. (Every time you double the pitch, you quadruple the photo site area.) Even factoring in advances in technology, I’d expect pixel-level performance to be on par with the Pen Mini; going from 12 to 16MP while maintaining the same pixel quality is pretty much what Nikon did with the D3s to D4 move, and in about the same gestation period.

_5000967bw copy
Hot day. OM-D, 45/1.8

Wrong. It seems that either the old sensor was pretty old, or the new sensor has skipped half a generation – pixel level image quality is on par with the D7000, as far as acuity and noise goes; it may even be slightly better on the noise front. Color accuracy is better, too; the OM-D is both accurate and delivers excellent skin tones. The best way to describe its tonal palette is ‘natural’ – very little work is required to get my desired output from the RAW file, which isn’t necessarily the case with other cameras. The only place where it can’t quite keep up (and this is a fact of the laws of physics) is in dynamic range; I don’t know exactly how much it has, but my gut puts it at around 11-12 stops useable at base ISO with careful RAW processing, which is a little less than the D7000, and two stops less than the D800E. The sensor is further limited at higher ISOs, at which point dynamic range falls further. There’s probably no more than 6-7 useable stops at ISO 3200. This is still excellent performance for such a small sensor!

_5000552bw copy
Migrant workers. OM-D, 45/1.8. ISO 3200

On the noise front, I limited my Pen Mini’s auto ISO to 1600; anything beyond was just too grainy and edge-compromised to use. I’m happy to raise that one stop to 3200 for the OM-D; perhaps 6400 if I have no choice, since there are a few more pixels to play with – but by then dynamic range and color are really suffering quite badly. All in all, though, I’d put the noise performance on par with the Leica X2 I recently tested. One more stop of useable high-ISO, the hugely improved stabilizer, and the ability to use an eye-level finder and brace the camera against your face (increasing stability and reducing the minimum shutter speed required to handhold) means that the OM-D is capable of delivering 2-3 stops of additional usability over the Pen Mini (and by extension, E-P3/ E-PL3 cameras of that generation) – which is a huge step forward. In fact, it gives better color and detail than my D700 at base ISO, and keeps up with it noise-wise to about ISO 800. It’s probably about as flexible as the D800E in that sense. In daylight, picking this camera is a no-brainer.

_5000228 copy
The thinking man’s camera. With beer, too. OM-D, 45/1.8. ISO 2000

This doesn’t of course mean that the OM-D is perfect; there are many things that only reveal themselves with extended use, and one of the reasons why this review has taken so long (other than the X2 and M-Monochrom arrivals) is because I didn’t feel like I’ve had enough time to shoot with it to fully understand this camera; there’s a lot of functionality in here I haven’t even tried, like video mode for instance. What I do want to test more extensively – and haven’t had the chance to, because FL-50Rs aren’t exactly cheap or easy to borrow – is the wireless flash system. If it’s as accurate and flexible as Nikon’s CLS, I may well have found a replacement lightweight system for anything that doesn’t require 36MP. I did briefly play with the two-part grip; it’s very solid, and improves handling and balance dramatically – with or without the vertical portion. It takes another battery and is sealed to the same degree as the rest of the camera. The only problem I have with it is the rather stiff price for what is effectively a few bits of plastic and some buttons; it’s fully 1/3rd of the camera – at least where I live.

_5001213 copy
Untitled portrait. OM-D, 45/1.8

Things I’d like to see improved:
– Strap lug placement is awful. Using the included D-rings, the strap digs into your palm, or the web between your fingers. It seems like this is an Olympus tradition; every single Olympus I’ve owned has had this problem. I solve it in the usual way: remove the D rings, and either use a thin lanyard hand strap (fortunately, the camera is light) or a Crumpler Urban Disgrace that attaches via a lanyard-style string that threads through the remaining eyelets.
– Continuous AF. It’s not usable now, period.
– The power switch is in a terrible location.
– The buttons could be more tactile, they feel, well, mushy. It’s not always clear if you’ve pressed something.
– Playback and FN1 buttons are too small, and you can quite easily press the wrong one.
– It seems battery life could be improved, perhaps through more intelligent use of sleep modes. The camera could be a bit faster in waking up and powering on, too.
– Some way of saving settings to an SD card and transferring them to another camera – this is meant to be a pro grade camera after all, and pros have more than one camera. With that many custom settings, resetting a second camera is a colossal pain.

_5001123 copy
Contemplating the upgrade (note watches). OM-D, 45/1.8

Notice that with the exception of continuous AF performance, there are no real big issues here. In all fairness, continuous AF is something that none of the mirrorless cameras do well (with the exception of the Nikon 1, which has phase detect photo sites on the sensor).

With the arrival of the OM-D, it finally feels like Micro Four Thirds has come of age. The original promise of ‘smaller, same quality’ which was made with Four Thirds I felt was never fulfilled with earlier cameras; they weren’t small enough, or able to deliver the same image quality. Although Micro Four Thirds went a long way to fulfilling the smaller part of the equation, image quality, speed and usability were lagging behind until the last generation; only now has the promise been met. I don’t look at the OM-D’s files and think ‘wow, this isn’t bad for such a small sensor!’; instead, I look at the files and am satisfied enough to not think about the sensor size. It’s hugely liberating to be able to carry a pro grade body and three lens fast-prime kit – 24, 40 and 90 equivalents – whose total weight is around 600g, and without feeling like I’m compromising anything (at least not for what I shoot; if it were sport, it’d probably be a different case). That’s the weight of one lens for the D800, or the M9-P body only. That’s hugely appealing for travel. Even two bodies wouldn’t weigh that much.

In conclusion: it’s an exciting time to be a photographer. For the vast majority of my work, this is more than enough camera; I just need a solid macro option (there’s a 60mm 1:1 on the way) and a good wireless flash system, and I’d be seriously tempted to switch over. MT

_5000959bw copy
Waiting for more rebar. OM-D, 45/1.8

More of my work with the OM-D can be found here on flickr. This is a set which will be continuously updated as time goes by…

Update: I’ve been made aware of an excellent thread on DPReview by Archer Sully here documenting some of the ‘hidden’ features of the OM-D that the manual doesn’t cover. It’s good reading for any OM-D shooter.

Get the Olympus OM-D here from B&H or Amazon.

____________

Visit our Teaching Store to up your photographic game – including Photoshop Workflow DVDs and customized Email School of Photography; or go mobile with the Photography Compendium for iPad. You can also get your gear from B&H and Amazon. Prices are the same as normal, however a small portion of your purchase value is referred back to me. Thanks!

Don’t forget to like us on Facebook and join the reader Flickr group!

appstorebadge

Images and content copyright Ming Thein | mingthein.com 2012 onwards. All rights reserved

More street images from the Leica M-Monochrom

This series shot with a Leica M-Monochrom and the 35/1.4 ASPH FLE.

_MM1_L9995549bw copy

_MM1_L9995517bw copy

_MM1_L9995575bw copy

_MM1_L9995505bw copy

_MM1_L9995560bw copy

_MM1_L9995552bw copy

_MM1_L9995548bw copy

_MM1_L9995522bw copy

_MM1_L9995506bw copy

_MM1_L9995538bw copy

Start with the end in mind: visualizing your shots

_M9P1_L1004614 copy
Lighting candles at Christmas outside Stefansdom, Vienna. Leica M9-P, 28/2.8 ASPH

Most of the time, we shoot first and then figure out what to do with the images later. That’s the wrong way of doing things. A healthy portion of famous photojournalism work was premeditated: not in the sense of the scenes being staged, but the photographers had some idea of what they were looking for, what might happen, and if it did, how they wanted to capture it. The final composition was most probably unplanned and spontaneous, relying on the photographer’s experience and training to deliver the precisely ‘right’ combination of elements in the scene.

_M220119bw copy.jpg
Market thespian, Kuala Lumpur. Nikon D200, 12-24/4

Even street photography works best with some degree of forethought: you might not know what’s going to come into your frame, but you do have to be conscious of light direction, possible backdrops or natural frames, and of course the flow of people. It isn’t planned, but a lot of the time I see locations with interesting urban geometries and abstractions, then wait around for something interesting to happen or for a person to be in precisely the right location to complete the shot. Often, most of these scenes would be acceptable but slightly boring without the human element – however, short of hiring a model, all you can do is wait and be prepared for somebody to turn up at the right place and time – and for that, you have to be both able to see what the difference would be, and ready to capture that instant.

_N215560 copy.jpg
Vintage Lemania chronograph for a book on military watches. Double page spread, text in white to go on the black column at right – planned and shot as such. Nikon D200, 105/2.8 VR Micro

On the other side of the spectrum, almost all commercial work is planned, right down to the smallest of details. There are blank spaces left in compositions that look awkward on their own, but are there because of intended text placements or cropping to fit strange aspect ratio spaces. And that doesn’t even begin to touch on the conceptual side of things – often most clients know what they want, but are unable to communicate it to the photographer because describing visual things requires a wholly different an unfamiliar language to somebody working in say, hamburger sales. The trick here then becomes trying to understand the end use of the image, its intended goal, and how you translate that into a photograph – in a sense, we photographer have become more than just executors – we have to think actively about human psychology to some extent, too.

_7021848 copy
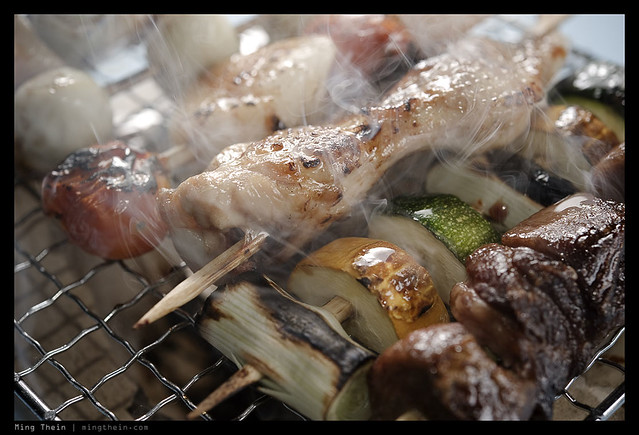
I bet you feel like a grilled snack on a skewer right now. And that’s the end goal. Nikon D700, AFS 60/2.8 G Micro

Fortunately, this is usually pretty simple: the end goal of commercial photography is almost always to sell more product. Which means that if you look at the image and it doesn’t stir some desire in you – whether it’s to go out and buy something or make you feel hungry – then the photograph has failed its objective.

I’m digressing here. What I really want to talk about is how the previsualization process works. I’ve already said a little bit about how I go about street photography – find the location and light, and then wait for the people or the action – but it’s different for every subject. Although photojournalism is pretty close in technique and execution to street photography, there’s one huge difference: you have to capture the story in a frame or a few frames, not just find an interesting random slice of life that may or may not be significant in a greater societal context. This means you have to identify what key elements you want in the frame beforehand – what you need to tell the story, in effect – and then go out and actively look for them. Throw the unpredictability of lighting and action into the mix, and you can see why it’s such a difficult job. You can also see why most photojournalists favor wide angle lenses; they allow the primary subject to be easily made prominent, and then context to be easily included in the frame as background – but not dominating the subject.

_0010675bw copy
Construction works on evacuation break. Ricoh GR-Digital III

In fact, wildlife, sport and photojournalism use similar processes. This is because you have no control of the subjects, but need to include key elements in order for the image to work.

Architecture is actually fairly simple: the architect usually wants to showcase a particular design detail or feature of a building, which means all you need to do is visualize how to present it in several ways – either with human-scale context, with environmental context, or in a more abstract, purer design-focuesd form. The remainder of the planning goes into figuring out what time of the day produces the most favorable light, and which vantage point and perspective you need to use. (I’ve got an upcoming On Assignment feature on an architectural shoot in Singapore, within a few days, actually.) In fact, the most unpredictable thing is the weather: there’s no way you can control it, and a few days of rain can completely kill your schedule.

_X1_L1000845 copy
Rain would have killed this job. Leica X1

Food, watches and other commercial object-things work in a very similar manner to architecture, with one key difference: you can control the light. And you can plan the light to give the object certain characteristics, and in turn create controlled emotions in the viewer – remember the earlier article on color and emotion – it applies equally to light, too, since color equals light equals image. Most commercial shoots have controlled compositions, too – for the reasons mentioned above – most of the time, there’s an intended final use. And frequently, the client knows exactly where the text is going to go, or what other layout features the image has to work around.

_7045122 copy
Jaeger Le-Coultre Master Ultra Thin 1833 limited edition. Nikon D700, AFS 60/2.8 G Micro.

Finally, there’s portraiture. I’ve left this one to last because it’s really a mix of everything; you can choose your background like street photography; elect to include or exclude contextual elements like photojournalism; pick the best and most flattering features of your subject like architecture; and finally, control the lighting like for food and watches. But yet there’s an uncertain element in the form of your subject; no matter how well you know a person, 99.99% of people will act differently in front of a camera, and that makes capturing a natural expression hugely challenging. Often I’ll find I shoot or pretend to shoot lots of frames at the start of a portrait session, but the ones that I submit in the end (and the client prefers) are the unplanned candids grab shots that happen during the informal downtime. In fact, doing this has almost become a habit with me – I should see if I can figure out how to drop the pretense in the future and just go straight to the informal bit.

_D90_DSC7558 copy
The beefeater. Nikon D90, 18-200VR

The upshot of all of this is one simple thing: no surprises. You get what you are expecting, and you can safely say a) job done, work delivered and b) the preplanning frees up your mind to focus on the other parts of execution, like lighting and fine tuning composition. All in all, producing a stronger image. MT

This post was brought to you by Ming Thein’s Email School of Photography – learn exactly what you want to learn, when you want to learn it. Don’t forget to like us on Facebook!

Photoessay: The Maitres du Temps Chapter 3

This watch was an early production prototype photographed for my client, which is the Manufacture. [Puts on horological hat] It’s an interesting piece because it carries clear DNA from its creator – Kari Voutilainen (the dial) – whilst at the same time retaining the brand’s own DNA (the rollers). It’s a substantial but not oversized watch at about 42mm in diameter; contained inside are time functions, small seconds, date, synodic moon phase indication, day/night indicator and second time zone display. The latter two functions are hidden under panels on the dial at 12 and 6 that retract slightly into the plane of the dial and rotate out of the way, activated by the button concentric to the crown. The button at 9 advances the second time zone display (under the panel at 6). You can see the action of the panels in the final two images. Maitres du Temps is an interesting brand because it collaborates with famous watchmakers to create the various ‘Chapters’ – they do have an in-house execution and assembly facility headed by the noted Andreas Strehler, but each project always lands up different because it carries the DNA of the master watchmaker in charge of the project. Chapter 3 looks nothing like 1 and 2; they were of course designed by completely different watchmakers. Personally, this piece is by far my favorite – I think of it as classical, with a twist. MT

This series shot with a Nikon D800, AFS 60/2.8 G Micro, and several SB900s. As always, clicking on an image brings you to the Flickr landing page, from which you can view a larger version.

_8004236 copy

_8004654 copy

_8004545 copy

_8004458 copy

_8004426 copy

_8004351 copy

_8004482 copy

_8004381 copy

_8004330 copy

_8004265 copy

_8004189 copy

_8004182 copy

POTD: When color might have been preferable

_MM1_L9995527bw copy
Postmen. Leica M-Monochrom, 35/1.4 ASPH FLE

One of those times where color would actually have been better. The bright blue and red uniforms of the motorbike postmen in this shot stood out well against the gray tarmac…I reached for a camera instinctively, nailed focus and exposure, but didn’t realize I was holding the M-Monochrom instead of the M9-P! Still, the geometry of this shot is its saving grace, I feel.

Today is going to be a busy day. Many people wonder what photographers do in the time they’re not shooting – well, here’s my schedule:

1. Client meetings
2. Test prints from M-Monochrom, 50 APO and D800E for clients, and if I have time, a quick article/ note on the site about relative print quality
3. Have to buy a light, strong, compact tripod in preparation for a trip (did I mention those are all oxymorons?). Tripod choice is another minefield I’ll probably write about at some point.
4. Retouching work for another client
5. Chase payments once Europe wakes up
6. Intersperse with replying email and comments to the site – between the two, I get an average of about 100-150 per day, which eats up a good couple of hours in replies. My laptop keyboard is now mirror smooth! 🙂

I think I need an assistant. MT

Minor firmware update: Nikon D800/ D800E

Sadly, it doesn’t seem to address the AF issue yet (if it is at all addressable via firmware) – but those of you who’ve been having problems with the camera freezing in playback mode, or wireless transmitter use, or D lighting shadows – here’s your fix. D800 and D800E

Translated, and linked:

A quick interview in Spanish for ‘Como la Hice’: click here translated by Calvin Dexter

The Leica X2 review translated into Mandarin Chinese by Tsian: click here

Black and white conversion options

_3100_DSC0450bw copy
Water drops. Nikon D3100, 60/2.8 G.

I’ve gotten a lot of emails after the Leica X2 and M-Monochrom reviews asking about B&W conversion and processing; I guess the M-Monochrom announcement had a knock on effect on the way people started seeing things. It doesn’t make color cameras redundant for B&W work, though.

Let’s start by demystifying two things.

1. Certain cameras have certain particular B&W characteristics. True, but only if you use JPEG. If you are shooting RAW, they provide different starting points – this is from a tonal response point of view – but ultimately you can get a consistent look regardless of the camera. I know, because I do this all the time.

_DSF1170bw copy
Singapore. Fuji X100

2. There are benefits to a monochrome-only camera. True. The Bayer filter and subsequent conversion is an interpolation of neighboring pixel image data to extract color information; luminance information is lifted from the photosite. Any sort of interpolation will reduce tonal accuracy and increase noise, because the luminance value you’ve got is now an approximation instead of a true value. However, it’s fairly easy to see that whilst there are benefits to shooting monochrome-only, you can actually convert a color RAW file into a monochrome one, and lower the perceived amount of noise – though not to as low a level as a monochrome-only camera. If you have a poor interpolation method, then the luminance values can be affected too – once again, increasing the perception of pixel-level image noise in a color image. Bottom line: yes, lower noise, and yes, better detail.

_M9P1_L1014802 copy
Trees. Leica M9-P, 21/3.4 ASPH.

Also one of the images available in my print offer.

However, what you lose from a monochrome-camera is the ability to do control the relative luminance level of individual color channels. Why is this important? Suppose your color scene has a relatively small range of background tonal values, but your subject is a very different color. Its luminance may be the same as the background, but it stands out because of the difference in color. As we concluded in a previous article, this kind of image is a very bad candidate for B&W conversion off the bat, because you’d land up with something very flat-looking. (Real life translation: running out and buying an M-Monochrom isn’t going to solve your B&W conversion woes, but it will give you an interesting starting base – especially when it comes to noise and dynamic range. Those of you who don’t mind doing a bit of work, hold on to your normal cameras. And in fact, these techniques apply to the M-Monochrom too.)

_7006528bw copy
Noryn Aziz in the spotlight. Nikon D700, 24-70/2.8

Actually, if you’re prepared to do some work, this not necessarily the case. It’s still possible to separate the subject from the background on the basis of luminance only; you just need to work a bit harder. You’ve even got a few options here. Park that thought for a moment, we have to introduce the basics of B&W conversion first.

_M8_L1022658bw copy
Shadows. Leica M8, Voigtlander 50/1.1

_5000935 original
A sample image for the purposes of demonstration for this article. This is the original file, converted from RAW, with all of the sliders set to zero. Olympus OM-D, 45/1.8.

The simplest method is to desaturate. All this does is throw out color information, and leave luminance information only. You are then free to do whatever you wish to complete processing of the file. After much investigation and experimentation, this is actually the method I use, coupled with another trick or two. Desaturation can be done in ACR (saturation slider, first tab) or in Photoshop (Hue/Saturation tool, then desaturate the master)

_5000935 desaturate
Straight desaturation. Note overall lack of contrast.

Slightly more complicated is the gradient map. You can use the standard linear black to white transition (press D in photoshop first, then add a new gradient map adjustment layer) – which gives very similar, but not quite the same, results as desaturation. Gradient maps with a straight gradient tend to be a bit more contrasty than desaturation. If you want to experiment a bit, it’s actually possible to put in intermediate control points into the gradient and bias it towards a high key (mostly white, black fades out faster) or low key (black stays for longer) look. What actually works here will depend on your image, however, so be prepared to do some fiddling. The good news is that if you use a new adjustment layer, the gradient is easily modifiable without having to redo your entire conversion.

_5000935 grad med copy
Gradient map, linear gradient. Note increased contrast over the straight desaturation.

_5000935 grad lo copy
Gradient map, low key gradient (mostly black)

_5000935 grad hi copy
Gradient map, high key gradient (mostly white)

Finally, we’ve got the channel mixer. Best used on the RAW file in ACR, this lets you decide how much of each individual color channel goes into making the final image. Note that the tool only uses the luminance components of each channel, and it’s additive; this means that color (and perceptual color) information is discarded. To make things even more complicated, there’s a separate B&W conversion adjustment layer in Photoshop itself that effectively does the same thing as the ACR conversion, but it only has six channels for you to play with instead of the eight in ACR.

_5000935 channel mix red heavy
Channel mixer via ACR, decreased reds; note how the subject (in this case, predominantly in the yellow channel) stands out more from the background.

Remember the conundrum of how to isolate a different colored, but similarly luminous, subject from the background from earlier? The solution to this is the channel mixer. You can increase the luminance of the primary color of your subject, and decrease that of the predominant background color; the converse also works. The problem comes when you’ve got a mixture of colors in both subject and background, and some of those are common colors. (Don’t get carried away though: remember that some images just don’t work in black and white).

This isn’t, the entire toolkit, of course. You’ll find that after this kind of conversion, things look rather flat. That’s because a lot of how the human eye perceives contrast and separation is dependent on differences in hue; obviously we have removed that, so we have to artificially put it back in again. Two of Photoshop’s tools will be your best friends here: the dodge and burn brush, and the curves tool. Understand how both of these things work, what the dos and don’ts are, and you can work magic with any B&W conversion. A tablet is also extremely helpful for these things, as it gives you precision control and feathering over your brush application. It lets you avoid hard edges, odd abrupt transitions, and permits highly precise editing.

_5000935 desaturated grad  copy
Desaturation with grad blue filter layer in multiply mode (higher density at the bottom of the frame) to darken the bottom red sign

At this point, it’s probably worth talking about plugins and filters. The former are either a set of Photoshop actions, or a separate program, that controls the conversion – specifically the luminance translation of each colour channel into a luminance value – and the tonal map of the final file. Whilst they are extremely popular and used by many ‘internet street photographers’ either to save time or because they are unable to get their desired results from a nuts and bolts conversion, I personally avoid them because they do not give you enough fine control, and even worse, everybody’s images that were run through that filter look the same. There is no personality or skill in that.

Photography is arguably art and very much down to personal taste. If you are 100% happy with the way those results look, great; I’m jealous of the amount of time you’ve saved in your workflow. However, claiming this is art is disingenuous; it’s like finding out Ansel Adams shot BW400CN (a B&W film designed to be run through a C41 color processing machine) and developed it at the local pharmacy – instead of Tri-X or Plus-X, controlling his development time and chemical composition, and then cutting precision masks to dodge and burn portions of his subjects.

_5000935 copy
That ‘arty’ high contrast, high grain look. It’s actually what heavily pushed Tri-X used to look like, but how many people actually know that firsthand?

There’s a second type of filer that’s useful, and in either form, it performs a similar function to the channel mixer – it either admits or cuts out light that’s of a certain range of wavelengths. The most common example of this is a physical red filter that goes over the end of your lens; the effect is dark skies, because very little of the blue spectrum passes through the red filter and onto the recording medium. It works with digital too, but you have to remember to adjust exposure accordingly, and obviously not use it in color mode. You can also replicate this effect digitally. Add in a new layer, make it one color, and then select the appropriate blending mode; then only do your B&W conversion. There are interesting results obtainable through this method.

_5000935bw copy
Final image, desaturation + curves + selective dodge and burn + second round of curves + slight palladium tone layer

If you pull back the B&W conversion layer slightly – assuming you didn’t directly apply the conversion to the image – then it’s also possible to use a color layer to create a toning effect; sepia or platinum is probably the most common. You can even use a graduated fill layer to provide a variable effect; this is especially useful for increasing the density of skies, for instance.

Personally, I prefer to shoot color and then convert to B&W; not because I can’t decide upfront how a scene should be presented, but because there’s a lot of flexibility in how I want to handle the conversion later to highlight certain aspects of my subject, or achieve certain tonal looks.

I’ll go into detail on my personal B&W workflow with an end to end example in a future article. MT

This post was brought to you by Ming Thein’s Email School of Photography – learn exactly what you want to learn, when you want to learn it. Don’t forget to like us on Facebook!

POTD: Construction site cubism, and a minor site organization change

_5000941 copy
Construction site cubism. Olympus OM-D, 45/1.8

I’ve also archived the most interesting posts for each category under their respective headers, so it should be much easier to find older articles/ posts in future. Let me know if it works or doesn’t work for you. MT

Photoessay: Landscapes with the Leica M-Monochrom

Sadly the M-Monochrom had to go home on Wednesday, but I did get a chance to make another quick set of images with it. Landscapes with the MM are slightly tricky, as the subtle tonal variations that normally make a nice landscape don’t work in luminance-only B&W. Instead, you have to force yourself to look for those extremely contrasty scenes which you’d probably normally be avoiding with a color camera and conversion.

I also want to address one of the major criticisms I saw on my earlier review regarding lack of mid-gray tonal variation: given limited time to shoot and lots of rain, I only managed to get the camera out around midday – which in the tropics, means extremely harsh light. This is of course the enemy of nice mid tones; there’s only so much you can do here under these conditions. Furthermore, web compression is not doing the images any favors – the subtle differences are being crushed into those 8×8 pixel JPEG blocks. The files do look a LOT better at full size, uncompressed on a good monitor. I suspect they will print even better still, but I haven’t had time to do this yet.

Now here’s a thought: Why doesn’t Leica do an X2 Monochrom for people who want B&W-only resolution, tonality and acuity, but would also like AF and a more compact package? MT

This set shot with the Leica M-Monochrom, 50/2 APO and Zeiss 28/2.8.

_MM1_L9995728bw copy

_MM1_L9995872bw copy

_mm1_l9995825bw copy

_MM1_L9995761bw copy

_MM1_L9995763bw copy

_MM1_L9995792bw copy

_mm1_l9995785 copy

_MM1_L9995860bw copy

_MM1_L9995804bw copy

_MM1_L9995780bw copy

This post was brought to you by Ming Thein’s Email School of Photography – learn exactly what you want to learn, when you want to learn it. Don’t forget to like us on Facebook!