Photoessay: The Jaeger Le-Coultre Master Ultra Thin Moon

From the horological files. MT

Set shot with a Nikon D800E, several SB900s, the AFS 60/2.8 G Micro, and one shot with a Leica 35/1.4 ASPH FLE via adaptor – see if you can spot which one!

_8011258 copy

_8011276 copy

_8011463 copy

_8011331 copy

_8011488 copy

_8011442 copy

_8011420 copy

_8011379 copy

_8011317 copy

_8011273 copy

____________

Visit our Teaching Store to up your photographic game – including Photoshop Workflow DVDs and customized Email School of Photography; or go mobile with the Photography Compendium for iPad. You can also get your gear from B&H and Amazon. Prices are the same as normal, however a small portion of your purchase value is referred back to me. Thanks!

Don’t forget to like us on Facebook and join the reader Flickr group!

appstorebadge

Images and content copyright Ming Thein | mingthein.com 2012 onwards. All rights reserved

Olympus OM-D lockup problems

I’ve found a particular combination of button presses that makes my OM-D lock up – admittedly it’s probably one that only I use, but I thought people should be aware so they can avoid it:

1. I’ve got my camera set to Continuous-L, 4fps, RAW.
2. Play back a file
3. Press the Fn1 button to zoom to 10x, keep pressing to zoom out again to the screen that shows the zoom slider and thumbnail toggle (i.e. keep pressing the button)
4. At that screen, press the Fn2 button to protect the file
5. You’ll now find the camera has locked up and requires a battery removal.
6. The file will still be there, though.

So there you have it. Unfortunately it happens to follow the way I work (zoom in to check focus, zoom out, protect file) – same thing I do with my Nikons – just that here it seems to trigger some sort of firmware panic, which requires a battery removal to resolve. MT

Book review: Supercell by Kevin Erskine


Image from Amazon.

Suppose you only ever photographed one subject in your life – hell, you’re not even a photographer by training or trade – what would your images look like? Supercell is the answer. Kevin Erskine is a farmer living in the American midwest, who also happens to be a storm enthusiast (storm chaser? I have no idea what these types of people are called).

What’s unique about this book is that Erskine photographs nothing but clouds and storms – he might well be great at portraits too, but it seems unlikely judging from the text. I must admit that a huge part of the appeal of this book for me stems from the subject – granted, the images are technically competent and nicely printed, but I want to look at the clouds, not the photograph. It’s one of those collections whose images speak for themselves – it’s rare, but you can actually look through the image, through the ink, through the page, through the book, and into the scene itself – nothing more, and nothing less.


Image from Amazon

And you know what, I really, really like it. To be honest, this book isn’t for everybody. Many viewers will find it extremely boring; page after page after page of nothing but clouds, tornadoes, rain, and myriad other forms of atmospheric precipitation. But to a huge Magritte fan like myself, who lives in the tropics and sees nothing but perhaps two or three common varieties of cumulus (and if you’re lucky, the occasional cirrocumulus) – it’s like looking at pornography. I can only imagine how much more interesting my cityscapes would be against a backdrop of enormous dramatic clouds; the interplay of light and shadow off the glass facades of modern architecture. Alas, Erskine’s problem is perhaps the opposite of mine: he has no end of clouds to play with, but nary any more construction than a grain silo or barn – the equivalent to our local clouds.


Image from Amazon

Almost all of the images in the book were shot with a wide angle, large-format camera; there really is no other way to capture the scale and majesty of the formations otherwise. I’m curious though, with such a slow method of working, how on earth does he get out of the way of the weather in time? It must be a pretty near thing in some of the images.


Image from Amazon

If you’ve ever wondered what it’s like to live in the great empty plains, or wanted to, then this is the book for you. It’s as much about the infinite fractal variety in nature as it is about the powerful beauty of clouds. And if you don’t like clouds, or prefer to live in the city, then it would at least make a great present for your meteorologist. MT

Photoessay: Around the temple at Tanah Lot, Bali

Tanah Lot is a rock formation on one of the Balinese beaches on the western side of the southern tip of the island, facing the Indian ocean. It’s also home to a famous temple to the Balinese sea gods, purportedly set up by the 15th century priest Nimrata. During the 1980s, subsidence and erosion threatened the temple’s survival; a comprehensive restoration and stabilization program saw about a third of the ‘rock’ replaced with artificial rock and concrete – courtesy of the Japanese Government. Today, it’s a popular site for both tourists and pilgrims. MT

This set was shot in 2006 with a Panasonic TZ3.

P1040329bw copy.jpg

P1040427b copy.jpg

P1040334b copy.jpg

P1040545b copy.jpg

P1040409bw copy.jpg

P1040341bw copy.jpg

Travel minimalism: one lens to go

_M8_L1025017 copy
Canterbury in autumn. Leica M8, 21/1.4 ASPH

Every time I travel for personal purposes, I’m always torn between experiencing the place, and photographing the place. Photography is such a part of me that sometimes I feel that I experience and understand things more through trying to capture the essence of them. Or perhaps it’s because doing so forces you into conscientious observer mode, and this in turn makes one’s mind more receptive to things, and more willing to question what you see and find juxtapositions or contrasts.

_M8_L1024931bw copy
Canterbury Cathedral crypt. Leica M8, 21/1.4 ASPH

That aside one of the things which inevitably keeps me up the night before departure is trying to figure out what to bring equipment-wise. If it’s on assignment, then I bring everything I might possibly need, plus spares – to hell with overweight baggage, if you don’t have it, it could mean a lost job – on the other hand, if I’m traveling for myself, I’d rather carry as little gear as possible. Well, little enough that I don’t notice it after walking around for hours on end, but with sufficient coverage that I don’t get frustrated and feel like I missed a rare photographic opportunity because I didn’t bring along a wide angle. Or something along those lines.

_M8_L1026056bw copy
A Parisian in her natural habitat. Leica M8, 21/1.4 ASPH

My last personal vacation saw me bringing an Olympus Pen Mini, the 14-42 kit lens and a Panasonic 20/1.7 pancake. We went to the beach. Frankly this made the choice easy as I didn’t really want to expose any of the more expensive gear to moisture, salt and sand; the M9-P definitely would not have been suitable, and the D800 might have produced great landscapes, but it would also have worked fine as a boat anchor.

_M8_L1026132bw copy
Three conversations, Paris. Leica M8, 21/1.4 ASPH

I’ve been trying to fine-tune this over the years. I’ve been on trips where I did carry coverage from 14-450mm and a spare body; whilst I got some great images, I also had a sore back, and landed up leaving everything but one body and the 24-70 zoom in the hotel room for the last week. More crucially, I felt the images produced from that trip lacked focus; I brought everything, so subconsciously I was actually trying to capture everything. The upshot is a set of images that isn’t as strong as it could have been, and worse still, experiencing that slightly chaotic panicky feeling that you just might have missed a shot opportunity somewhere.

_0011006bw copy
Tate Modern yard, London. Ricoh GR Digital III

My preferred travel kit is a moderate wide, and a moderate telephoto – both fast – and one body. I might carry a spare compact or something similar as a backup, just in case. I’ve gone with the D700, 24/1.4 and 85/1.4 – this is an absolutely fantastic and hugely flexible combination – plus a spare compact, either the Fuji X100, Leica D-Lux 5, or my favorite, the Ricoh GR-Digital III. Most recently, I spent two weeks in Europe with an M9-P, 28 and 50mm lenses, plus the Pen Mini and 45/1.8 (giving me 90mm in a pocket). This was also an excellent combination, and in some ways better than the Nikon based setup due to weight and instant availability of the telephoto. However, it lagged hugely in low light performance. I think the next trip I take will probably be Micro 4/3 based; an OM-D and Pen Mini with 12, 20 and 45mm lenses will cover the vast majority of situations handily. And not weigh very much, either.

_0011022 copy
Piccadilly Circus, London. Ricoh GR Digital III

So what’s all of this talk about a single lens?** Or single camera? There are advantages to this approach: firstly, you’re unencumbered and free to enjoy the atmosphere, people and culture without feeling like a packhorse; a small camera around your neck is probably much easier to manage than an entire backpack full of lenses. Also, you don’t have to worry as much about security – frankly, carrying several Leica f1.4 Summiluxes and a Noctilux around even safe Singapore made me pretty nervous.

**Let me clarify: I don’t mean going with a 28-300, though I suppose this might be a viable option for some situations. That lens has more compromises than strengths, and if you don’t know how to manage your perspectives properly, then you’ll land up with weak images too, because you’ll always be trying to ‘zoom in’.

_0011001bw copy
The Shard, under construction. Ricoh GR Digital III

The main advantage, however, is that it frees up your mind from having to think about what perspective to take for a scene. Do you find the essence in the details, or do you go for something wider and more encompassing, with context? Trouble is, there is often no right answer – and from experience, I know that inevitably you’ll land up trying to make both work and being satisfied with neither. On the other hand, if you’ve got just one focal length, then you can pre visualize what your frame will look like; with sufficient experience, your eye naturally looks for compositions that fit within the perspective and angle of view of the lens you’ve got. Thus: instead of wondering what perspective to use, you’re free to spent that mental capacity on fine-tuning the elements inside the frame of the only perspective you have. It can be liberating – providing you’re thinking about the photograph, and not about the equipment you left at home. There’s also the side benefit of not having to change lenses, and thus always being ready.

_7017234bw copy
The doorway, Hanoi. Nikon D700, 85/1.4 G

I actually did this on several occasions. At the end of 2009, I made short trips to Oxford, Canterbury and Paris; for these I brought two lenses (21 and 50mm for the M8) but only used the 21. I did it again in 2010; the first trip saw me bringing a D700 and several lenses, plus the Ricoh GR-Digital III; I only used the Ricoh and its fixed 28mm because it was both much more convenient, as well as matching the way my eye was tuned at the time after my first Leica-M experience. I got wiser on the second trip and left everything behind except the GR-Digital III. Hanoi later that year saw me using only the D700 and 85/1.4 G.

_7017494 copy
A Vietnamese stereotype. Hanoi. Nikon D700, 85/1.4 G

If you are going to try this exercise, I’d recommend going for a wide normal rather than an ultra wide or a tele; for the simple reason that these are the most flexible focal lengths to use. 35-50mm can appear wide or moderately telephoto depending on how you choose to use the foreground elements in your scene. And at some point, chances are you’ll probably want to take a photo of yourself or your traveling companion (or both of you, or your family…you get the point) – and it’s generally much easier with something wide or normal than say a 300mm.

_M9P1_L1005025 copy
Prague castle and stars. Leica M9-P, 28/2.8 ASPH

Some people may find a telephoto easier to use in these kinds of situations because they can snipe from a distance; I’d personally advise against it because it’s very difficult to make images with context; and that’s one of the cornerstones of travel photography. The bokeh may be great, but if the background gives you no clue as to where the subject is, then the image could well have been shot anywhere – and that somewhat defeats the point of travel photography.

_M9P1_L1004062 copy
A Viennese moment. Leica M9-P, 28/2.8 ASPH

Personally, if I had to pick, I’d go with either a 28mm, or a 35mm – depending on whether my images would likely be more people-biased (longer), or more location-biased (wider). And it’d have to be fast, too; I’d be using the lens at night, and anything slower than 2.8 wouldn’t cut it. Frankly, in some situations, even f2.8 may be a little borderline. Finally, it’d have to go on something small, light and unobtrusive; responsiveness is important because your ability to anticipate things will be a little bit diminished thanks to the foreign environment. Right now, my choice is probably between the Olympus OM-D and Panasonic 20/1.7, the Ricoh GR-Digital III/ IV, or the Leica M9-P and a 35/1.4 ASPH FLE.

Give it a try. On your next trip, just use a 35 or 50 prime for at least a day or two; if it makes you feel better, bring along your zooms too, but don’t use them until you absolutely feel that you’re missing shots. MT

_M9P1_L1013074 copy
Wat Arun and Boat, Bangkok. Leica M9-P, 35/1.4 ASPH FLE

____________

Visit our Teaching Store to up your photographic game – including Photoshop Workflow DVDs and customized Email School of Photography; or go mobile with the Photography Compendium for iPad. You can also get your gear from B&H and Amazon. Prices are the same as normal, however a small portion of your purchase value is referred back to me. Thanks!

Don’t forget to like us on Facebook and join the reader Flickr group!

appstorebadge

Images and content copyright Ming Thein | mingthein.com 2012 onwards. All rights reserved

Photoessay: In the pit lane at the Super Japan GT

Shot in 2011, from the pits during the Super Japan GT500/GT300 race at Sepang International Circuit, Malaysia. Had to make do with the 28-300 VR – which was extremely challenging for moving vehicles. Since I don’t regularly shoot wildlife or sport, I also don’t have any long fast glass. Still, an interesting experience. MT

Series shot with Nikon D700, D5100 and AFS 28-300/3.5-5.6 VR

_7039307bw copy

_7039309bw copy

_7039365bw copy

_7039442bw copy

_7039419bw copy

_7039183bw copy

_5100_DSC2571bw copy

_7039591 copy

Some thoughts on reprocessing and revisiting images

Reprocessing
The difference of seven years of Photoshop skill: 2012 (left) vs 2005 (right). Mandarin duck; Nikon D2H, Tokina AF 80-200/2.8

From day one, I was told by every serious photographer two things: one, don’t delete anything because opportunities never come twice, but storage is cheap; two, shoot raw, and keep your raw files somewhere in an archive. Or at very least, keep your original jpegs if your camera doesn’t do raw.

I only recently started doing the former: I keep all of the raw files from a commercial shoot, and then send a contact sheet off to the client to let them pick the ones they want retouched – usually between 10 and 50%, per whatever the commercial agreement was. The rest stay in the archive in case they come back later and want to license additional images, or I need to composite in bits during the retouching. For my personal work, I cull ruthlessly – the rationale and the methodology was previously covered in this article.

_DSC8648b copy
Venice, 2004. Nikon D70, 24-120VR

One of the more popular justifications given for being the image-hoarding equivalent of a packrat is that you might want to go back and reprocess your files later once technology or your technique improves, so you can get more out of the original image. This makes sense from a logical point of view, but from a practical standpoint, if you’ve improved that much as a photographer it’s probably because you’re out there shooting new stuff and refining both the shooting and processing portions of your technique. In short: I’ve never gone back and reprocessed anything. Well, there might have been a couple of exceptions when an image was licensed to a client and adjusted for print or to the client’s taste, but nothing more than that. I honestly don’t have time to reprocess my personal work.

_DSC8648-2012 copy
Venice, 2012

However, I suppose we could all find time to do things if we thought they were important enough. And this brings me to the biggest argument against reprocessing images: your artistic vision for that particular image, or what you saw in that particular scene, will never be stronger than at the time of shooting. It just fades gradually as time passes; this is just a consequence of the way the human brain works: we forget things over time. And unless you suddenly look at an image again later and find something that bothers you hugely, you’re probably just going to go with whatever you thought was best at the time.

_MT39141bw copy
Courchevel cloud, 2005. D2H, Sigma 70-300/4-5.6 APO

However, in the interests of academic curiosity, I’m going to do some reprocessing for this article. I don’t know how it’s going to turn out: I’m writing this philosophical portion of the article before doing the work. Frankly even finding shots that meet my compositional standards is tough, because I (hope, at any rate) have moved on significantly in my photographic abilities since these images were shot. There’s no point in reprocessing something from last month, because I don’t think you’ll see any difference in the before and after – one’s style changes slowly, like a tree growing. But one’s style is also defined by the way you shoot, and there are things I do routinely now – for instance, cinematic, very shallow DOF in low light – which I couldn’t physically have done back then, because the equipment didn’t exist.

_MT39141-2012 copy
Courchevel cloud, 2012.

The archives have been raided, and yielded a number of images. In some cases I’ve had to use the original JPEGs as a starting point because I didn’t have raw files; this is obvious in the lack of file quality and noise. There’s not a lot I can do about that, unfortunately; 8 compressed bits of tonal information can never be made into 16 complete ones. You’ll also see in some places I disagreed with my original processing choice of B&W vs color, and even the final crop – I guess as one’s style and eye evolves, we see different things in the same image. The eagle-eyed of you will also notice small corrections to composition via distortion, cropping or stretching; I normally do these things today, but I’m sure I wasn’t doing any of it at the time. Similarly, dust/ speck cloning was something I never bothered with. I’ve picked a wide range of subjects, too. I’m going to post the final state I arrived at back at the time – usually a mildly edited jpeg – and the reprocessed, 2012-version. I would highly encourage all of my readers to share their thoughts on which they prefer, and why; let the comments section be a forum for discussion. I’ve also provided some thoughts below on each individual image.

_M227904bw copy
Nikko station, 2007. Nikon D200, 17-55/2.8

_M227904-2012 copy
Nikko station, 2012. There’s a lot of empty space in the top portion of this image, especially the overexposed window at top left; it threatens to imbalance the composition – hence switching to a 16:9 crop. The original colors in the scene were delicate and tonally interesting, so I opted to rebalance for true color instead of do another monochrome conversion.

_DSC8280b copy
Piazza San Marco, Venice, 2004. Nikon D70, 24-120VR

_DSC8280-2012 copy
Piazza San Marco, Venice, 2012. This is one of the very early images from my DSLR career; up til this point I’d been using a super zoom compact. If I’d known any better, I’d have used a different exposure time to retain more suggestion of people in the scene, or better yet, stacked many exposures. And f10 isn’t exactly the optimal aperture on the first-generation 24-120VR. Aside from the obvious color fix – this is much closer to the reality I remember than the original processing – verticals, horizontals and tonal maps have also been tweaked. I don’t think the composition is particularly fantastic, but gimme a break, I just started at this point, okay? 🙂

_M227348 copy
Kinkakuji, Kyoto, 2007. Nikon D200, 17-55/2.8

_M227348-2012 copy
Kinkakuji, Kyoto, 2012. You’ll notice there isn’t a lot of difference between the two; this was from a later period in my photographic career where my processing was both more refined, and I was shooting RAW (with all of the associated available adjustments) to hand. I didn’t change the composition, though I’m not 100% happy about the positioning of some of the edge elements in the frame; the majority of the change was to sort out the dayglo colors, and the horribly inaccurate foliage. It was a particularly hot summer that year; the image was shot in August, and the trees were looking a little dry and wilted – I think this is much closer to the reality I remember at that point.

_M215519 copy
Scarlet Ibis, 2007. Nikon D200, AI 500/4 P

_M215519-2012 copy
Scarlet Ibis, 2012. Not a lot of change; I punched up the color a little, because these birds are pretty darn striking in person. I don’t remember the color of the swamp, so I left it much as-is. Again: a late 2007 image.

_MT39064 copy
La Tania sunset, France. Nikon D2H, Sigma 70-300/4-5.6 APO

_MT39064-2012 copy
La Tania sunset, France. WHOA! You’re probably wondering what happened here – of all the images, this is the one which is the most different from the original. Aside from the obvious change in crop, I’ve now got the shadow recovery tool at my disposal, and better yet, an intimate familiarity with it. The problem I faced at the time was the sunset was a) both not very punchy and b) the native dynamic range of the scene was already quite challenging, meaning that making the highlight portion punchier would have sacrificed tonal detail in the shadows. At the time, I had no clue how to unblock it. I don’t remember the exact color of the the scene, but I suspect it was probably somewhere between the two images. Which one do you prefer?

_DSC8121bw copy
Venice, 2004. Nikon D70, 24-120VR

_DSC8121-2012 copy
Venice, 2012. At the time, I was influenced heavily by a number of ‘classical’ monochrome shots I’d seen in magazines; as a result, this street scene was instantly converted. What I failed to notice in the original – until now, fortunately I still have the original color jpeg – is that the light spillage from the shop windows at left actually give the image an interesting structure that’s lost in black and white because of the similarity of luminance values between the warm-lit stone and the regular stone. I’ve attempted to bring this back, however the limited dynamic range of the jpeg has led to less smooth tonal transitions than I’d be able to achieve with a raw file. Actually, working this ‘vintage’ jpeg reminded me a lot of dealing with iPhone files – imperfect color, blocked shadows, blown highlights, and a decidedly averse reaction to resizing.

_DSC8066b copy
Canal reflections, 2004. Nikon D70, 24-120VR

_DSC8066-2012 copy
Canal reflections, 2005. To me, reflections are juxtapositions. Our minds invert them subconsciously anyway, otherwise we would recognize them as the mirror images of their own selves; I usually take this further by treating the image as the real subject, and the subject as the abstraction – what’s the difference anyway, since all images are subjective and facsimiles of the real thing? Aside from that obvious flip, the verticals have been corrected, and the tonality smoothened out – especially in the water, so it looks more like liquid and less like a block of color.

_MT73080 copy.jpg
Mandarin duck, 2005. Nikon D2H, Tokina AF 80-200/2.8. For some odd reason Flickr won’t let me re-upload a modern duplicate of this image with the right border and matching image size, so I apologize. However, the original image remains the same.

_MT73080-2012 copy
Mandarin duck, 2012. Improved color accuracy and worked on micro contrast a little.

With all of the reworked versions, I’m not sure I can say that I 100% prefer the 2012 version over the originals – photography is very much the sum of the parts, and the interaction between the original framing and the processing is very much a large component of that. The processing methodology I currently use doesn’t really fit the vision I had back then, and vice versa. Score one for the argument against do-overs: you really can’t fix it in post; you can enhance an image, but not fix something that’s fundamentally wrong with the composition or lighting. Here’s another interesting idea for a future article – reprocessing somebody else’s raw files. Might provide an interesting insight into how much difference Photoshop really makes…MT

____________

Visit our Teaching Store to up your photographic game – including Photoshop Workflow DVDs and customized Email School of Photography; or go mobile with the Photography Compendium for iPad. You can also get your gear from B&H and Amazon. Prices are the same as normal, however a small portion of your purchase value is referred back to me. Thanks!

Don’t forget to like us on Facebook and join the reader Flickr group!

appstorebadge

Images and content copyright Ming Thein | mingthein.com 2012 onwards. All rights reserved

On Assignment: The contents of my bag

_5A00585 copy

I thought you may all be curious to see what I’m bringing to Switzerland for my current assignment. Let’s just say there’s a hell of a lot of stuff here:

Primary system:
– Nikon D800E
– AFS 28/1.8G
– AFS 60/2.8 G Micro
– PCE 85/2.8 Micro
– ZM 28/2.8 plus Leica M to Nikon F adaptor

Backup system:
– Olympus OM-D with HLD-6 grip – I plan to do some walking around too, and I don’t want to carry the D800E.
– Olympus ZD 12/2
– Olympus 45/1.8
– Panasonic 20/1.7 G
– Panasonic Leica 45/2.8 Macro
– That little clip on flash thingy to trigger the SB900s in SU4 mode
– Nikon G to M4/3 adaptor

_5A00587 copy

Lighting:
– Nikon SB900 x3
– Custom made perspex diffuser and case, various cards, papers and laminates for backdrops and diffusion.
– Manfrotto 5001B compact light stands plus heads and flash stands x3

Support
– Gitzo GT1542T Traveller 6X carbon fiber tripod
– Manfrotto 468RC0 Hydrostat ball head
– Manfrotto micro positioning rail

IT
– Apple MacBook Air 11″
– Apple iPhone 4
– Western Digital MyPassport 1TB 2.5″ USB drive for backups
– Sandisk Extreme SD/CF USB card reader
– Chargers and universal adaptors

Other accessories:
– Spare batteries and chargers for both cameras
– 8 sets of Sanyo Eneloop AA batteries for the SB9000s
– Two sets of Kenko Pro DG extension tubes
– Adaptor plugs and multi strip
– SD cards; Sandisk Extreme HD 32 GB x4
– MAHA C801D fast AA charger
– Nikon SC-31IR flash deflector panel for D800E built in
– Rocket air blower
– Soft white cloths
– Blu tack
– Duct tape
– Magic tape (for removing dust)
– WhiBal cards
– Small lens pouches

Bags
– Think Tank Airport International v1
– Billingham Hadley Pro, without the internal dividers but with some small lens pouches and a camera wrap, packed into my check-in luggage
– Manfrotto MBAG80P for light stands and tripod

_5A00588 copy

Here’s most of it packed in. What you don’t see is the diffuser case, which is quite enormous and wouldn’t fit into the picture…

____________

Visit our Teaching Store to up your photographic game – including Photoshop Workflow DVDs and customized Email School of Photography; or go mobile with the Photography Compendium for iPad. You can also get your gear from B&H and Amazon. Prices are the same as normal, however a small portion of your purchase value is referred back to me. Thanks!

Don’t forget to like us on Facebook and join the reader Flickr group!

appstorebadge

Images and content copyright Ming Thein | mingthein.com 2012 onwards. All rights reserved

A day in the life of…

For the loyal readers who’ve been with me from the start of this blog, I thought I’d give you all a quick update on how the transition to full time pro is going a few months in. In short: I’m enjoying it, but boy is it hard work. Even during the dark depths of my management consulting career, I don’t think I worked such long hours – and there’s no goof off time either, because you’re always on your own clock. I won’t lie and say that it’s all rosy; there are always days I wake up and worry about the pipeline, or collections, or sudden changes, or even being faced with a challenge that I can’t shoot – but I also think the reality is that these anxieties are normal, and if you don’t have them, then something is wrong (or about to go wrong) because one is being overconfident.

For the curious, here’s how my typical day looks – in this case, I’m using my schedule from 17 May, because I happened to flip to that page in my planner and can still read most of the handwriting:

7.00am: Wake up, hit snooze again.

7.15am: Alarm goes off again. I’m in that half-asleep-half-awake state thinking about what I need to get done for the day. I finally get out of bed when either antsyness (is that even a word?) overcomes inertia, or my wife starts getting ready for work.

7.20am: Poke the polar bear, who’s still sleeping.

7.30am: I’m at my desk and dealing with email. Thanks to the internet, messages arrive at all hours – a quiet day will see perhaps 20 emails when I wake up, over 50 on a busy day. And that’s having cleared out my email just before I went to bed earlier. Some stuff is from clients, some stuff is blog comments, some stuff is reader questions. And there are personal emails, offers for credit cards and personal enhancement pills buried in there somewhere too usually.

8.30am: I’m usually done with replying messages by now. Time to put an upload onto Flickr, and sort things into groups.

8.45am: POTD goes up onto the site, and any amendments that other articles require (I work about a month in advance) are made.

9.00am: Leave for breakfast with a client to pick up a watch to shoot.

10.00am: Back in the studio, begin setup of lighting for the shoot.

10.05am: Clean watch. Microfiber cloths to polish, and Rodico watchmakers’ putty to remove grit and dust from the cracks and crevices.

10.15am: Still cleaning watch. The more cleaning you do upfront, the easier your job is later in the retouching.

10.30am: Finally done cleaning watch; now handled only with microfiber gloves and a filtered blower is used between position changes to remove as much dust as possible.

11.30am: A break for the flashes because they’re starting to overheat; time for new batteries and a drink for the photographer. Download cards onto computer and run a backup.

12.45pm: Finish shooting, download cards again and run a backup. Charge all batteries, clean equipment and stow in dry cabinet. With ambient RH of anywhere between 65 and 90%, you really don’t want to leave anything out and run the risk of a fungus growing on it.

12.50pm: Burn disc of rough preview jpegs for the client to pick from. This was a rush job because it’s a foreign client that happens to be in town, otherwise I’d normally do things via Dropbox.

1.30pm: Lunch with client, delivery of rough images on CD, return watch

3.00pm: Quick coffee with a friend – the coffee is more for my benefit at this point – we share a mutual client (he’s a lawyer)

3.30pm: A serendipitous phone call reveals that another potential client is not only in town, but within the same 500m radius; I manage to squeeze in an appointment for 4.30. Rush back to the studio to get the iPad.

4.20pm: Arrive at meeting location, wait a little; find nearest and coldest air conditioning vent to cool down after rushing.

4.30pm: I’ve got a 15 minute window to pitch; it’s another watch client, so I take him to see the exhibition which fortunately still happens to be running. Turns out he’s seen it, liked the work, but didn’t realize I was the photographer. Note to self: ensure proper signage in future.

4.45pm: We go our separate ways, and I return to the studio/home/office.

5.00pm: Clear email and messages again.

5.30pm: Write an email to a prospective new agent-representative in Singapore; safeguarding the pipeline of future work is always the number one concern for any commercial photographer.

6.00pm: Call another client in Switzerland to follow up retouching details and payment; it’s a good time to call because they’ve had their morning coffee and aren’t quite thinking about lunch yet.

7.00pm: Some light browsing to see what’s news in the world of photography.

7.30pm: Time to think about dinner and spend time with the wife, who’s now arrived home and been patiently waiting for me to get off the damn computer.

9.30pm: Back online again to clear yet more email and write another post; by the time I’m done laying everything out, proof reading, adding images and so on, I’m beat.

11.30pm: Schedule post, look up my stats for the day (ooh, just noticed the site must have crossed the quarter million hit mark sometime in the last few days) and check the to-do list for tomorrow. Realize that on the to do list is ‘buy diary’ – I’m relying on a combination of memory, iPhone reminders and bits of paper, and it’s utterly useless for longer term scheduling.

11.45pm: Climb into bed, try to read a little before sleep; manage about four pages before dozing off. It’s bad if it’s an exciting book, because then I might read until 1-2am and not get enough sleep for the next day.

So, who wants my job? 😛 MT

____________

Visit our Teaching Store to up your photographic game – including Photoshop Workflow DVDs and customized Email School of Photography; or go mobile with the Photography Compendium for iPad. You can also get your gear from B&H and Amazon. Prices are the same as normal, however a small portion of your purchase value is referred back to me. Thanks!

Don’t forget to like us on Facebook and join the reader Flickr group!

appstorebadge

Images and content copyright Ming Thein | mingthein.com 2012 onwards. All rights reserved

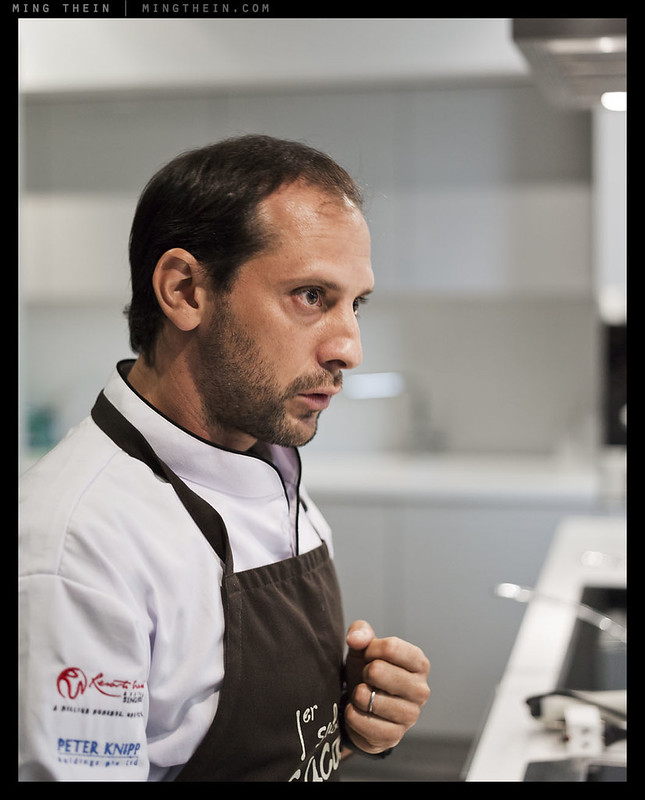
Photoessay: Pedro Miguel Schiaffino from Malabar, Lima

I had the opportunity recently to do some teaching (food photography, not cooking of course) with noted Peruvian chef Pedro Miguel Schiaffino from Ristorante Malabar, Lima at the World Gourmet Summit in Singapore. First off – he’s one of the nicest people I’ve met, with completely zero ego; that’s pretty darn unusual for a chef. Secondly, he has a hugely infectious enthusiasm for the native foods of Peru, most of which he has to trek into the jungle to find. Pedro says he trains locals to recognize edible plants and roots, but they subsequently tend to leave for food distributors who can pay more; to this he shrugs, and rationalizes it against anything that raises awareness of his country’s produce and helps the locals find regular employment being a good thing. As I said, one of the nicest people I’ve met. Oh, and he makes the most amazing ceviche, too. Enjoy, vicariously. MT

This set shot with a Leica S2 and 75/2.5 Summarit (people photos) and a Leica D-Lux 5 (food photos.)

_S21_L1008294 copy

_S21_L1008303 copy

_S21_L1008348 copy

_S21_L1008338 copy

_S21_L1008401 copy

_DL5T_L1000709 copy
Ceviche, with a domestic Peruvian speciality algae – the green blobs. Difficult to describe the taste; a little like a gelatinized gherkin but not as sour.

_DL5T_L1000726 copy

_DL5T_L1000714 copy
What looks like rocks…

_DL5T_L1000719 copy
…are actually Peruvian root vegetables, meticulously tourneed, and covered in a local edible river clay mix that the natives use to aid digestion. Although the clay itself tastes like…well, dirt, it lends an interesting semi-roasted texture to the skin of the vegetables. I’m sure it probably gives you your RDI for most minerals, too.

_DL5T_L1000727 copy
In their natural habitat, with sous-vided lamb finished on the pan. Pedro blends modern techniques – sous vide for instance – with traditional ingredients, like the clay.

_DL5T_L1000732 copy

_DL5T_L1000735 copy
Dessert. Pisco sour sorbet, stewed melon and various flowers.

_DL5T_L1000740 copy

_S21_L1008406 copy
Talking with the students after the meal.