On vision and postprocessing

H51-B0000691 composite
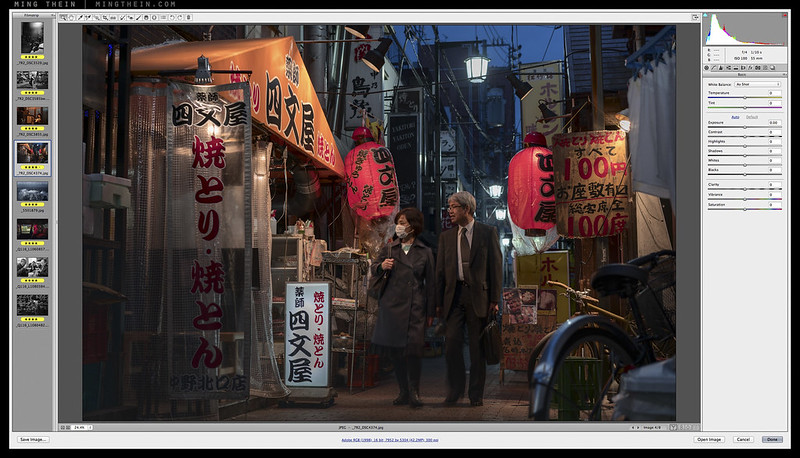
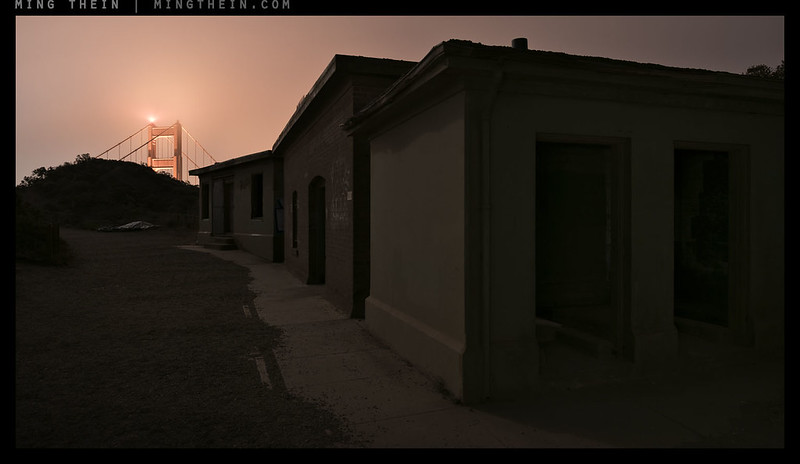
Before and after – starting point of RAW file in color (right), final presentation mono (left). Is that ‘photoshopped’? To most audiences, it probably is; but it’s no different to using black and white film, processing with a certain chemistry and doing a little dodging and burning of the print. Nothing has been added or removed that was not physically present in the original scene.

Though the mainstream population has now been firmly in the digital era of photography for more than a decade, I’m sure we can all remember a recent time when we were asked ‘so how much photoshop did you do?’ when presenting an image. The misconception that a good image must have some degree of implicit trickery is problematic; to the public, ‘Photoshop’ has become synonymous with ‘digital illustration’, ‘compositing’, or worse, ‘deliberate misrepresentation’. As much as we do our best to explain that Photoshop is really no different to the darkroom and chemical processes of the film days, we are at best regarded with some skepticism. But it does beg the question: why not use all the tools at one’s disposal, and what’s wrong with it if we do?

[Read more…]

New: MT’s Weekly PS Workflow Classroom

PS weekly review

It’s time to take postprocessing further in the new year.

Given the popularity of the photoshop and postprocessing videos, and the continual feedback for more of the same – I’ve decided to try an experiment for 2016. Every week, with the first instalment available on 3 Jan 2016, I’ll be putting out a new video. The concept is simple: it’s a classroom where submitted images are critiqued and postprocessed and subscriber questions answered. This is the closest I can get to a providing a consistent learning environment for a large audience.

  • Subscribers can submit images of their own; I will try to critique all of them
  • We select the most interesting to post process in ACR/photoshop using workflow II, with a discussion of the rationale behind it
  • Any subscriber questions are answered
  • In addition, I postprocess images of my own so you can see the complete workflow from capture and conception to completion – to see how the complete ‘idea’ comes together (i.e. capture with previsualized output)

Each weekly video will run for ~1h15min.

[Read more…]

Thoughts on achieving natural tonality

_8B05265 copy

Riddle of the day: what do a good magic trick and a good photograph have in common – or by extension, a good prestidigitator and a good photographer?

The answer is of course both of them distort your perceived reality. The magician makes you believe you saw something that’s physically impossible, or at very least completely unexpected. The photographer presents you with either something you may not have expected, or could not previsualize. Both are technicians in a sense, but the best of both professions are more than that – they’re also psychologists. At this point, you are probably wondering what any of this has to do with tonality. Read on to find out.

[Read more…]

Repost: HDR, the zone system, and dynamic range

_8042033 copy
My eyes, my eyes! I had to work quite hard to make this as a) I don’t own any of those filter programs and b) I don’t do this kind of hyper toned, overlapping HDR. The actual, final version of this image is at the end of the article.

Note: I’m reposting this article as a refresher before I talk about something a little harder to define in the next one.

HDR/ High Dynamic Range photography is perhaps one of the greatest blessings and curses of the digital age of imaging. On one hand, we have retina-searing rubbish that’s put out by people who for some odd reason celebrate the unnaturalness of the images, encouraged by the companies who make the filters that make doing this kind of thing too easy – and on the other hand, there are a lot of HDR images out there that you probably wouldn’t have pegged as being anything other than natural. There is, of course, a way to do it right, and a way to do it wrong. I use HDR techniques in almost all of my images – I live in the tropics, remember, and noon contrast can exceed 16 stops from deep shadows to extreme highlights – we simply have no choice if you want to produce a natural-looking scene.

[Read more…]

Managing the postprocessing workload

_8B15461 copy
The sigh of relief on completion

Today’s article is a practical one: how to efficiently deal with the postprocessing workload and overhead, especially when you’re shooting in enormous quantity. I originally wrote this on the back of several back to back assignments and trips, but for some reason it got buried in the deluge. Now that things are a little quieter, I’ve had a chance to revisit and amend. I’m sure I’m not the only one who’s got the twin problems of shooting too much and then suffering from editing fatigue, in turn resulting in compromised selections and postprocessing…

[Read more…]

Apple PC hardware choices for the photographer

mbp
Choices, choices. Image from the Apple Malaysia homepage.

At some point early on in the digital era, the world decided that Apple was the way to go for serious photographers and graphics professionals – granted, there were applications that were Mac-specific or just worked so much better on a Mac than a PC that it made sense. I’m sure some of that was image and hubris, too pricing be damnmed, the hardware just looked sooo much cooler. There was also a point in not so distant history at which we weren’t held hostage by Apple’s upgrade options, either: you could buy the base version, and upgrade certain components yourself if you were handy with a screwdriver, which brought the cost of performance down. The cost of ownership wasn’t (and still isn’t) as bad because Macs maintain their resale value – probably because the new machines are never much cheaper than the old ones. But a) does Apple hardware still make sense for photographers, and b) if so, what hardware?

[Read more…]

Now available: The Monochrome Masterclass workshop video!

I’m pleased to announce that after a very long gestation period, including filming in some foreign locations 😉 the video is finally ready and available immediately here.

[Read more…]

A digital B&W epiphany

_8047882 copy

With the previous article on HDR, the zone system and dynamic range as background, I can now explain exactly what my B&W discovery was: it’s mostly to do with the highlights, but only in certain areas. And to make things more confusing, creating a natural-looking – perhaps even filmic image – required me to take processing steps that were both highly counterintuitive, but also go against everything else I’ve done and used successfully in the past. Read on if you dare; I can’t promise enlightenment, but I can certainly try for insight.

[Read more…]

Demystifying HDR, the zone system, and dynamic range

_8042033 copy
My eyes, my eyes! I had to work quite hard to make this as a) I don’t own any of those filter programs and b) I don’t do this kind of hyper toned, overlapping HDR. The actual, final version of this image is at the end of the article.

HDR/ High Dynamic Range photography is perhaps one of the greatest blessings and curses of the digital age of imaging. On one hand, we have retina-searing rubbish that’s put out by people who for some odd reason celebrate the unnaturalness of the images, encouraged by the companies who make the filters that make doing this kind of thing too easy – and on the other hand, there are a lot of HDR images out there that you probably wouldn’t have pegged as being anything other than natural. There is, of course, a way to do it right, and a way to do it wrong. I use HDR techniques in almost all of my images – I live in the tropics, remember, and noon contrast can exceed 16 stops from deep shadows to extreme highlights – we simply have no choice if you want to produce a natural-looking scene.

[Read more…]

To process or not to process?

_RX100_DSC2614b composite copy Ginza dusk.

This is the photographer’s analog of the classic fisherman’s dilemma: fish or cut bait?

I’ve always, for as long as I can remember being serious about photography, shot RAW and done some form of processing afterwards. The more potential the file had, the more processing; conversely, I’d also spend time trying to save files that probably weren’t compositionally worthwhile. And as much as I hate to admit it, in the early days, trying to hide photographic mistakes behind punchy processing. In effect, the processing was taking center stage instead of the image. One of the hardest things to do is create a strong, but natural looking image – both from a perspective and processing standpoint; in order for it to stand out well from reality, the light, subject and composition all have to be exceptional. The image has to tell a story – but that’s another topic I covered here and here.

Note: all images in this article are a half-and-half composite of Sony RX100 shots; the SOOC JPEGs are on the left half (especially obvious for the B&W images) and the processed RAW files on the right. The RAWs were converted to DNG first then run through my usual workflow; CS5.5 doesn’t natively support the RX100. Where the finished file was cropped to a different aspect ratio, I’ve followed the finished file. Some noise reduction was one on the high ISO files. As usual, go by what I say and not what you see – there’s web compression involved in the mix, and you aren’t looking at the original files on a calibrated monitor.

_RX100_DSC2614 crop
And a 100% crop of the above – a huge difference here, but aside from tonal density – not much in it at web sizes, is there?

For argument’s sake, I’m going to assume that you’re able to see, compose and execute the image you see at a particular scene when pressing the shutter. For the purposes of this discussion, I’m going to exclude conceptual and commercial work – there is simply no way you can achieve some frames in a single look, and it’s impossible to have a perfectly dust-free product in others – even if you can get the lighting perfect. We’re talking about creative, personal and documentary work only. The reality is that a lot of photojournalists and reports never leave the JPEG – and some even SRGB JPEG – realm as it is. There are many reasons for this; speed and throughput being the first, the display medium being the second – there’s no point in supplying a beautiful file that uses all 16 bits of the Prophoto gamut if it’s going to be printed on a halftone CMYK process on newsprint. It’s a waste of time. (That of course doesn’t mean you can’t shoot both a JPEG and a RAW and deal with the latter if you find yourself up for a Pulitzer.)

_RX100_DSC2172b composite copy
Giant chef. Either rendition works, frankly – I don’t mind the overall tonality of the SOOC image, even if it’s lacking the pop of the actual scene.

A recent email exchange with a hobbyist photographer friend has spurred me on to think about this topic a bit more. The question: is Photoshop really necessary? Shouldn’t a good image be able to stand on its own? Yes, but don’t good ingredients taste better when skilfully prepared and cooked? (The Japanese may disagree with the cooking part; I can’t blame them.)

To answer this, we need to backtrack a bit. In the early days of digital, JPEGs were simply not an option because cameras lacked the required processing power. Raw output was something that was simply a direct data dump off the sensor itself; the data stored (perhaps lightly compressed to save space) for later processing. JPEG file quality was simply, unusable compared to the standards of the day: film. It didn’t have the tonal subtlety, the dynamic range, the detail; to make things worse, there was an inherently blocky “digital-ness” to it that made images feel, well, unnatural. RAW processing was a way to partially get around that and reduce the gap – we could alter the conversion/ output algorithm to create an image whose shadow and highlight response more closely matched that of film. It was also a way to overcome some of the limitations of early sensors; notably color response, chroma noise and tonal accuracy.

_RX100_DSC2103b composite copy
Imperial Palace East Garden, Tokyo. The SOOC image is too green – the needles definitely didn’t look like that after a warm summer and heading into November.

_RX100_DSC2103 copy
100% crop. There’s quite a lot more detail and tonal subtlety in the processed image.

Postprocessing my raw files was a habit I acquired since shooting with a DSLR in 2004, and I haven’t shaken since. I don’t discount JPEG-only cameras, but I’d definitely take the availability of a RAW file into consideration when buying one. And I certainly don’t feel like an image quality evaluation is fair or exhaustive until I’ve run some RAWs through my normal workflow. However, recent experiences with first the Sony RX100 and more recently, the Fuji XF1, have made me revaluate this: in fact, the XF1 has such good JPEGs and such crappy RAW files (perhaps ACR is also to blame here) that I don’t think I’d ever shoot RAW on this camera; but I will still postprocess the JPEGs. However, this is not a RAW vs JPEG debate; it’s something a bit more fundamental: for non-critical applications, is it still worth spending time processing or not?

_RX100_DSC2046b composite copy
What happened here is perspective correction – nope, you can’t do this in-camera. Not much to fix with tonality, though.

Yes, the processed RAW files clearly look better at the 100% level, but you’d have to make a 120cm wide print to really see that. And for practical viewing purposes, the only difference was in the overall tonality (and sometimes not even then) of the image, which could easily be fixed by altered JPEG output settings. Downsizing hides all manner of dirty pixel-level flaws. Could it be that I’d been creating some unnecessary work for myself for some time, and hadn’t realized it? It was the same case with the JPEGs from the Nikon D600 I was testing around the same time; they looked great at typical display sizes, but started to fall apart at the pixel level. (Before you worry that I might have gone all Hipstagram on you, note that I’m always open to finding new ways to balance image quality and throughput – and that includes shooting Ilford PAN F in my F2T and then ‘scanning’ the negatives with a D800E. I’m just saying.)

Suppose you weren’t super-anal about image quality, though. Suppose you didn’t pixel-peep, or print large. Suppose you shared your images online or at most made 8×12″ prints. Remember the points of sufficiency; if your display medium is going to be that severely limited, then the reality is you might not see much of a difference if you set your camera up correctly. The strength of the image and its contents is of course going to make more of a difference; the camera is just a tool and medium.

_RX100_DSC1961b composite copy
Facebook break from shopping. Near zero difference in tonality, just a bit of shadow recovery and perspective correction. Again, the SOOC JPEG would be fine for 99% of uses.

The basic reason for shooting RAW and postprocessing is that there is no one-size-fits-all for camera settings; therefore it’s impossible to have these baked in to the JPEG development algorithms of a camera. Fair enough; however, these algorithms have been getting increasingly clever over time as processing power increases. (A lot of RAW files aren’t even composed of truly RAW data anymore, but that’s another topic altogether.) To push perfection with every frame, there’s no way around RAW and postprocessing, end of discussion. You simply cannot have a camera that’s smart enough to recognize when some parts of an image need to be dodged and burned; the day that happens, I think I’ll retire as a photographer.

There are cases where the format-imposed limitations can actually force you to make stronger images – spot metering for subject or highlights can result in more powerful compositions and fewer distractions, especially when you have very contrasty lighting. Alex Majoli’s early work with the Olympus compacts is a good example of this. I frequently use this technique to strengthen the mood of an image, regardless of what camera I’m using.

_RX100_DSC2062b composite copy
Port of Tokyo. The AWB got this one horribly wrong; it could have been the window I was shooting through that threw things off.

_RX100_DSC2062 crop
100% crop. Not as much extra detail as you would have thought.

Once again: pick the right tool for the job, and that includes your file formats. I think what might be useful is a set of guidelines as to when each method is useful; even for a person who can run through their entire RAW workflow for a file (excluding heavy duty retouching) in about 30 seconds, I’m considering moving to JPEG for some things. Firstly, I don’t need perfect files for everything; social/ personal/ family documentary etc. is one such thing. Secondly, I’ve been spending more and more time processing files as my workload increases and camera resolution gets higher; I simply don’t want to spend any more time in front of a computer than I have to. I’d rather be out shooting and meeting people. (An obvious solution would be to shoot less, but this somewhat defeats the point of being as photographer. And yes, I’m trying film again at the moment, too.) Client and professional work will always remain shot RAW of course – there’s no point in going to the nth degree to ensure pre-capture image quality with the best lenses and supports then throwing most of your tonal space away with a JPEG. And you never know what post-capture manipulations you might need to do later on.

The biggest downside of shooting JPEG is that your settings are pretty much baked unless you’re willing to change settings on the fly from scene to scene. (Some cameras offer bracketing for this, too.) In real terms, you have to make a conscious choice at the time of shooting whether you wan high key portrait color or low key B&W. On top of that, you have to deal with limited dynamic and tonal range, and that you have to get your exposure as close to perfect as possible in-camera. This is very different from shooting RAW with the aim to post-process afterwards; in this case, you always expose to the right (and even clip highlights slightly) to maximize tonal range in the low-noise highlight and midtone portions of the image. My RAW files look flat and a bit too bright; this is normal because matching exposure to the desired tonal map is a critical portion of the processing flow.

_RX100_DSC1931b composite copy
The camera got this one spot on – all I did was straighten out the perspectives a bit, and sharpen.

It’s important to note that you need to spend some time figuring out what the best JPEG settings are for your camera and shooting style; the rest of this article is meaningless if you’re shooting with the wrong settings. And regardless of whether you JPEG or not, I would always shoot RAW+JPEG – you never know when you might need the file later. Storage is cheap; do-overs are often impossible.

When it might be best to use a straight-out-of-camera JPEG (or film + minilab):

  • When file quality is secondary; anything intended for facebook or social email, for example. These distribution methods compress the hell out of the images, strip color information, and then to make things worse, viewing is almost always on a non-calibrated device. You can spend all the time in the world tweaking, but it’s going to look like crap if the display can’t make the required color.
  • In very high throughput situations, like sport or news or reportage. And dare I say it, wedding factories.
  • I’m cringing as I write this, but if you camera has a style preset you particularly like (and are okay adopting as your own style) then go right ahead…so far, I haven’t seen anything that fits the bill personally.
  • When you don’t have the time. If I go away for a week, I’ll shoot an average of 1,000-1,500 images a day; of this, perhaps 100 will be saved to review on a computer later; I’ll throw away another half, but the problem is now I’m stuck with 350 images to process. At say 1 min per image, that’s around six hours. A lot of what I shoot is documentary/ observation/ personal, and these don’t need processing. I am now being even more critical with my editing, but it’s still a lot of time to carve out when you don’t have any spare to begin with.
  • If you enjoy photography but don’t want to deal with the hidden back end that comes with it – the computers, the storage, ensuring you have enough power to run photoshop and that your converters are up to date…the list is endless.
  • What you see is pretty much what you get: if you’re learning, it’s much easier to see the effect of exposure or setting changes. With RAW, you have to use experience to visualize what you can get. This is probably the most common stumbling block I see amongst my students who are just starting to discover the power of Photoshop.
  • If your camera puts out lousy RAW files but amazing JPEGs – the XF1 is a great example of this.

_RX100_DSC2392bw composite copy
I’ve never used SOOC B&W before, though I doubt it would have been able to retain the slight tonal variation in the man’s trousers. I had to do quite a bit of dodging and burning to bring that out.

And in favor of RAW + Photoshop (or self-developed and printed film):

  • No question: when image quality is the first priority.
  • When you want to do something that can’t be done in camera; compositing, for instance.
  • When you don’t have many images to process
  • When you have no choice – either the JPEGs are crappy, or there are no JPEGs at all…
  • When you have to do perspective correction (and don’t have a tilt-shift lens).
  • In extreme lighting situations that can’t be handled out of camera.
  • When you need to make tonal/ exposure changes to part of the image only, and not the whole image; this is where dodging and burning comes in.
  • If you’re a control freak…

But wait, there’s a middle ground:

  • You can shoot RAW but batch process; I think Aperture and Lightroom are a good example of these halfway houses. The problem I see is that you’re spending nearly as much time as a full-blown individual Photoshop workover, but without the same control or output quality. And this somewhat defeats the point. That said, I do keep presets for various things – usually to do with color calibration for flash work or for certain types of lighting or cameras, or high ISO situations.
  • The other option is to have the camera output a very neutral JPEG and postprocess that; you can skip the RAW conversion step (although it is possible to open JPEGs in ACR and have the same adjustments, but not the same latitude of course). This actually frees up quite a bit of time; that minute can get down to 15 seconds or less if you have a fast computer – dodge and burn, curves, color correct, sharpen, save. And it does of course help that the files are much smaller, too. This is actually not a bad option – whenever I review a camera without RAW support, this is the method I use – but if you start to do any extreme tonal manipulations to the files, it will become obvious, especially at the pixel level.

_RX100_DSC1925b composite copy
Standing nap. Yes, it’s two files. Look carefully.

_RX100_DSC1925 crop
100% Crop. More noise, a smidge more detail, and slightly smoother tones; not a lot in it. And that’s with me looking at the full size files on my calibrated monitor, not the web crop; there’s even less difference here.

My currently preferred JPEG settings

Important note: currently, I’m using my JPEGs as preview images either for quick client contact sheets after a job. When shooting RAW-only, the JPEG settings apply to the preview image but not the RAW file  so I generally try to make them as close as possible to be representative of the tonal range I can get of the RAW file, i.e. flat and not saturated, but sharp. If I was shooting JPEG only, I’d run similar settings with the anticipation of doing some light processing work on them afterwards – the halfway house.

  • My current style is neutral and natural; I look for or create light first and foremost (though the latter doesn’t apply here; if I’m creating light, I’m also shooting RAW to maximize image quality). I want to retain a decent amount of the tonal range; however there’s no way to control the output curve for most cameras, which results in large dynamic range images appearing very flat. This means contrast is set to the lowest option, or close to it – depending on the camera.
  • It’s very easy to have individual color channels blow; thus reduce your saturation a notch or two.
  • Sharpening is a mixed bag; some cameras do this well, some don’t. But I don’t use zero sharpening, as a lot of the time this setting does actually affect the in-camera RAW conversion and the amount of detail extracted. It also helps you to determine if critical focus was achieved – I’ll usually run somewhere between neutral/ default and maximum.
  • White balance is on auto, but I will override it where necessary to avoid blown highlights.
  • Maximum quality and size, of course – with an extra RAW file saved, too.

There are still many reasons to shoot RAW – and even exclusively RAW – but I can’t help but feel those are eroding slightly; and for the vast majority of users – even serious hobbyists – it might not be necessary all the time. Admittedly, my main reason for revisiting this topic is in the interests of curiosity and efficiency; I don’t think there’s as much of an image quality penalty as there used to be, especially for smaller output sizes. I haven’t decided just how much SOOC JPEG I’m going to use at this point – edited JPEGs are probably as far as I’m going to go – but you can be assured that I won’t use it at all until I feel that I’m getting the image quality I want. And in any case, I can still apply my normal workflow to the JPEGs – the tradeoff is significantly shorter processing time against a bit less latitude. Moral of the story: get it right out of camera; if it’s not there, you’re not going to be able to add it in afterwards. MT

____________

Visit our Teaching Store to up your photographic game – including Photoshop Workflow DVDs and customized Email School of Photography; or go mobile with the Photography Compendium for iPad. You can also get your gear from B&H and Amazon. Prices are the same as normal, however a small portion of your purchase value is referred back to me. Thanks!

Don’t forget to like us on Facebook and join the reader Flickr group!

appstorebadge

Images and content copyright Ming Thein | mingthein.com 2012 onwards. All rights reserved