You can download the final release candidate here. Notable changes are support for the Olympus E-PL5, E-PM2, Panasonic GH3, some of the new Canon compacts, a whole slew of lenses, and final support for the Nikon D600. Fuji owners are still out of luck, unfortunately. MT
Just got interviewed on the Leica blog…
November 8, 2012 by
…For those of you who might be a little curious about the person behind the site, the interview by Eric Kim can be found here. MT
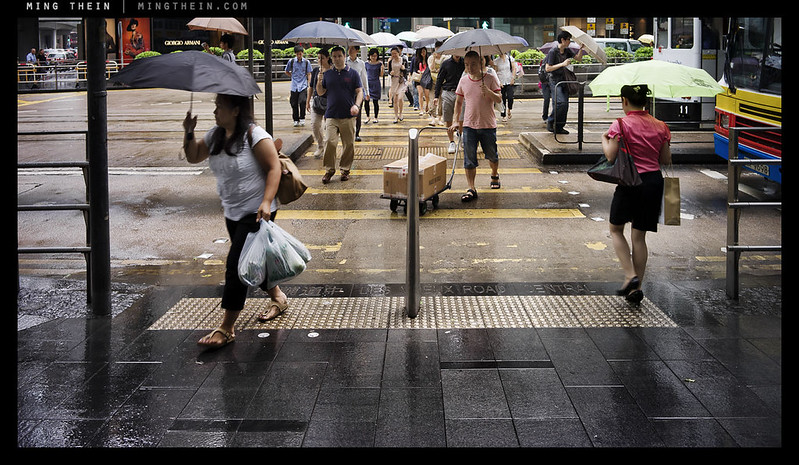
Photoessay: Street photography with the OM-D and ZD 60/2.8 macro
November 8, 2012 by

From outside looking in
All images in this series shot with the Olympus OM-D and ZD 60/2.8 macro.
There’s nothing that says you can’t use macro lenses for non-macro purposes; the old myth of the optics being poorer at longer distances is just that: a myth. In fact, macro lenses tend to perform better than most standard lenses even at long distances because they are so well corrected in the first place. There are two drawbacks: firstly, the apertures tend to be slower, which isn’t so good for achieving subject separation and is solely a physical property of the focal length and aperture combination of the lens; secondly, the focus throw tends to be shorter.

Not wanting to be part of the crowd
This is a both good and bad – good because if an autofocus lens, the focusing elements don’t have to move as far since the lens must also be able to provide sufficient effective extension to focus at macro distances, bad because it means that if you have a manual focus lens – like the ZF.2 2/50 Makro-Planar I use – you have very, very little travel between mid distances – say 2-3m or so – and infinity, which can make precise focusing very difficult. For manual focus lenses, using the camera’s built-in rangefinder/ focus confirmation dot simply isn’t precise enough as the dot stays lit for some not inconsiderable displacement of the focusing barrel*. For autofocus lenses, the camera/ lens combination may not have the ability to consistently move the elements by the precise displacements required for very small changes in focusing distance – this is especially apparent with older screwdriver-focused lenses like the Nikon 60/2.8 D. Newer coreless motor lenses (AFS, EFS, M4/3 lenses etc) generally don’t have problems as there is very little backlash in the focusing system.

The writing’s on the wall
*Do this simple test to see what I mean: shoot the same subject, at the same distance, with the cameras on a tripod and your desired test lens attached. Using the viewdfinder or EVF, try to focus the lens/ camera manually from both infinity and near limit, stopping just once the focus confirm indicator lights. Do this with the aperture wide open, otherwise other focus errors like backfocusing or mirror misalignment can’t be identified and compensated for. Shoot the same frame again, focusing with live view to use as a comparison image. What you’ll probably see – is that neither image using focus confirm is as sharp as the live view image. This effect is even worse for telephotos, because of the depth of field characteristics of the focal length. The shorter the focus throw, the worse this problem becomes.

Untitled.
Potential focusing issues notwithstanding, so long as you have enough light for a sufficiently high shutter speed to avoid camera shake, the results are generally excellent. Specifically in the case of the ZD60, (my full review at macro distances is here) I’m pleased to report that the lens’ already excellent optical properties do not change at all at longer distances. In fact, the one niggling flaw I saw at close range is mostly gone – I’m not seeing any bright edges to out of focus highlights. Both foreground and background bokeh is smooth and non-distracting. Subjects fall nicely in planes and are separated in a manner that has plenty of 3D pop; this is characteristic of a lens with excellent microcontrast.

Arches
Focusing is not an issue at all, and is just as fast as the ZD 45/1.8 providing you have the 4-way limiter switch in the right position. The one minor issue I did find was that the lens with hood is not exactly inconspicuous (and nowhere as compact as the 45), being nearly 15cm long with everything in place. Relatively small by DSLR standards, but probably not exactly what M4/3 users have in mind.. Personally, I find this combination of interest not because I’d take it out on dedicated street photography/ travel expeditions, but because I frequently carry the OM-D system either as a backup camera (or as a primary for assignments that don’t require the D800E’s resolution) – and the ability for a lens to do double-duty means one less thing to carry, break, fail or potentially lose. It’s always nice to have options. MT
The Olympus OM-D, 60/2.8 Macro and 45/1.8 are available through Amazon by clicking on their respective links.
____________
Visit our Teaching Store to up your photographic game – including Photoshop Workflow DVDs and customized Email School of Photography; or go mobile with the Photography Compendium for iPad. You can also get your gear from B&H and Amazon. Prices are the same as normal, however a small portion of your purchase value is referred back to me. Thanks!
Don’t forget to like us on Facebook and join the reader Flickr group!

Images and content copyright Ming Thein | mingthein.com 2012 onwards. All rights reserved

A pick-me-up before the pick up

Hiding from the dishes

Guardedly relaxed

I’m on the way

Hop to rainbow row

A surprisingly good soup
The four stages of creative evolution of a photographer
November 7, 2012 by

As close as I got to Everest. Nikon D700, 85/1.4 G
On careful reflection, there are a number of stages which every photographer (hopefully) goes through as their creative vision develops. In fact, it’s more like a pyramid or mountain that requires climbing: the higher you go, the more difficult it gets, and the more commitment is required. The lower slopes are gentle, easy and well-charted; the higher slopes are rocky, icy, treacherous and the preserve of the supremely brave or foolhardy. At the same time, far more people visit base camp than the summit; and few do it without supplemental oxygen.
Perhaps that metaphor has gone a bit too far. Like every pursuit, photography is one of severely diminishing returns: it isn’t difficult or expensive to become reasonably good, but if you’re trying to push the boundaries, be prepared for frequent dead ends, wrong turns, and never-ending criticism: the simple reality is that if you are always experimenting, not all experiments turn out better than the previous one, let alone tried and true methods.
I was at a dinner with a number of fellow commercial photographers recently where this point was discussed in some detail: we work in an environment of shrinking budgets and drying up jobs, yet there will always be some clients who perhaps are more like patrons than business as usual: they don’t mind you trying to push the boundaries. The comparison to the art world was drawn: a piece that may not make any sense to a casual, external observer makes no sense precisely because of the casualness of the observation: the viewer does not have the benefit of having experienced and seen the evolution of the artist from the starting point into their current form of expression. I think the same thing is true with photography, though to a lesser extent; we were discussing another recent batch of image submission which had to be graded/ sorted/ reviewed etc. and how to judge whether something had extremely deep and complex metaphors, or whether it was simply a bad image – the conclusion was that the caption was the giveaway. (It stands to reason that a casual-looking image with a deep meaning and careful execution would have an equally-carefully crafted caption that supports the message of the photograph. None of these particular images did.)
Pre stage
The vast majority of the population falls into this group. These are the people who own cameras and perhaps use them at social occasions, or for recording/ documentary purposes, or when they are expected to – like when on vacation – but do not actively seek to go out and take photographs. They may be creative in other areas, but just not photography. Composition is not something that they actively think about and technical skill is limited to turning the dial to the green mode. For the purposes of this discussion, I will classify them but not discuss their traits in any greater detail; I’m almost certain that none of my readers fall into this category anyway.
First stage
To progress to the first stage, you need to have the intention; you have to make a conscious choice in wanting to make a image. You may or may not know what is good, what works and what doesn’t, or the technical aspects of photography; the bottom line is that a person in this category has the desire to photograph. I suppose this is what separates newbie photographers from the rest of the population who might merely own a camera. Intention is what gives people the motivation to actually get out and do something – in this case, learning, experimenting, and trying out things. It is impossible to learn photography solely by reading or looking at other people’s images, though this can be very useful – you really don’t get a feel for things without experience, and this experimentation is something which is a common factor to all forms of creativity.
The other characterizing traits of a person in the first stage of creativity is that the way they shoot and the work they produce is reactive; they may make a conscious choice to embark on an outing whose sole purpose is to take photographs, however, it is very much a case ‘of shoot what you see’, and only photographing a subject if it’s obvious and front and centre. There is no element of anticipation, preconception, or previsualization involved; this means that the images are frequently lacking in a story – ‘the idea’ – because the photograph frequently contains only the subject and no related elements (the context) – or worse still, a bunch of distracting and misleading elements.
Second stage
The next phase of development involves some awareness of ‘the idea’. It is usually also accompanied by a heightened consciousness of one’s surroundings; this is caused by the development of one’s sense of observation and anticipation. The photographer in the second stage will visit a particular place and feel that it is photographically ‘rich’, with a lot of opportunities or stories; or perhaps that there are certain elements that must be included in a shot in order to the essence of the location.
However, the idea may not be fully formed, or the photographer may lack the technical ability to execute what they are envisioning in their minds. Images produced by the photographers in the second stage tend to feel a little bit chaotic; this is because not all of the elements in the scene are under control, or were included or excluded as a conscious choice on the part of the photographer. It is very possible for a second stage photographer to occasionally produce a brilliant piece image; the problem is that although the outcome may match the intended story perfectly, it was more due to luck than planning and would not be consistently repeatable. Most dedicated amateurs will reach this stage.
Third stage
The first part of this stage – let’s call it 3A – is when a photographer firstly has a vision in their mind of what the end product should look like, can consistently execute this, and have the image communicate its meaning or intention to a viewer on its own merits, without the help of a caption, or intervention from the photographer. These photographers tend to have nearly every element of the image under conscious control; and have a level of technical skill that enables them to consistently repeat the execution if required. There is practically nothing left to chance, and no detail is too small. A good commercial photographer would fall into this category, and it’s probably beneficial for them not to push too much farther, especially in Asia and other conservative markets – there are far more clients that prefer the ‘safe’ route rather than the experimental one.
At the same time, there’s something missing from the images – they’re too safe, too perfect; stage 3B is where the creative realizes this and is trying to produce something different, but can’t quite make it work; it isn’t a bad image, but the full idea or story isn’t getting through. On the way to the pinnacle, one has to expect to fail at least some, if not most of the time. And by fail, I mean produce images that are not quite satisfactory for some reason or another – usually because they fall short of fully and clearly communicating the photographer’s idea at the time of capture. If this isn’t happening, then chances are you’re playing it overly safe and stagnating.
Fourth stage
Defining what makes a photographer qualify for this level is tough, simply because it’s impossible to pin a concrete set of limits on creativity. Perhaps it’s best to say they have to be gifted in some way and give examples; we start with Louis Daguerre, include Oskar Barnack, H-CB, Capa, Kubrick, Salgado, Majoli and perhaps also Avedon and Leibowitz; I think some of the Japanese photographers like Araki would also qualify, though I don’t claim to fully understand their work – but it is clearly a very developed, evolved style. I’m sure there are plenty more out there whose work I haven’t yet had the chance to see, or whose work is either kept private (Vivian Maier, for example – though I don’t think she’s a stage four) or not well publicised. There are but a small handful of people who ever reach this point; they have the common trait of pushing the boundaries in one or more aspects of the image making process simply because they can imagine and envision things which the majority of the population are unable to. I suppose in some ways, this aberration of the mind or difference in thinking is a bit like having a disability, but in a way that’s more beneficial than debilitating.
Although these people have the benefit of being able to see in a way that the rest of us cannot; a lot of them are also handicapped by it because this way of seeing is so ingrained into their thought processes and consciousness that it is very difficult, if not impossible, to break away from. This is in a way analogous to a form of savantism in which the subject has a narrow, obsessive focus on one particular topic that leads them to consider every possibility and outcome; including the ones that are normally discarded through a more balanced rational thought process. This focus results and creativity or games in one very specific niche; a slightly less intense variant of this is the development of personal style. Discovery and adoption of a personal style, in a way, is the development of and obsession with a particular look or mood to an image.
One little thing I notice about photographers who are at the fourth stage is that none of them will ever admit it: their work is never excellent, it is merely good enough (and rarely, if that). They are proud of what they do, but they know that things can still be taken further with another push; ideas fleshed out and illustrated more fully. Their work is always technically very well executed, and frequently polarising; their creativity is so far ahead of the interpretative capacities of most people that there are two camps of viewers: the concept or message is so fundamental that either you understand it, or you don’t. They have a deep passion in what they do, bordering on the obsessive; and are frequently difficult people to interact with in social settings, simply because their thought processes are so different to the majority of people that there is no common ground or reference basis on which for them to interact, leading to frequent miscommunication and awkward gaps in conversation. This in turn contributes to such artists being misunderstood or developing a reputation for genius – it’s not that they don’t want to explain the rationale behind their thought processes, it’s because they simply cannot – what seems perfectly ordinary to them and not requiring a second thought is something that requires a huge number of mental leaps for somebody else.
The conclusion of this article has deviated somewhat into an examination of the mind of how an extremely talented and gifted person would think; this was not intentional however in the interest of full disclosure it is a topic that is very personal to me because of things I have faced in my own life. I graduated young, and have always been – by a large margin – the youngest person at my level in any organization I’ve worked at; in my last corporate job, my peers were in their 50s (I was 25). I had no problems doing the job – the huge delta in thought processes and social experience is what made me feel highly uncomfortable with my day to day situation.
One of the reasons I’m so passionate about photography is because it is one of the last few truly meritocratic fields; it doesn’t matter how old you are or who you’re related to (there are of course exceptions); in an anonymous viewing, a crap image will always be a crap image; there is far less discrimination based on age than in other fields. Perhaps it’s because a perception thing: you can instantly judge the merits of a photograph visually, but it’s impossible to know if somebody is a good investment manager or consultant or operations director simply by looking at them. (And even several years down the line, it’s still difficult to tell; it’s impossible to separate out the person from the other environmental factors affecting their work.)
This is of course not to claim that I fall into stage four or even 3B; I think it takes recognition by a large body of people for a person to be recognized as gifted. But I do know that I plan and think about my images to the point of being neurotically obsessive; there is always something that can be better, there is always something else to try, another article to write or another thought to elucidate and share. And in a weird way, I think I rather enjoy it. MT
____________
Visit our Teaching Store to up your photographic game – including Photoshop Workflow DVDs and customized Email School of Photography; or go mobile with the Photography Compendium for iPad. You can also get your gear from B&H and Amazon. Prices are the same as normal, however a small portion of your purchase value is referred back to me. Thanks!
Don’t forget to like us on Facebook and join the reader Flickr group!
Images and content copyright Ming Thein | mingthein.com 2012 onwards. All rights reserved
Last workshop for November 2012: Introduction to Wildlife Photography, Kuala Lumpur
November 6, 2012 by

By popular demand, I’m going to be conducting one more workshop this month in Kuala Lumpur: an introduction to wildlife photography techniques. Due to our current weather and afternoon rains, the session will be split into two mornings – Friday 23 November, 9-1pm and Saturday 24 November, 9-1pm. The sessions run continuously, and the break in between allows for critiques and literal and figurative recharging of batteries between the two sessions.

Since wildlife photography can be very hit and miss – in the past, I’ve spent entire weekends in swamps with only five minutes of action – we will be conducting the workshop in a ‘safe’ environment where there definitely will be animals to shoot: the Kuala Lumpur Bird Park at Lake Gardens.

The topics covered will include:
– Long lens technique and shot discipline
– Approaching your subjects
– Understanding animal behaviour and what constitutes an interesting wildlife image
– Use of context and environment
– Metering techniques under difficult lighting
– Understanding and managing AF
There will also of course be feedback and critique sessions at the end of each half-day.

Finally, it’s worth remembering that wildlife photography isn’t just applicable to wildlife: the skills of anticipation and shot discipline are valuable for every type of photography. The workshop will be jointly supported by the local distributor of Gitzo tripods and monopods, Shriro. They will be bringing along a range of tripods and monopods to experience.
A quick note on equipment requirements: Although you can bring along your big guns and DSLRs – 300mm would be a minimum, and 400mm+ preferable – you can also produce compelling work with smaller formats such as a M4/3 camera and 100-300 zoom, or even a bridge camera – a lot of the images in this post were shot with a Leica V-Lux 3.
The price for both days with an experienced wildlife photographer – I shot mainly wildlife for five years, and my some of my work can be seen here – is just RM1,250 inclusive of park admission. Please send an email to mingthein2@gmail.com for bookings or more information. Thanks! MT

____________
If you enjoyed this post, please consider supporting the site via Paypal (mingthein2@gmail.com); Ming Thein’s Email School of Photography – learn exactly what you want to learn, when you want to learn it or learn how to achieve a similar look with our Photoshop workflow DVDs. You can also get your gear from Amazon.com via this referral link. Prices are the same as normal, however a small portion of your purchase value is referred back to me. Thanks!
Don’t forget to like us on Facebook and join the Flickr group!
Images and content copyright Ming Thein | mingthein.com 2012 onwards. All rights reserved
Clearing up the myth of higher resolution, shot discipline and image quality once and for all
November 5, 2012 by
Empirical observation #1: Cameras with higher resolutions, for a given sensor size, are harder to hand-hold and get a good result than those with a lower resolution.
And I define a good result as one which the image is critically sharp at 100% actual-pixels view, with no motion blurring or other artefacts such as slightly missed focus (we’ll get to this later). Motion blur is when the camera moves by a greater amount than a pixel during the time when the shutter is open; if it’s less than this, then you see either hard edges on your subject as a perfect sharp edge, or with slightly lower contrast than expected due to the image projected by the lens on the sensor plane ‘spilling over’ into the next adjacent pixel slightly when the camera moves.
The simple reason why higher resolution cameras are less forgiving is that for a given angle of view, the camera with the high resolution will put the greater number of pixels per degree of field of view on the subject. This means, that less angular movement is needed before it becomes visible as blur on the image – i.e. you need to be more static than with a lower resolution camera to avoid seeing the effects of motion blur at the pixel level.
But what about the image when viewed as a whole at the same reproduction size? If we started out with a huge number of pixels with both – say 24MP and 36MP and resized both them down to say, 4MP or so – we would not see any difference between two cameras assuming one assuming both were equally downsized. This is because the downsampling process has enough information for each pixel to accurately determine its color and luminance value and therefore appears as true detail. If we downsize 36MP to 24MP, it might or might not look better: a lot of the outcome depends on the interpolation process. It isn’t a ‘clean’ situation where each new, downsized pixel has multiple pieces of information (the original pixels) to form an average that would be the same whether you used 8 or 12 pixels originally. Since 36 doesn’t divide cleanly into 24 – you get 1.5 old pixels per new one – there’s always going to be some guesswork as to precisely how that half pixel is allocated. And depending on the algorithm, any one of the following might happen – blur edges; stairstep artefacts; haloes or abrupt transitions; odd discontinuities in diagonal lines.
Let’s take an example: if you have a scene shot with 12 (8.45um pixel pitch) and 36 MP (4.88um pixel pitch) cameras, and both are equally motion-blurred. The degree of camera shake may be less than a pixel on the 12MP camera – let’s say 5um for argument’s sake, which will still produce a critically sharp image. However, the 36MP camera is now blurred by more than one pixel, which definitely will not look critically sharp at 100%. Yes, we can downsize – but you are downsizing not to 1/2 of the original linear dimension (which would yield 8MP, and bin the two blurred pixels into one sharp one that looks perceptually okay), but to 1.7x of it – and once again, we run into potential issues in trying to fit discrete, nonlinear data into a linear continuum.
This is one of the reasons why less pixels might actually produce a perceptually sharper/ crisper image for a given reproduction size, providing that this size is reasonable for the amount of resolution you’ve got in the smaller image.
The upshot of all of this in practical shooting is that you’ll need to use a higher shutter speed than you expect, which lowers your shooting envelope by a corresponding number of stops as noise increases as you ramp up the sensitivity to keep shutter speeds high. Perceptually, if you’re going to be shooting under already borderline conditions to get a critically sharp image with a 12MP camera, you’re not going to get one with a 36MP one – even if you print them at the same size.
Empirical observation #2: Cameras with higher resolution require more precise autofocus.
Comparatively, this one is very simple to explain: if the camera misses focus, the resolving power of the lens is diminished. You need to have the ability to resolve slightly smaller structures than the pixel pitch of the camera in order to create a perfectly sharp image at the sensor plane. If you miss focus by an arbitrary amount – let’s say 1% of your subject to camera distance – this may result in a loss of resolution corresponding to the inability to resolve structures below 5um in size. For our 36MP, 4.88um pitch camera, this will appear to be a blurry shot. For our 12MP, 8.45um one, things still look critically sharp.
A lot of what we’re seeing isn’t necessarily worse autofocus; what’s happening is that we are now visibly reaching the limits of tolerances and precision since sensor quality is now high enough to resolve at or close to the previously acceptable tolerances.
A lot of the reasons why an image appears sharp or not has to do with the reproduction medium, as well as how our eyes interpret information: an image with hard edge is seen to be ‘sharper’ than an image without one, even if there is less fine detail or edge definition. The fact that digital capture splits out our images into distinct zones – the pixels – doesn’t help this at all, either. It’s important to remember that a slightly blurred image (depending on the degree of blur, of course) from a higher resolution camera may technically still have more detail, our eyes don’t necessarily pick up on this; it’s a perceptual thing. Bottom line: don’t use more pixels than you are capable of handling properly for a given situation. It’s one of the reasons why I don’t shoot the D800E for casual work…but it’s also the reason it’s my camera of choice when I have full control of the execution. MT
____________
Visit our Teaching Store to up your photographic game – including Photoshop Workflow DVDs and customized Email School of Photography; or go mobile with the Photography Compendium for iPad. You can also get your gear from B&H and Amazon. Prices are the same as normal, however a small portion of your purchase value is referred back to me. Thanks!
Don’t forget to like us on Facebook and join the reader Flickr group!
Images and content copyright Ming Thein | mingthein.com 2012 onwards. All rights reserved
Basic street photography techniques
November 4, 2012 by

Offerings for sale. Sony RX100
Continuing in this mini-series on street photography, there are a number of techniques that I use while shooting. Although it’s possible to describe most of them in some detail, full understanding requires both demonstration and practice – this is where joining one of my workshops is ideal 🙂 Together with the basic principles of balance, perspective, composition and what makes a good image – these techniques may be used singly or in combination to generate strong street images. In fact, they also apply to documentary and reportage work, too; the only difference between good street photography and photojournalism is that the latter has a consistent theme and subject.
It’s important to note that not every technique is suitable for every situation, and vice versa; as always, a good portion of making a strong image is knowing what to leave out.

Hiding from the rain. Leica M9-P, Zeiss ZM 2.8/28
Timing and anticipation
In a photographic situation where you have effectively zero influence of any of the elements in your frame except the composition and exposure, timing is the one key bastion of control that remains in the hands of the photographer. By making a conscious choice of when you push the shutter, you decide when each and every single one of the moving elements in the frame is in the position you want them to be in. However, it is too late to react only at the exact instant you see the composition you want. It is therefore important for photographers to be able to see a scene, visualize the potential contained there, and be able to imagine what the finished frame will look like once all of the desired elements are in place. It is then a matter of simply waiting for those elements to all come together, and being ready with the camera when they are. No matter how fast reflexes, or your camera, the fact is that if you react off to you see something, it’s too late; training yourself to anticipate action is something that can give you the critical second or half-second which can make all the difference between getting the that and missing it completely.

Progression. Olympus OM-D, Panasonic 20/1.7
Shoot stopped down
A lot of these techniques are about timing. Specifically, gaining yourself a little bit of extra breathing room to react. In this case, shooting stopped down allows you to simplify the process somewhat by not having to decide what to have in focus, and what not to have in focus. If you’re shooting with an autofocus camera, it also allows a little bit of leeway for the camera to misfocus, yet still allow the final shot to be in focus thanks to extended depth of field. Note that of course this technique does not work under low-light situations, where you need every stop of aperture you can get. Compositionally, shooting with great depth of field actually forces you to create stronger images. This is because you have to think more about your subject placement, leading lines, empty spaces, etc – which all affect the overall balance of the image. If you can make interesting image without relying on the crutch of bokeh, then you will find yourself with increased compositional and artistic flexibility when you do have this option in your toolkit.
Divided. Leica M9-P, Zeiss ZM 2.8/28
Shoot wider
There are many reasons to shoot with a wider lens. First of these, is of course the enhanced foreground perspective emphasis that it provides, hopefully on your subject and not an expanse of pavement. Having a lens with a shallower and more forgiving depth of field profile both allows greater latitude for focusing errors, as well as allowing extended depth of field without having to stop down too much. There are also other non-obvious advantages of going wider – not only do you eliminate or minimize the possibility of having unwanted elements come between you and your subject due to physical distance (and you subsequently missing the shot because in the time it takes for your frame to clear, your primary subject has already moved on or changed position), but also you can get people in the periphery of the frame as edge subjects or context without them suspecting anything. In this sense it’s also about minimizing the reaction time between you visualizing the shot and executing it.

The taxi men. Sony RX100
Act as though you belong
In pretty much all situations, you will notice the confident people rarely – if ever – get challenged. This of course also applies to street photography. By acting like you belong, and you’re confident and know what you’re doing, casual observers to the scene assume that you have every right to be there and generally allow you to go about your business without interference. A subset of this is acting like a tourist. Tourists are not self-conscious and they are generally expected to take photographs of everything encountered; by doing this you’re fitting the expected stereotypes. And, as you will no doubt already know by having read my earlier articles, a large portion of photography – including the execution – is seriously influenced by human psychology at a subconscious level. Spend some time understanding how people think, and you will find that you both have more control over the way you images are interpreted, as well as how people react to you while you’re out shooting.

A glitch in the matrix. Leica M9-P, Zeiss ZM 2/50
Hyperfocal and zone focusing
One way of speeding up the shooting process is by completely eliminating focusing altogether. Hyperfocal focusing means that you have everything in focus beyond a certain point; it requires the lens to have a comprehensive depth of field scale in order to set your focus distance precisely. Manual focus lenses tend to be better for this, I suppose because manufacturers of autofocus lenses think that photographers will not use the manual option and therefore simply choose not to include proper depth of field scales. (Most of the time, they’re right.) Zone focusing is similar. What you do, is ensure that your desired subject distances fall between the two aperture markings on opposite ends of your depth of field scale. For the current bunch of high density digital sensors (anything over 12MP or so), you will need to use an aperture one stop smaller than indicated on the depth of field scale because these scales were calibrated for the circle of confusion corresponding 35mm film, and haven’t been updated since. There is a game played by rangefinder shooters that can help you improve your skills at estimating distances; pick a subject, set distance on the lens, and then check through the rangefinder to see how accurate you up. Do this often enough, and you will find that your focusing ability has magically improved. The upshot is that with sufficient practice, it is possible to estimate distances without even having to look through the viewfinder. This means that you can focus the camera and have it ready even while at waist level or in your hands, before you frame up the shot – once again, it’s all about reducing your reaction time.

Querry. Olympus OM-D, Panasonic 20/1.7
Stages
I don’t believe ‘stages’ is a commonly used terminology. I use it to refer to a setting, or scene, where the light is interesting and directional, and all it needs to complete the image is a human element of some sort to add context. I’m constantly on the lookout for these ‘stages’ when I shoot; when I find one, I will stay and work to seeing for his long as it takes for me to get an image that I’m satisfied with. Sometimes this is within seconds; sometimes it can take hours and I leave without getting the shot I wanted. But if I have a chance, and it’s a case of ‘unrequited stage’, then generally I’ll return again at some future point in time to get the shot I’d originally envisioned.

Haircut. Leica M9-P, Zeiss ZM 2.8/28
Layering
Layering is a technique that you can use to add context and depth to an image. It requires the use of a longer lens, which is ideally suited to this because it naturally separates out your scene into foreground, midground and background, all with relatively similar prominence. This allows you to place your subject in any one of these zones, and use the remaining zones to form the context and tell the story. Aside from using a longer lens, the other way to achieve layering is by the use of reflections; whether it be in a building’s glass, a puddle or perhaps some other shiny object. In this case, a wider lens is actually preferable because it allows you to capture more of the reflection. Note that when you’re composing, your reflected background is going to be further away than you think because the light has to come from the subject, to the point of reflection and then back out again to the camera; this can affect perspective in strange ways if it not consciously compensated for.

They don’t know you’re there. Leica X2
Shoot through people
The most difficult and counterintuitive technique that I use is something I call ‘shooting through’. It basically requires you to stand still in a flow of oncoming people, and just shoot into the crowd. Although this will feel strange but first because you’re pointing your lens directly in people’s faces, offer a while you get used to it. The challenge then becomes actually separating out individual frames from the general scene as a whole. This technique works better in busy spaces and thoroughfares, simply because this means people tend to be more concerned with where they are going rather than what you’re doing. In a relatively quiet space, this technique is not very effective because people can see you coming – or rather, standing there – from a mile away. It is important to note that the psychological reaction to somebody standing still with a camera held up and ready to shoot is very different to if the same person stood there and suddenly brought out the camera to shoot; the action of raising the camera draws attention to yourself. Psychologically, sudden movements also catch us unawareness and make us uncomfortable. By looking like you have been there for a while, and will continue to be there, people are put at ease which allows you to operate without drawing unnecessary attention to yourself. In fact, oncoming pedestrians will probably take pity on you (poor tourist, trying to take a photo but we’re all in his way), not knowing that they themselves are actually the subject of your image.

Garden of earthly delights. Olympus OM-D, 45/1.8
Stealth or flamboyance?
The final technique is simply being inconspicuous. This involves techniques such as not making any sudden moves, and most of the time, not even having the camera raised to your face when you take a photograph. The smaller, blacker and more nondescript the camera you use, the better, because it does not draw any attention. This is one of the reasons I like to use compact cameras for street photography – not only do I look like a tourist, but what possible threat could a small Asian man with a point and shoot pose? He’s probably just lost and on holiday. The complete opposite of this, and also viable option, is to be completely flamboyant and ridiculous. You stand out to the point that nobody takes you seriously; and this allows you to get on with your serious work in peace. I’m talking about shooting a bright pink camera dressed and perhaps being dressed red and blue; or maybe using a view camera on a tripod whilst dressed a three-piece suit and top hat. Then, you become a subject of interest and curiosity rather than the potential threat. (I have never done the latter myself, although in the interest of improvements in image quality, and perhaps the different look to my images, I am quite tempted. I plead the fifth on the former.)
Although this list is by no means exhaustive, I hope this article has given you some insights into both how I shoot when I’m on the street, and some new techniques for you to try out yourself when perhaps you see a great shot but you’re too shy to go out and get it. Bottom line is that street photography is not very different to being a Boy Scout: be prepared and confident. MT
____________
Visit our Teaching Store to up your photographic game – including Photoshop Workflow DVDs and customized Email School of Photography; or go mobile with the Photography Compendium for iPad. You can also get your gear from B&H and Amazon. Prices are the same as normal, however a small portion of your purchase value is referred back to me. Thanks!
Don’t forget to like us on Facebook and join the reader Flickr group!
Images and content copyright Ming Thein | mingthein.com 2012 onwards. All rights reserved
Photoessay: The people of Tokyo
November 3, 2012 by
Another one of the continuing series from my last Tokyo trip – this time focusing on is inhabitants. Enjoy! MT
This set was shot with an Olympus OM-D and the ZD 45/1.8. As usual, click on any image to go to its Flickr landing page; EXIF data is intact on the right hand side link.

Plenty to spare, Ginza

Geisha in training, Asukusa

Maid for hire, Akihabara

Only in Tokyo would this be considered normal. Shibuya

Putting up a wager, Asakusa

Untitled. Senso-Ji temple grounds, Asakusa

Coffee break, Shibuya

A considered proposition. Somewhere along the Yamanote line

Reading the fine print, Akihabara

What happens after closing time. Asakusa

Elegant shopping. Ginza

Public opinion, Shibuya

A Japanese cliche, Shibuya

Even the chauffeur gets lost sometimes. Ginza
____________
If you enjoyed this post, please consider supporting the site via Paypal (mingthein2@gmail.com); Ming Thein’s Email School of Photography – learn exactly what you want to learn, when you want to learn it or learn how to achieve a similar look with our Photoshop workflow DVDs. You can also get your gear from Amazon.com via this referral link. Prices are the same as normal, however a small portion of your purchase value is referred back to me. Thanks!
Don’t forget to like us on Facebook and join the Flickr group!
Images and content copyright Ming Thein | mingthein.com 2012 onwards. All rights reserved
What is street photography?
November 2, 2012 by

Calling in to check if the city is really there. Sony RX100
Sometimes, I think I’m a bit of a masochist. I actually like to shoot difficult subjects, and increasingly of late I’m also starting to write a lot about difficult topics. Today’s article seems like a very simple question to answer: what is street photography?
The more I try to nail it down – and I spent a considerable amount of time on this before the Finding Light workshop – so I would know what to cover, and more importantly, what my students would expect me to cover. The first point of confusion comes when you try to decide what is ‘street’ and what isn’t: what about public spaces? What about museums, galleries, fora etc? Stairs? Restaurants? Hawker centers? Public transport, like the Underground?
And here’s another question: does street photography always have to have human subjects in the frame? And when does street photography turn into travel reportage?
You can see how this becomes confusing. I’ve decided that in general, the genre is loosely defined around several broad guidelines (at least for me; your mileage may vary). Let’s take a closer look at these.

Hands up. Leica V-Lux 3.
Street photography is unplanned.
If you’re controlling any of the elements in the scene, then it starts to become a conceptual or even outdoor studio shoot – posed models in public definitely do not count as street photography: the photographer knew (or should have known) exactly what poses, look and lighting he wanted before beginning the shoot. (You certainly wouldn’t hire a model and get shooting permission if you had no intention to shoot there, would you?) There is also a reactive element to it – spontaneity and the ability to anticipate are both critical tools for the street photographer. You really never know what you’re going to get on any given day, and that’s what draws photographers to the genre: a never-ending source of material.

Breakfast. Sony RX100
Street photography mostly uses available light.
In fact, the only exception I can think of to this rule is the work of Bruce Gilden and his imitators. Setting up lights on the street corner or using a big flash tends to make the photographer extremely conspicuous, which that removes the unplanned element. People either go out of their way to be photographed, or alternatively, avoid you completely. Part of the challenge and attraction to street photography is the very fact that the light, amongst other things, is not under your control. A photographer has to train their eye to see interesting light, and their muscle memory to be able to take advantage of it – sometimes under extremely fleeting circumstances.

Rojak. Sony RX100
Street photography may or may not involve people.
This is a question of scale; at the near or human scale, you have that which are dominated by people as the primary subject; at the large scale you have entire cityscapes and street scenes, that use people to give context and scale to the image. The farther away you go, the more the image becomes about the atmosphere and the feeling of the place, rather than the people who inhabit it. That said, there is no reason why you cannot take photos of something which you happen to see while walking around looking for these scenes or people; this is the kind of thing which I like to call ‘street furniture’ – interesting lampposts, mail boxes and other geometries are also fair game. I think it is also possible to make an argument to include casual architecture in the genre; I know that when I travel, I tend to shoot a lot of interesting buildings with or without human context involved – simply because these are things I see while walking around, and they add a lot to the context and general feel of a place.

Morning papers. Sony RX100
Street photography, if involving people, tends to do so under situations where they generally do not expect to be photographed.
I suppose this sounds both a little bit voyeuristic, and slightly contradictory when it comes to frequently photographed public tourist attractions such as Trafalgar Square, but in general even though a person may know that you are photographing them, they certainly didn’t leave the house preparing for in the morning. This variety and unpredictability of people is yet one more aspect of what makes street photography interesting.

Door symmetry. Sony RX100
Street photography, if involving people, generally has subjects that are unfamiliar or unknown to the photographer.
Perhaps this may be an overly fine distinction to make, however if a subject is known to the photographer and the photographer is familiar with the subject, there is usually some form of interaction between them. This relationship is usually clearly reflected in the photograph. I personally find that one of the things that makes street photography interesting is the fact that for that brief moment while you’re photographing somebody, there is that instant of connection between you and your subject which is then preserved for posterity – even if you never happen to see them again.

Sometimes, smaller is better. Sony RX100
Street photography must always have a subject, regardless of any of the above restrictions.
This rule is a fundamental of photography in general, not just street photography. However, I feel it necessary to draw attention to this specifically because there are so many images out there on the Internet which claim to be ‘street photographs’ – yet they fail fundamentally as photographs because they lack a clear subject or idea. Even though the photograph itself may not be planned, this does not mean that you can’t have an idea in the instant instant when you see a potential frame, which is then executed immediately.

Evening. Sony RX100
Street photography must observe certain ethical restrictions.
This is very much a personal thing. There are certain people or things that I will not photograph because I do not feel comfortable doing so. In general however, a good rule to go by is not to do to other people what you would not want done to you; this includes intrusion into personal space, photographing people in potentially compromising positions, or under duress. I do not believe in taking photographs of the homeless, because I feel this is both exploitative and does not help them in any way. Similarly, paying somebody money to take their photograph may be an acceptable way to make a living in certain countries where there is no choice, however this is not something I want to encourage because I feel that widespread proliferation of this both discourages social documentary as well as taking away from the authenticity of the image.

Christo comes to Kuala Lumpur. Sony RX100
Street photography has an element of reportage or the documentary to it.
Given that a strong photograph must have a distinct subject and a clear idea, the easiest way to do this in a street photography image is by capturing a moment. This is where HCB’s idea of the decisive moment becomes critical; in that one moment, all of the elements in the frame come together to tell a story. There is only one decisive moment for each story, but many possible stories for any given scene. If all street images have a story to them, then becomes clear that what we street photographers are collectively doing is capturing daily life for posterity. In areas where the pace of change is increasingly rapid – especially in developing countries – I feel there is a certain element of social responsibility here for all able photographers. (Or, at very least, the desire to show your descendants what life was like during your time.)

Outside the W. Leica M9-P, Zeiss ZM 2.8/28
Street photography is not restricted to black and white.
There are many reasons why historical street photography was done in black and white; most of them because that was either the only film available, or because it was a lot cheaper than color – especially in the quantities that prolific street photographers tend to shoot. Today, I sometimes get the feeling that black and white is overused as a distraction to cover up the fact that the image itself is fundamentally mediocre. Instagram certainly does not help things. Is important to remember the fundamental rules of color and composition to decide when black and white or color may be more appropriate. (Black and white works well for strong luminance contrasts and oblique lighting; color should be used when it is the primary means of isolation of your subject.)

Looking up. Leica M9-P, Zeiss ZM 2.8/28
Street photography takes place in public spaces.
In a private, or restricted access space, the people who use the space tend to be known to each other, which changes the dynamics of interaction between them (and the photographer). Public spaces maintain a degree of unpredictability simply because you never know who is going to be your subject.
Street photography doesn’t always have to have a purpose, but each image must aim to say something.
In fact, most photographers tend to shoot in the street genre simply because they feel like going out to photograph, but may not necessarily have any specific subjects in mind; I do this all the time. This of course does not mean that week images are acceptable!

Contemplating the markets. Leica M9-P, Zeiss ZM 2.8/28
Street photography doesn’t require you to fill the frame with a random stranger’s face.
One of the common misconceptions is that street photography always requires a clearly identifiable stranger or or person dominating the frame; let’s take a step back and think about the way we perceive the world when we are out walking on the streets. Our eyes scan around us, taking in the entire scene, and this generally corresponds to something around the 28mm field of view. It is very rare that our attention lingers on any one particular person or point, unless they are strikingly outstanding. Personally, my photographic style is developing in a direction that makes me want to replicate and reconstruct what I see both in reality altered by the filter of my mind’s eye, which means that the perspective I choose to frame my images tend to correspond to what I see. These tend to take one of two distinct perspectives, the first of which is slightly wide, corresponding to my general field of view; the second is narrower, akin to when you are focused on something and the rest of the scene gets ignored – 28, and 85mm.

Escape route. Leica X2.
Street photography can be done with any equipment.
Although there are some cameras that are better suited to street photography than others, there is really no reason why you can’t use anything you happen to feel like using on the day. There are two ways of shooting street; the first is always to be set up and ready, which requires you to preset focus and exposure and work solely on framing at the instant of capture; the second is to be reactive and have a camera that is capable of both focusing and exposing very quickly. However no matter how fast the camera, a degree of anticipation is required in order to capture the decisive moment – there will always be some lag between you seeing the moment, due process happening, and the shutter firing.

Shadows. Leica M9-P, 35/1.4 ASPH FLE
Street photography and travel photography are largely interchangeable.
The only difference between the two is purpose and intention: the former can be when you are shooting with no specific goal or project in mind; the latter is almost always when you want to capture the feeling or mood of a place that happens to be both unfamiliar to you and fleeting or temporary; there’s a time limit on how long the photographer has to absorb and observe. That also introduces a perspective difference: when you travel, you look at a place through different eyes than a local; however, most street photographers operate primarily in their home cities.

Bangkok bus. Leica M9-P, 35/1.4 ASPH FLE
Having broken down my thought process in this article, I’m actually no longer sure that there is a concrete definition of street photography. At the same time, I don’t think that it should be a catch-all genre for everything else that doesn’t have its own category. Perhaps the simplest, and most accurate, definition is simply to think of it as ‘reporting on life’; through our images we are documenting the daily life of the people around us. I wouldn’t go so far as to think of ourselves as social anthropologists, but who’s to say what these extensive collections of images – assuming they survive – may be used for a few hundred years from now? MT
____________
Visit our Teaching Store to up your photographic game – including Photoshop Workflow DVDs and customized Email School of Photography; or go mobile with the Photography Compendium for iPad. You can also get your gear from B&H and Amazon. Prices are the same as normal, however a small portion of your purchase value is referred back to me. Thanks!
Don’t forget to like us on Facebook and join the reader Flickr group!
Images and content copyright Ming Thein | mingthein.com 2012 onwards. All rights reserved
Photoessay: Tokyo monochromes
November 1, 2012 by
This set is a whole bunch of little snippets of life from around Tokyo – mostly Shibuya, Shinjuku and Ginza. I’ve tried to get into the Japanese style of street photography/ reportage a little; the intentional chaos is somewhat unnerving to my perfectionist nature and definitely not so easy to replicate. Still, I think I got just enough of an influence in there to get something different to my normal work. MT
This set was shot with an Olympus OM-D, ZD 12/2, 45/1.8 and Sony RX100. As usual, click on any image to go to its Flickr landing page; EXIF data is intact on the right hand side link.

Shadow of a head

Look before you leap

Untitled

Diagonal
Trapped

Meditation nap

Lines I

Lines II

Overpackaged

Ginza reflections

Confidence

Bad boy I

Bad boy II

Just another afternoon in Shibuya
____________
If you enjoyed this post, please consider supporting the site via Paypal (mingthein2@gmail.com); Ming Thein’s Email School of Photography – learn exactly what you want to learn, when you want to learn it or learn how to achieve a similar look with our Photoshop workflow DVDs. You can also get your gear from Amazon.com via this referral link. Prices are the same as normal, however a small portion of your purchase value is referred back to me. Thanks!
Don’t forget to like us on Facebook and join the Flickr group!
Images and content copyright Ming Thein | mingthein.com 2012 onwards. All rights reserved


