Watch photography with the Olympus OM-D, and thoughts on its use as a backup system

_5001608 copy
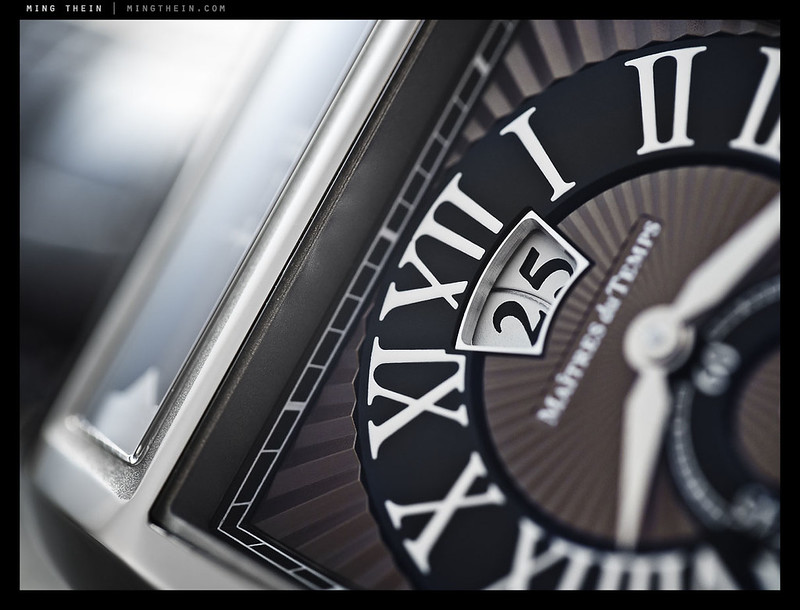
The Maitres du Temps Chapter Two Tonneau China special edition.

For a system to be able to serve as backup, it must fulfill one important function: the ability for me to continue working with it and delivering images if my main system should fail for any reason. And it should be able to cover all genres of what I shoot, without too many workarounds or compromises. The obvious choice would of course be to buy two of the same camera, but a) where’s the fun in that, and b) sometimes it’s also useful to have a different camera system to give you other shooting options not available from your primary.

_5001346 copy

For the past couple of months, I’ve been shooting with the Olympus OM-D for most jobs which do not require special purpose lenses (e.g. tilt shifts) or huge resolution; the Nikon D800E of course covers everything else. What I’ve found so far is that from a usability and image quality point of view, the camera has no problems delivering the goods consistently; the only exception being a peculiar lockup problem that only happens if you use the Fn1 button to zoom into an image after shooting, then hit the protect button if you’re in the screen with the zoom toggle slider on one side. Unfortunately that does seem to be part of my workflow, but I’m learning to avoid it.
_5001447 copy

The biggest question, in my mind, was whether the system was a viable alternative to the D800E for doing watch work – rather important, given that this is the majority of what I do commercially. I acquired a Panasonic-Leica 45/2.8 Macro Elmarit (yes, a review is in the works) for this purpose. Suffice to say – the lens isn’t the limiting factor at all, it’s pretty darned awesome (and one of the better macro lenses I’ve used, actually).

_5001632 copy

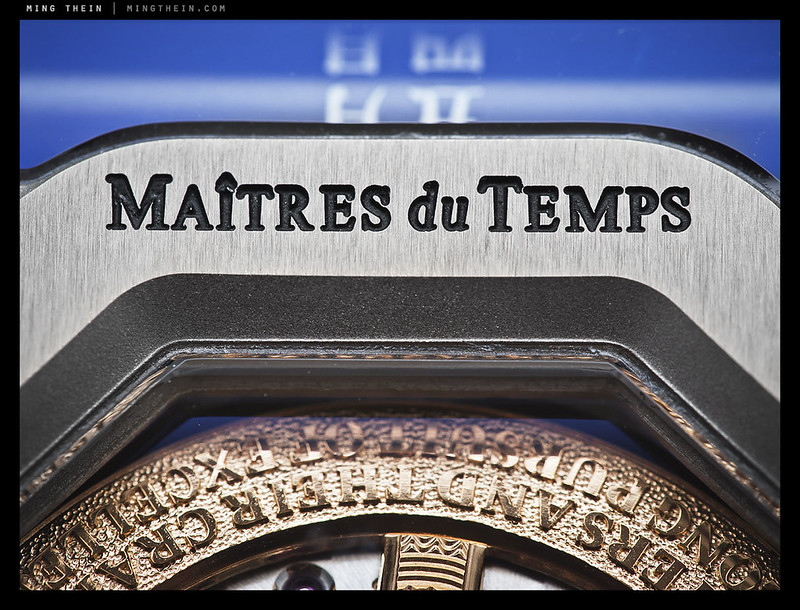
Although Olympus does have a wireless flash system (FL36R, FL50R and FL500R) which is IR-triggered like Nikon and Canon’s systems, I wasn’t about to buy another set of speedlights, and certainly not about to carry them around along with the primary system, too. Fortunately the Nikon SB900s I use have a SU4 optical slave trigger mode – with manual flash power, of course. I used this and manually set the output levels. Yes, it’s much slower than using iTTL and dialing in adjustments directly through the camera, but it works.
_5001532 copy

All in all, as you can see from the images here, I think the results are pretty darned good – my client didn’t say anything about the file quality, or lack of it; the OM-D’s files interpolated very cleanly to 25MP and their required resolution.

Depending on what I shoot, I’ll carry the OM-D body and 12mm and 45mm macro lenses, or just the 45; the 20/1.7 rides along as a body cap. One nice thing is its ability to use the Zeiss ZF glass I’ll normally carry for my D800E via an adaptor, so I don’t even have to carry the 45 and 20mms if I’ve got the 50/2 Makro-Planar and 21/2.8 Distagon.

One note of caution – during my recent Hong Kong workshop, the camera decided to stop working in a very humid environment (light rain, probably 90-95% humidity) and didn’t come back to life again until being dried out in air conditioning and with a few blasts from a hair dryer for good measure – so they’re probably not as well weather sealed as they claim. It continued to work intermittently for a few days afterwards, with menus self-navigating (as though one of the buttons was shorted out) before working normally thereafter. Odd. MT

The Olympus OM-D in various configurations is available here from B&H and Amazon.

____________

Visit our Teaching Store to up your photographic game – including Photoshop Workflow DVDs and customized Email School of Photography; or go mobile with the Photography Compendium for iPad. You can also get your gear from B&H and Amazon. Prices are the same as normal, however a small portion of your purchase value is referred back to me. Thanks!

Don’t forget to like us on Facebook and join the reader Flickr group!

appstorebadge

Images and content copyright Ming Thein | mingthein.com 2012 onwards. All rights reserved

On Assignment: Time factors and big magnets

_8018601 copy
MRI machines are a lot thicker than they look on TV. Nikon D800E, Zeiss ZF.2 2.8/21 Distagon

I’ve shot for hospitals before, though not under these conditions. The day – well, night – before the shoot, I didn’t know I was going to be shooting the next day. Turns out that the hospital ordered a new MRI machine, at a cost of just RM13,000,000 – making it by far the most expensive object I’ve ever photographed. Here’s a bit of background on MRI machines: they’re so heavy that the room has to be purpose built to accommodate it, and the machine settled in then the rest of the place completed around the outside. (The control booth wasn’t operational or in place when I went there.) Apparently the magnet has to be cycled when it’s new to run in; during breaks in the cycling when the magnetic field strength dropped to zero was the only time we could go in to shoot it – they never fully turn the thing off. The upshot of all of this was that I had about half an hour to complete the shoot before they had to gas the MRI machine up with helium and start the cycling process again.

_8018659 copy
Inside the donut. Nikon D800E, Zeiss ZF.2 2.8/21 Distagon. Single SB900 with an umbrella outside to illuminate the patient and room. I don’t know why, but I kept thinking of Star Wars whilst I was inside here shooting.

There were about ten shots to complete inside the room – several of the room and machine itself, a few with a patient in it, and a couple with doctor-patient interaction. Needless to say, everything required lights to be brought in; not because ambient wasn’t bright enough, but because even, flat light is great for soothing patients but utterly crappy for providing definition on white objects. I used two SB900 speedlights for this shoot, triggered by the built in on my Nikon D800E. One was the main key light on a stand using an umbrella, and the other was placed to provide background fill. Whilst they work fine with line of sight, I do find myself wanting to hide them in ever more creative places; the inside of the MRI’s donut hole being one. I think I must be one of the few people to ever stick a flash inside an MRI machine. Perhaps I’ll pick up a set of Pocket Wizards at some point.

Half an hour and one haematoma on my finger later (I clipped it between the leg joins of my Gitzo while rushing to pack up) – good thing I was at a hospital – we were done. Possibly the most rushed shoot I’ve ever done, but also rather fun.

_8018592 copy
The Mammomat. Has a rather neat carbon fiber um…rack tray, too. Nikon D800E, Zeiss ZF.2 2/50 Makro-Planar. SB900 with umbrella from top right. The bluish color is actually a big glass panel that’s part of the machine; it changes color which supposedly helps keep patients calm.

The session actually started off here, in Mammography – it’s challenging to make a room that’s designed to have some separation between the x-ray source and the operator booth look cosy and inviting. And even more challenging was to show the process with a model patient in a way that didn’t reveal any skin.

The trick with lighting here was to balance the mid-warm ambient fluorescent with flash to provide definition and shadows; I shot manual for all of the exposures at about 0.5-1.5 stops under ambient. A SB900 with umbrella behind and above the subject provided face definition, with a second naked one on the floor provided room fill.

_8018569 copy
Showing everything while showing nothing. Nikon D800E, Zeiss ZF.2 2/50 Makro-Planar

____________

Enter our August 2012 competition – Compact Challenge – here!

If you enjoyed this post, please consider supporting the site via Paypal ([email protected]); Ming Thein’s Email School of Photography – learn exactly what you want to learn, when you want to learn it or learn how to achieve a similar look with our Photoshop workflow DVDs.  You can also get your gear from Amazon.com via this referral link.  Prices are the same as normal, however a small portion of your purchase value is referred back to me. Thanks!

Don’t forget to like us on Facebook and join the Flickr group!

Images and content copyright Ming Thein | mingthein.com 2012 onwards. All rights reserved

Clients from hell (or, some light partial humor)

I think a lot of working pros will be able to relate to this list, see the satire in it, and then commiserate with me that I was only partially joking…

Without further ado, in no particular order:

– Those who ask for endless retouching revisions, all of which creep increasingly outside scope – masking out figures to place from a location shot to garnish a text page in a brochure

– Those who haggle price with you til the last cent, then pay late (big companies are notorious for this; it’s as though there’s an internal KPI for creditor days – the higher the better)

– Those who haggle price with you til the last cent, and don’t pay at all

– Those who haggle price with you til the last cent, agree, then question every item on the bill again at payment date whilst of course contesting half of them

– Those who after agreeing price and scope, sneak something in under the pretense of ‘oh, can you also help me out with something small?’ (which is of course neither small nor easy)

– Those who pay for a fixed number of shots but ask for all of the raw files or expect at least 50% more final delivery shots, knowing you’ll produce far more than agreed to ensure the scope is completely met

– Those who ask for uncompressed maximum resolution 16bit CMYK TIFF files, then complain they can’t open them because their computers have ‘insufficient system resources’

– Those who don’t actually pay your work more than a cursory glance before finding one shot they didn’t like in the 200 you delivered, then demanding a discount even though they loved everything else

– Those who specifically look for one image they don’t like, so they can complain to you non-stop about it afterwards so they can get a discount

– Those who think their problems with other unrelated contractors are your fault, and either use that as an excuse as to why they can’t pay, or why they expect more from you

– Those who ask for your style, then hand you a book/ magazine/ menu and say ‘copy this’

– Those who approve every single shot on the camera review screen, then complain that you didn’t give them what they asked for afterwards

– Those who don’t supply any of the agreed props or items

– Those who supply you with objects or food to be photographed that are obviously unpresentable – they may be scratched, dented, cracked, partially eaten, or generally used

– Those who complain that your make the food look overcooked, when in fact that was the way it came out of the kitchen – identifiable by the fact that only the roast looks too dark, but every other object on the plate looks fine

– Those who don’t supply any of the agreed equipment/ props/ garnishes/ sauces/ spare parts

– Those who aren’t on time, and worse still, don’t tell you that they’re running late

– Those who want fully processed and retouched images the day after the shoot

– Those who expect you to reschedule all of your other shoots to accommodate them

– Those who leave all decisions to their creative agency, whose vision is substantially different to their own…you can imagine what happens after that

I’ve just realized that this list isn’t that funny after all, I’ve had some clients who qualify for almost every single item…MT

____________

Visit our Teaching Store to up your photographic game – including Photoshop Workflow DVDs and customized Email School of Photography; or go mobile with the Photography Compendium for iPad. You can also get your gear from B&H and Amazon. Prices are the same as normal, however a small portion of your purchase value is referred back to me. Thanks!

Don’t forget to like us on Facebook and join the reader Flickr group!

appstorebadge

Images and content copyright Ming Thein | mingthein.com 2012 onwards. All rights reserved

On Assignment: The contents of my bag

_5A00585 copy

I thought you may all be curious to see what I’m bringing to Switzerland for my current assignment. Let’s just say there’s a hell of a lot of stuff here:

Primary system:
– Nikon D800E
– AFS 28/1.8G
– AFS 60/2.8 G Micro
– PCE 85/2.8 Micro
– ZM 28/2.8 plus Leica M to Nikon F adaptor

Backup system:
– Olympus OM-D with HLD-6 grip – I plan to do some walking around too, and I don’t want to carry the D800E.
– Olympus ZD 12/2
– Olympus 45/1.8
– Panasonic 20/1.7 G
– Panasonic Leica 45/2.8 Macro
– That little clip on flash thingy to trigger the SB900s in SU4 mode
– Nikon G to M4/3 adaptor

_5A00587 copy

Lighting:
– Nikon SB900 x3
– Custom made perspex diffuser and case, various cards, papers and laminates for backdrops and diffusion.
– Manfrotto 5001B compact light stands plus heads and flash stands x3

Support
– Gitzo GT1542T Traveller 6X carbon fiber tripod
– Manfrotto 468RC0 Hydrostat ball head
– Manfrotto micro positioning rail

IT
– Apple MacBook Air 11″
– Apple iPhone 4
– Western Digital MyPassport 1TB 2.5″ USB drive for backups
– Sandisk Extreme SD/CF USB card reader
– Chargers and universal adaptors

Other accessories:
– Spare batteries and chargers for both cameras
– 8 sets of Sanyo Eneloop AA batteries for the SB9000s
– Two sets of Kenko Pro DG extension tubes
– Adaptor plugs and multi strip
– SD cards; Sandisk Extreme HD 32 GB x4
– MAHA C801D fast AA charger
– Nikon SC-31IR flash deflector panel for D800E built in
– Rocket air blower
– Soft white cloths
– Blu tack
– Duct tape
– Magic tape (for removing dust)
– WhiBal cards
– Small lens pouches

Bags
– Think Tank Airport International v1
– Billingham Hadley Pro, without the internal dividers but with some small lens pouches and a camera wrap, packed into my check-in luggage
– Manfrotto MBAG80P for light stands and tripod

_5A00588 copy

Here’s most of it packed in. What you don’t see is the diffuser case, which is quite enormous and wouldn’t fit into the picture…

____________

Visit our Teaching Store to up your photographic game – including Photoshop Workflow DVDs and customized Email School of Photography; or go mobile with the Photography Compendium for iPad. You can also get your gear from B&H and Amazon. Prices are the same as normal, however a small portion of your purchase value is referred back to me. Thanks!

Don’t forget to like us on Facebook and join the reader Flickr group!

appstorebadge

Images and content copyright Ming Thein | mingthein.com 2012 onwards. All rights reserved

A day in the life of…

For the loyal readers who’ve been with me from the start of this blog, I thought I’d give you all a quick update on how the transition to full time pro is going a few months in. In short: I’m enjoying it, but boy is it hard work. Even during the dark depths of my management consulting career, I don’t think I worked such long hours – and there’s no goof off time either, because you’re always on your own clock. I won’t lie and say that it’s all rosy; there are always days I wake up and worry about the pipeline, or collections, or sudden changes, or even being faced with a challenge that I can’t shoot – but I also think the reality is that these anxieties are normal, and if you don’t have them, then something is wrong (or about to go wrong) because one is being overconfident.

For the curious, here’s how my typical day looks – in this case, I’m using my schedule from 17 May, because I happened to flip to that page in my planner and can still read most of the handwriting:

7.00am: Wake up, hit snooze again.

7.15am: Alarm goes off again. I’m in that half-asleep-half-awake state thinking about what I need to get done for the day. I finally get out of bed when either antsyness (is that even a word?) overcomes inertia, or my wife starts getting ready for work.

7.20am: Poke the polar bear, who’s still sleeping.

7.30am: I’m at my desk and dealing with email. Thanks to the internet, messages arrive at all hours – a quiet day will see perhaps 20 emails when I wake up, over 50 on a busy day. And that’s having cleared out my email just before I went to bed earlier. Some stuff is from clients, some stuff is blog comments, some stuff is reader questions. And there are personal emails, offers for credit cards and personal enhancement pills buried in there somewhere too usually.

8.30am: I’m usually done with replying messages by now. Time to put an upload onto Flickr, and sort things into groups.

8.45am: POTD goes up onto the site, and any amendments that other articles require (I work about a month in advance) are made.

9.00am: Leave for breakfast with a client to pick up a watch to shoot.

10.00am: Back in the studio, begin setup of lighting for the shoot.

10.05am: Clean watch. Microfiber cloths to polish, and Rodico watchmakers’ putty to remove grit and dust from the cracks and crevices.

10.15am: Still cleaning watch. The more cleaning you do upfront, the easier your job is later in the retouching.

10.30am: Finally done cleaning watch; now handled only with microfiber gloves and a filtered blower is used between position changes to remove as much dust as possible.

11.30am: A break for the flashes because they’re starting to overheat; time for new batteries and a drink for the photographer. Download cards onto computer and run a backup.

12.45pm: Finish shooting, download cards again and run a backup. Charge all batteries, clean equipment and stow in dry cabinet. With ambient RH of anywhere between 65 and 90%, you really don’t want to leave anything out and run the risk of a fungus growing on it.

12.50pm: Burn disc of rough preview jpegs for the client to pick from. This was a rush job because it’s a foreign client that happens to be in town, otherwise I’d normally do things via Dropbox.

1.30pm: Lunch with client, delivery of rough images on CD, return watch

3.00pm: Quick coffee with a friend – the coffee is more for my benefit at this point – we share a mutual client (he’s a lawyer)

3.30pm: A serendipitous phone call reveals that another potential client is not only in town, but within the same 500m radius; I manage to squeeze in an appointment for 4.30. Rush back to the studio to get the iPad.

4.20pm: Arrive at meeting location, wait a little; find nearest and coldest air conditioning vent to cool down after rushing.

4.30pm: I’ve got a 15 minute window to pitch; it’s another watch client, so I take him to see the exhibition which fortunately still happens to be running. Turns out he’s seen it, liked the work, but didn’t realize I was the photographer. Note to self: ensure proper signage in future.

4.45pm: We go our separate ways, and I return to the studio/home/office.

5.00pm: Clear email and messages again.

5.30pm: Write an email to a prospective new agent-representative in Singapore; safeguarding the pipeline of future work is always the number one concern for any commercial photographer.

6.00pm: Call another client in Switzerland to follow up retouching details and payment; it’s a good time to call because they’ve had their morning coffee and aren’t quite thinking about lunch yet.

7.00pm: Some light browsing to see what’s news in the world of photography.

7.30pm: Time to think about dinner and spend time with the wife, who’s now arrived home and been patiently waiting for me to get off the damn computer.

9.30pm: Back online again to clear yet more email and write another post; by the time I’m done laying everything out, proof reading, adding images and so on, I’m beat.

11.30pm: Schedule post, look up my stats for the day (ooh, just noticed the site must have crossed the quarter million hit mark sometime in the last few days) and check the to-do list for tomorrow. Realize that on the to do list is ‘buy diary’ – I’m relying on a combination of memory, iPhone reminders and bits of paper, and it’s utterly useless for longer term scheduling.

11.45pm: Climb into bed, try to read a little before sleep; manage about four pages before dozing off. It’s bad if it’s an exciting book, because then I might read until 1-2am and not get enough sleep for the next day.

So, who wants my job? 😛 MT

____________

Visit our Teaching Store to up your photographic game – including Photoshop Workflow DVDs and customized Email School of Photography; or go mobile with the Photography Compendium for iPad. You can also get your gear from B&H and Amazon. Prices are the same as normal, however a small portion of your purchase value is referred back to me. Thanks!

Don’t forget to like us on Facebook and join the reader Flickr group!

appstorebadge

Images and content copyright Ming Thein | mingthein.com 2012 onwards. All rights reserved

Shooting professionally with the Olympus OM-D E-M5

_5003127%20copy
Rice. Olympus OM-D and Panasonic Leica 45/2.8 Macro-Elmarit

I had an interesting food assignment recently, which was challenging for several reasons – not least the location:

_5002420 copy
Doesn’t look so bad? Look again:

_5002274 copy

Turns out this particular client’s restaurant wasn’t ready; the assignment was concept food for the menu, website and marketing materials for a new local chain. So they borrowed the (primitive) kitchen of another friend, who happened to run a small cafe in an office-building-cum-training-center-cum-community-college. The only place they had for me to shoot that was both close to the kitchen and powered (for the lights) was literally off to the side of a hallway! I’ve never thought of photography as performance art before, but judging by the crowds that stopped by to rubberneck throughout the two days, I should probably have charged admission. To be honest though, I was more worried about people tripping over the cables or moving lights, or worse still, equipment going missing. (Fortunately, none of that happened – thanks in no small part to the wonders of duct tape.)

IMG_1850 copy
Setup shot – Apple iPhone 4

In the past, I would have done this shoot with a Nikon FX body, macro lens, tilt-shift, and a few speedlights and umbrellas. After much experimentation with LED panels for both casual work and teaching – I’ve come to the conclusion they’re a much better option for food photography, both enabling you to see straight away the light effects, plus minimize the effects of heat on food – especially important with things like ice cream or raw fish.

I don’t have any questions about the image quality of the OM-D – at base ISO, it’s better than the D700 – but what did concern me was the client reaction to me using a ‘small’ camera, given their expectations and my rates. I even packed a D700 and full set of lenses just in case. However, so far those concerns have been completely unfounded. I’ve mixed in a number of images from the OM-D with a recent submission to a watch client, and they haven’t said anything negative (the bulk of the job was shot with a D800E; the OM-D images were upsized to 25MP) – however, they didn’t see me shoot as I wasn’t working on location.

Fortunately those fears turned out to be unfounded. There was no negative reaction from the client to the camera or image quality. (Though to be on the safe side, I added the HLD-6 to bulk things out a bit – and give me some more battery life.) In fact, I have to say I’m extremely impressed with the color reproduction of the OM-D – after shooting a WhiBal card under the LED panels to lock in the white balance, the images needed almost zero color correction in ACR – this is something I’ve never experienced before. I think the combination of high CRI LED panels and the OM-D for food photography is a revelation, and not having to do extensive color rebalancing work to achieve perfect color saves a huge amount of processing time afterwards. The extended DOF for a given FOV/ aperture combination helped too; f8 was about as low as I could go with the LED panels and still manage 1/90s or so at base ISO. I did bring a tripod along – my shiny new Gitzo GT1542 Traveller which I haven’t had a chance to use yet – but didn’t need it due to the image stabilization and reasonably high shutter speeds.

_5002312 copy
More rice. Olympus OM-D and Panasonic Leica 45/2.8 Macro-Elmarit

A note on the gear used – one OM-D body with HLD-6; the Panasonic Leica 45/2.8 Macro-Elmarit for the majority of the shots, with the Voigtlander 25/0.95 (the near focus ability is extremely useful for food photography, but I’m not so enamored with the wide open performance – review coming soon) for the wider shots; I brought the 12/2 and 45/1.8 just in case, but didn’t land up using either. A D700, 24/1.4, 60/2.8 G Macro and 85/2.8 PCE rode shotgun as backup. In future, I think I’m just going to bring a pair of OM-D bodies and save a lot of space and weight. Battery life on the OM-D was pretty good – not as good as the Nikons (the D700 usually gets me around 700-800 shots per charge with the commander flash firing, or 1000+ with no flash; the D800E is good for 2000+) – but a respectable 650-700 per charge with heavy chimping. One slightly concerning behavior I did see with the OM-D was an occasional lockup – it seems that if I review and zoom in fairly soon after taking the shot, the camera sometimes freezes on zooming out again. Popping the battery from the grip is the only way to solve this. I only see this behavior with the battery grip, and it’s not always repeatable. Hmm. Fortunately, it doesn’t eat shots or corrupt things. I will be following up with Olympus in due course…probably after I’m done processing this assignment, and after next week’s assignment in Geneva.

All in all – a positive experience. I was surprised by how much less fatiguing using the OM-D is for studio work; I always thought I didn’t really notice the weight of a full sized DSLR, but I guess it turns out I do. Even with the HLD-6 and heaviest Voigtlander 25/0.95 – it weighs in at just over 1kg instead of the 1.6kg or so for a D700/D800 and 85 PCE; more if I’m using the vertical grip for those cameras.

Now, time to decide if my second body should be black or silver…MT

A note for all of those complaining my previous images were over sharpened – I think I’ve fixed the problem, but please let me know if they still look off. I can’t do anything about the images already in the system, so there may still be a few that I post in the future that appear a little over sharpened.

____________

Visit our Teaching Store to up your photographic game – including Photoshop Workflow DVDs and customized Email School of Photography; or go mobile with the Photography Compendium for iPad. You can also get your gear from B&H and Amazon. Prices are the same as normal, however a small portion of your purchase value is referred back to me. Thanks!

Don’t forget to like us on Facebook and join the reader Flickr group!

appstorebadge

Images and content copyright Ming Thein | mingthein.com 2012 onwards. All rights reserved

On Assignment: Architecture and the concrete jungle

_DL5T_L1000581 copy

I recently shot a commission for the famous Japanese architecture firm Kenzo Tange Associates – whilst I’d heard of them before and seen their work in Japan, I didn’t realize that they had a number of projects closer to home. Turns out there are four buildings in downtown Singapore – all fairly close together – plus another one or two a little further out, and another under construction. And there are some underway in Kuala Lumpur. The scope of this assignment was to get a variety of general exterior views of the buildings during the day, at night and in the context of their environment.

_DL5T_L1000547 copy

Architectural photography has always been something I’ve done out of personal interest – followers of this site or my flickr page will undoubtedly have noted my predilection for geometry, abstracts and general building form. The interplay of light, shadow, texture, and how the building sits in its environment are something that I pay perhaps an unhealthy amount of attention to. You just know if the design is balanced and ‘feels right’ by looking at whether it dominates the surrounding landscape, if it disappears and looks insignificant, or whether it looks comfortable.

_DL5T_L1000615 copy

That said, although Singapore is an interesting architectural environment – there are a lot of modern, different cutting edge designs and a huge variety of facade treatments (that’s what happens when you have a lot of money flowing into the country; notably most of the places that spend big on their real estate are banks and malls – go figure) there’s also not a huge amount of landscape left to dominate (and that’s what happens when you’re a small island). This of course means that the dominating landscape is urban and of very high density; from a photographic point of view, this presents a huge number of challenges because of lines of sight and vantage points, not to mention permits, access and the like – you’ll need permits to shoot from somebody’s property, even if you’re not taking photos of their property itself.

_DL5T_L1000539 copy

Since real estate is expensive, everything is high rise. The challenge then becomes perspective: how do you find the right position to get a perspective that somehow looks natural, but at the same time isn’t blocked by a huge amount of other stuff? It all depends on location. Some buildings can be shot from their plazas with a wide angle (though this is quite conventional and boring); across the street from another building’s rooftop (if the height is right, and the street is wide enough); or much further down the street with a telephoto. Ideally, you’d want a helicopter at low height and a telephoto, but that isn’t practical most of the time.

_DL5T_L1000573 copy

Perspective is very important here because anything too wide will look unnatural; this isn’t how the eye sees it. I find when shooting architecture that the best results aren’t from extreme angles: they’re from natural perspectives and details; you want to be able to appreciate the building from a human perspective, because that’s how and why the damn thing was designed in the first place. It’s great if it makes a stool for King Kong, but an architectural failure if the podium steps are too high for people to climb easily.

_DL5T_L1000625 copy

That said, shooting in tight confines requires you to get creative. Although you do want to see the whole building, there’s nothing wrong with focusing in on the details and going for some degree of abstraction; I’m sure every architect wants the attention to detail in their work to be seen. I know I would.

_DL5T_L1000610 copy

For this assignment, I shot exclusively Leica; their M wide angles are superb, and much superior to anything available for the Nikon F system, though the Zeiss 21/2.8 runs pretty close. The other reason why I went with the Leica system was weight: there’d be as lot of moving around on foot to get the best angles and unique perspectives, which means schlepping everything around like a mule. Lightness is your friend. Oh, and don’t forget that the heavier your camera, the more rigid (and thus, heavier) your support needs to be.

_DL5T_L1000564 copy

Sadly, there are no tilt-shift lenses for Leica M; in any case, they wouldn’t have been wide enough in some of the quarters I was working in. I used the new 21/3.4 Super Elmar ASPH M with finder, 35/1.4 ASPH FLE and 50/0.95 ASPH. In hindsight, the noctilux was not the best choice for this – not because of its optics, but because I never used anything larger than f5.6 (you do want everything in focus, and critically sharp, everywhere). I wanted the 50/2.5 Summarit, but turns out it was on loan already. Oh well. The 21 and 35 performed superbly, as expected. In fact, I was surprised by just how good the 21 was – even wide open, in the corners. I think I’ll need to do a full review of this lens in future. Suffice to say, if you don’t need the f1.4 speed of the ‘lux – it’s a no-brainer. (Aside: I owned and shot with the 21/1.4 ASPH as my primary lens extensively during the M8 days, on which it became a handy fast 28mm; however, it wasn’t great for architecture because of the distortion and ever so slight field curvature. Also, overkill when you need f5.6 and smaller.). A D-Lux 5 Titanium rode shotgun for spontaneous shots and the B-roll for this article (due to licensing reasons, I obviously can’t use the original images.) I also used the S2, 30mm and 70mm lenses for some of the daylight work.

_DL5T_L1000540 copy

On the support side, I used my old Manfrotto 444 Carbon One – I think this thing must be at least ten years old by now, if not more. I got it used from a friend. Whilst it’s rigid and relatively light, I’d still like something lighter for travel – especially if I’m not putting anything heavier on it than a Leica M. Perhaps one of those Gitzo 00 series things. The problem is I can’t justify one because I do so little tripod work. The head – very important – was my favorite Manfrotto 468RC2 Hydrostat bullhead. This thing is amazing: it locks at any angle, with no ‘droop’ – either it’s locked, or it isn’t. As far as I know, it uses some sort of vacuum system and teflon rollers, but I haven’t needed (or wanted) to take it apart.

_DL5T_L1000523 copy

I can’t help but wonder if a V-Lux 3 with it’s excellent 24-600mm lens and a much lighter tripod would have been a better way to go – perhaps something to experiment with in future. All cameras are more than capable of deliverin the required results at base ISO and shooting RAW, anyway.

One final note about processing: to maintain optimum quality throughout the tonal range, I shot at base (160) ISO and did something I rarely do and used a two-stop HDR on the night shots – there’s simply too much difference between the spotlit parts of the building and the deep shadows – easily four or five stops. There are right and wrong ways to use HDR, and that’s a discussion I’ll save for a future article. MT

This post was brought to you by Ming Thein’s Email School of Photography – learn exactly what you want to learn, when you want to learn it. Don’t forget to like us on Facebook!

Opening night of my joint exhibition with Jaeger Le-Coultre and Leica

_7063611 copy

Last night was the grand opening party for my exhibition of fine art watch photography at Starhill Gallery, Kuala Lumpur, Malaysia. Pending any unforeseen changes, the images should be up for the next month on the first (Adorn) floor, and were co-sponsored by Jaeger Le-Coultre and Leica. Some images from the launch party follow.

For my KL readers, I’ll also be on radio – a short interview – on Friday, 4th May at 1.45pm on BFM 88.9. For everybody else, there’s a podcast on bfm.my. MT

Sorry, no POTD today – was trying to rush these out for today’s post.

Some images courtesy KH Yeo (D700, 24/1.4) and myself (M9-P, 35/1.4 ASPH FLE).

[Read more…]

On assignment and studio review: Watch photography with the Leica M9-P

We photographers are a strange lot: sometimes we make our lives difficult when there’s absolutely no need to. I recently shot a watch photography assignment using a Leica M9-P, of all things. (This setup has been the subject of another post, here)

You probably know that my usual rig for this is a Nikon with a whole bunch of extension tubes. Why did I do it, you might ask? See the end of the post for the answer.

Let’s start back-to-front, with a few highlights from the results:

_M9P1_L1013948 copy
Deep Sea Chronograph.

I would conservatively say that this was the most difficult shoot I’ve ever done, and the only one that required the services of an assistant – normally, I find they just get in the way and it’s much faster for me to do what needs to be done rather than have to explain it. Firstly, this rig is one which does not focus to infinity, is entirely manual, and is both heavy and unwieldy. Put one finger wrong and you’re liable to make a hole in the bellows, which being the better part of half a century old, is extremely fragile. (The mechanical parts are still in amazingly good condition though, and operate very smoothly.) You need to set magnification first – also restrictive, between about 2.5:1 to 1:2 only (with the Visoflex and 90/4 only) – then move the entire rig to frame – and because it’s unwieldy, you can’t do this handheld. I made a kind of gimbal head out of a Manfrotto 468RC0 Hydrostat head tilted at 90 degrees, to which was vertically mounted a Manfrotto geared focusing rail, with the rail on the Bellows II attached at right angles to that – which allowed me tilt and yaw motion, and precise front/back and up/down movements. Slow going – there were ten adjustment points on support system alone, to say nothing of photographic controls – but accurate.

_M9P1_L1013352 copy
Duometre a Quantieme Lunaire 40.5

Secondly, the Visoflex prism obviously blocks the M9-P’s hotshoe, ruling out the use of flashes – at least by any conventional means. With a custom-fabricated cable (read: a hotshoe cover with holes made in it to thread through speaker wire, which was then soldered to the contact points of a donor slave – in this case, a Nikon SB700), it was possible. The slave flash would fire at minimum power and trigger the other flashes in SU4 optical slave mode. Optical slave mode is a polite way of saying 100% manual – so it’s either light meter (which I don’t have) or experience (which I do have, from shooting the same thing with slide film). My assistant would run from flash to flash poking buttons and turning wheels in response to cryptic instructions like “top, up one; back, thirty-two and fifty millimeters, up ten degrees; kill the right one.”

[Translation: Top flash, increase power by one stop. Back flash, change power to 1/32 and zoom head to 50mm, tilt the head up ten degrees. Turn off the right flash.]

_M9P1_L1014200 copy
Amvox World Chronograph

It was a near thing. The entire job relied on a single critical part: that sync cable. At one point, there was an internal short somewhere which either kept the flash firing frequently enough to trigger epilepsy, or not firing at all. And to compound things, I suspect the trigger voltage of the hotshoe and flash didn’t agree, which would occasionally cause the M9-P to not fire its shutter at all. And then the Visoflex jammed…let’s just say the Victorinox earned its keep on that day.

_M9P1_L1013260 copy
Duometre a Quantieme Lunaire 40.5

It took me just over nine hours to make a final cut of 80 photographs – which is excruciatingly slow, considering I’ll normally do three times that number in two thirds of the time. Most of the delay was due to moving and setting the camera, or fine-tuning the flashes.

_M9P1_L1013409 copy
Duometre a Spherotourbillon

However, I think this conclusively proves that the Leica M system is a lot more versatile than most people think. Now, if only Leica would produce modern versions of these accessories – and perhaps something to trigger a flash. I don’t think most people have any idea how difficult it is to find a Bellows II-screwmount to Leica M adaptor until you look…

_M9P1_L1014513+28 copy
Master Ultra Thin Reserve de Marche

One quick comment on image quality: the 90/4 Macro-Elmar is a superbly sharp lens with great micro contrast, if you use it in the optimal range. At maximum aperture (f4), there is very visible chromatic aberration – both longitudinal and lateral. Stopped down between f5.6 and f11, it’s superb. At f16, diffraction suddenly kicks in – there’s a huge difference between f13 and f16, it’s as though somebody has run a Gaussian filter over the entire image. (I think at this magnification it’s probably closer to f32, though). I wouldn’t even go near f22. I had to pay careful attention to lighting with the M9, for the simple reason that its dynamic range is probably 2-2.5 stops less than the D800 at base ISO. All in all though, I think you’ll agree that the combination is capable of some spectacular results – even more impressive considering that it was never designed for this.

leicamacro01

Because we photographers have a particularly odd fascination with checking out other people’s equipment, I’m going to leave you with some gear shots. I will also say that if anybody is in the market for a tripod head, the Manfrotto Hydrostat series is truly excellent – it’s the only head I’ve ever used that doesn’t exhibit any ‘droop’ when locking down the head, no matter the weight or magnification of the camera and lens combination attached. It’s rock solid.

leicamacro02

leicamacro05

Yours truly at work. (You’ll notice I’m not using the tripod here; I put it aside for the further-away shots of whole watches.)

leicamacro06

My exhibition of fine art horology sponsored by Jaeger Le-Coultre and Leica will be on display at Starhill Gallery, Bukit Bintang, Kuala Lumpur from 3 May onwards – please drop by if you’re in town! If you let me know in advance, I’ll try to give you a personal tour. MT

____________

Visit our Teaching Store to up your photographic game – including Photoshop Workflow DVDs and customized Email School of Photography; or go mobile with the Photography Compendium for iPad. You can also get your gear from B&H and Amazon. Prices are the same as normal, however a small portion of your purchase value is referred back to me. Thanks!

Don’t forget to like us on Facebook and join the reader Flickr group!

appstorebadge

Images and content copyright Ming Thein | mingthein.com 2012 onwards. All rights reserved

One man’s detail is another man’s retouching nightmare

Untitled-1 copy
The editing suite. Maitres du Temps Chapter 2, Nikon D800, 60/2.8 G Micro

At 100% view on a 15″ MacBook Pro, (1440x900px) note the little red box in the navigation pane at top right: this is how much (how little?) of the whole image you can see at once. Let’s just say that retouching takes a lot longer when you’ve got this many pixels, and the product has to look perfectly flawless. I of course have to remove my reflection from the watch crown – you could probably tell what lens I’m using, since the 60/2.8 G has a fairly distinctive front (small element, big vanity plate, no markings). MT