Photoessay: Paris part three: some architectural cliches

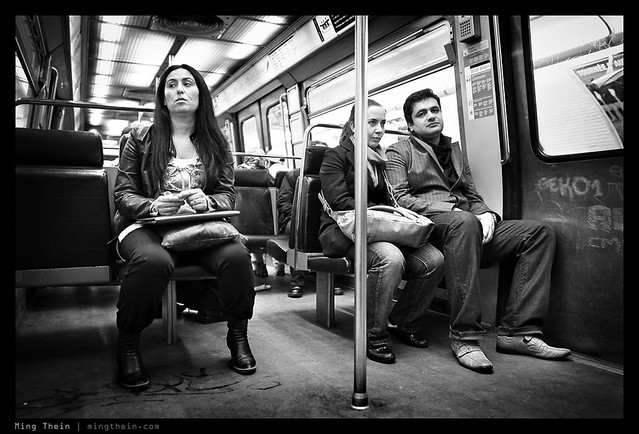
Finishing this three-part series on Paris are some architectural shots and general cityscapes; the grandeur, oldness and overall feel of the place is something that’s evident the moment you start walking around. Capturing the atmosphere in a photograph of a relatively static scene that both invokes some feeling (and not a postcard) isn’t so easy to do; there are only so many angles of the Eiffel tower that work compositionally.

This series shot with a Leica M8, 21/1.4 ASPH and 50/1.1 in 2009, except for the Eiffel Tower shot which was with a D200 and 17-55 in 2007.

_M8_L1025381bw copy

_M8_L1025982 copy

_M8_L1025414bw copy

_M8_L1025232 copy

_M8_L1025256bw copy

_M212668bw copy.jpg

_M8_L1025318 copy

_M8_L1025915 copy

_M8_L1025340 copy

_M8_L1025554 copy

_M8_L1025970bw copy

_M8_L1025374 copy

_M8_L1025394 copy

_M8_L1025272 copy

____________

If you enjoyed this post, please consider supporting the site via Paypal (mingthein2@gmail.com); Ming Thein’s Email School of Photography – learn exactly what you want to learn, when you want to learn it or our Photoshop workflow DVDs.  You can also get your gear from Amazon.com via this referral link.  Prices are the same as normal, however a small portion of your purchase value is referred back to me. Thanks!

Don’t forget to like us on Facebook and join the Flickr group!

Photoessay: Paris part two: the streets, in B&W

Part two continues with a series from my last visit; focusing on the people of Paris. This is a place where hyperfocal shooting, honing your distance-estimation skills and shooting like a stealth ninja are the order of the day.

This series shot in 2009 with a Leica M8, the 21/1.4 ASPH and Voigtlander 50/1.1.

_M8_L1025697bw copy

_M8_L1026180bw copy

_M8_L1025793bw copy

_M8_L1025458bw copy

_M8_L1025280bw copy

_M8_L1025308bw copy

_M8_L1026056bw copy

_M8_L1025558bw copy

_M8_L1025296bw copy

_M8_L1026350bw copy

_M8_L1025617bw copy

_M8_L1025748bw copy

_M8_L1025435bw copy

_M8_L1025455bw copy

_M8_L1026132bw copy

____________

Visit our Teaching Store to up your photographic game – including Photoshop Workflow DVDs and customized Email School of Photography; or go mobile with the Photography Compendium for iPad. You can also get your gear from B&H and Amazon. Prices are the same as normal, however a small portion of your purchase value is referred back to me. Thanks!

Don’t forget to like us on Facebook and join the reader Flickr group!

appstorebadge

Images and content copyright Ming Thein | mingthein.com 2012 onwards. All rights reserved

Photoessay: Paris part one: color vignettes

One of the spiritual homes of street photography, Paris is actually quite a challenging environment to shoot in – partially because the people are rather unfriendly, and because the urban space itself isn’t really human scale. The left bank is much more conducive to shooting.

This series is a mix of images from 2007 and 2009; shot with a Leica M8, 21/1.4 ASPH, 50/1.1 and Nikon D200 with 17-55/2.8.

_M8_L1025466 copy

_M8_L1026299 copy

_M8_L1026229 copy

_M8_L1026085 copy

_M8_L1025241 copy

_M8_L1025305 copy

_M212811 copy.jpg

_M8_L1025260 copy

_M212319 copy.jpg

_M8_L1025741 copy

_M8_L1026176 copy

_M8_L1025475 copy

____________

Visit our Teaching Store to up your photographic game – including Photoshop Workflow DVDs and customized Email School of Photography; or go mobile with the Photography Compendium for iPad. You can also get your gear from B&H and Amazon. Prices are the same as normal, however a small portion of your purchase value is referred back to me. Thanks!

Don’t forget to like us on Facebook and join the reader Flickr group!

appstorebadge

Images and content copyright Ming Thein | mingthein.com 2012 onwards. All rights reserved

Photoessay: Hong Kong life in monochrome

The first set from my recent Hong Kong and Macau workshop. Click for larger versions or EXIF data via the flickr landing page. Enjoy! MT

Images shot with a Leica M9-P, Zeiss ZM 2.8/28 Biogon, ZM 2/50 Planar, Olympus OM-D and 45/1.8.

_M9P2_L1000243bw copy

_M9P2_L1000655bw copy

_5006315bw copy

_5006438bw copy

_5006253bw copy

_M9P2_L1000041bw copy

_M9P2_L1000348bw copy

_M9P2_L1000288bw copy

_M9P2_L1000109bw copy

_M9P2_L1000005bw copy

_5006205bw copy

_M9P2_L1000310bw copy

____________

Enter the August 2012 competition: Compact Challenge – here!

If you enjoyed this post, please consider supporting the site via Paypal (mingthein2@gmail.com); Ming Thein’s Email School of Photography – learn exactly what you want to learn, when you want to learn it or learn how to achieve a similar look with our Photoshop workflow DVDs.  You can also get your gear from Amazon.com via this referral link.  Prices are the same as normal, however a small portion of your purchase value is referred back to me. Thanks!

Don’t forget to like us on Facebook and join the Flickr group!

Video: A B&W workflow tutorial

After the series of articles on color and B&W – and of course the M-Monochrom review – I got a huge number of emails asking about my workflow for B&W conversion. I originally tried to put this post into a conventional text and image format, but gave up shortly after I realized it would be impossible. Instead, have a video! I don’t claim to be any good at video production (forays into this are are another topic for another day), but I think this should give you a good idea of how it all comes together. Excuse the lousy sound, that bit I still haven’t quite gotten figured out yet. I suppose I need some collar mics or something – the equipment buying never ends…

Anyway, enjoy the video. MT


____________

Visit our Teaching Store to up your photographic game – including Photoshop Workflow DVDs and customized Email School of Photography; or go mobile with the Photography Compendium for iPad. You can also get your gear from B&H and Amazon. Prices are the same as normal, however a small portion of your purchase value is referred back to me. Thanks!

Don’t forget to like us on Facebook and join the reader Flickr group!

appstorebadge

Images and content copyright Ming Thein | mingthein.com 2012 onwards. All rights reserved

More street images from the Leica M-Monochrom

This series shot with a Leica M-Monochrom and the 35/1.4 ASPH FLE.

_MM1_L9995549bw copy

_MM1_L9995517bw copy

_MM1_L9995575bw copy

_MM1_L9995505bw copy

_MM1_L9995560bw copy

_MM1_L9995552bw copy

_MM1_L9995548bw copy

_MM1_L9995522bw copy

_MM1_L9995506bw copy

_MM1_L9995538bw copy

POTD: When color might have been preferable

_MM1_L9995527bw copy
Postmen. Leica M-Monochrom, 35/1.4 ASPH FLE

One of those times where color would actually have been better. The bright blue and red uniforms of the motorbike postmen in this shot stood out well against the gray tarmac…I reached for a camera instinctively, nailed focus and exposure, but didn’t realize I was holding the M-Monochrom instead of the M9-P! Still, the geometry of this shot is its saving grace, I feel.

Today is going to be a busy day. Many people wonder what photographers do in the time they’re not shooting – well, here’s my schedule:

1. Client meetings
2. Test prints from M-Monochrom, 50 APO and D800E for clients, and if I have time, a quick article/ note on the site about relative print quality
3. Have to buy a light, strong, compact tripod in preparation for a trip (did I mention those are all oxymorons?). Tripod choice is another minefield I’ll probably write about at some point.
4. Retouching work for another client
5. Chase payments once Europe wakes up
6. Intersperse with replying email and comments to the site – between the two, I get an average of about 100-150 per day, which eats up a good couple of hours in replies. My laptop keyboard is now mirror smooth! 🙂

I think I need an assistant. MT

Black and white conversion options

_3100_DSC0450bw copy
Water drops. Nikon D3100, 60/2.8 G.

I’ve gotten a lot of emails after the Leica X2 and M-Monochrom reviews asking about B&W conversion and processing; I guess the M-Monochrom announcement had a knock on effect on the way people started seeing things. It doesn’t make color cameras redundant for B&W work, though.

Let’s start by demystifying two things.

1. Certain cameras have certain particular B&W characteristics. True, but only if you use JPEG. If you are shooting RAW, they provide different starting points – this is from a tonal response point of view – but ultimately you can get a consistent look regardless of the camera. I know, because I do this all the time.

_DSF1170bw copy
Singapore. Fuji X100

2. There are benefits to a monochrome-only camera. True. The Bayer filter and subsequent conversion is an interpolation of neighboring pixel image data to extract color information; luminance information is lifted from the photosite. Any sort of interpolation will reduce tonal accuracy and increase noise, because the luminance value you’ve got is now an approximation instead of a true value. However, it’s fairly easy to see that whilst there are benefits to shooting monochrome-only, you can actually convert a color RAW file into a monochrome one, and lower the perceived amount of noise – though not to as low a level as a monochrome-only camera. If you have a poor interpolation method, then the luminance values can be affected too – once again, increasing the perception of pixel-level image noise in a color image. Bottom line: yes, lower noise, and yes, better detail.

_M9P1_L1014802 copy
Trees. Leica M9-P, 21/3.4 ASPH.

Also one of the images available in my print offer.

However, what you lose from a monochrome-camera is the ability to do control the relative luminance level of individual color channels. Why is this important? Suppose your color scene has a relatively small range of background tonal values, but your subject is a very different color. Its luminance may be the same as the background, but it stands out because of the difference in color. As we concluded in a previous article, this kind of image is a very bad candidate for B&W conversion off the bat, because you’d land up with something very flat-looking. (Real life translation: running out and buying an M-Monochrom isn’t going to solve your B&W conversion woes, but it will give you an interesting starting base – especially when it comes to noise and dynamic range. Those of you who don’t mind doing a bit of work, hold on to your normal cameras. And in fact, these techniques apply to the M-Monochrom too.)

_7006528bw copy
Noryn Aziz in the spotlight. Nikon D700, 24-70/2.8

Actually, if you’re prepared to do some work, this not necessarily the case. It’s still possible to separate the subject from the background on the basis of luminance only; you just need to work a bit harder. You’ve even got a few options here. Park that thought for a moment, we have to introduce the basics of B&W conversion first.

_M8_L1022658bw copy
Shadows. Leica M8, Voigtlander 50/1.1

_5000935 original
A sample image for the purposes of demonstration for this article. This is the original file, converted from RAW, with all of the sliders set to zero. Olympus OM-D, 45/1.8.

The simplest method is to desaturate. All this does is throw out color information, and leave luminance information only. You are then free to do whatever you wish to complete processing of the file. After much investigation and experimentation, this is actually the method I use, coupled with another trick or two. Desaturation can be done in ACR (saturation slider, first tab) or in Photoshop (Hue/Saturation tool, then desaturate the master)

_5000935 desaturate
Straight desaturation. Note overall lack of contrast.

Slightly more complicated is the gradient map. You can use the standard linear black to white transition (press D in photoshop first, then add a new gradient map adjustment layer) – which gives very similar, but not quite the same, results as desaturation. Gradient maps with a straight gradient tend to be a bit more contrasty than desaturation. If you want to experiment a bit, it’s actually possible to put in intermediate control points into the gradient and bias it towards a high key (mostly white, black fades out faster) or low key (black stays for longer) look. What actually works here will depend on your image, however, so be prepared to do some fiddling. The good news is that if you use a new adjustment layer, the gradient is easily modifiable without having to redo your entire conversion.

_5000935 grad med copy
Gradient map, linear gradient. Note increased contrast over the straight desaturation.

_5000935 grad lo copy
Gradient map, low key gradient (mostly black)

_5000935 grad hi copy
Gradient map, high key gradient (mostly white)

Finally, we’ve got the channel mixer. Best used on the RAW file in ACR, this lets you decide how much of each individual color channel goes into making the final image. Note that the tool only uses the luminance components of each channel, and it’s additive; this means that color (and perceptual color) information is discarded. To make things even more complicated, there’s a separate B&W conversion adjustment layer in Photoshop itself that effectively does the same thing as the ACR conversion, but it only has six channels for you to play with instead of the eight in ACR.

_5000935 channel mix red heavy
Channel mixer via ACR, decreased reds; note how the subject (in this case, predominantly in the yellow channel) stands out more from the background.

Remember the conundrum of how to isolate a different colored, but similarly luminous, subject from the background from earlier? The solution to this is the channel mixer. You can increase the luminance of the primary color of your subject, and decrease that of the predominant background color; the converse also works. The problem comes when you’ve got a mixture of colors in both subject and background, and some of those are common colors. (Don’t get carried away though: remember that some images just don’t work in black and white).

This isn’t, the entire toolkit, of course. You’ll find that after this kind of conversion, things look rather flat. That’s because a lot of how the human eye perceives contrast and separation is dependent on differences in hue; obviously we have removed that, so we have to artificially put it back in again. Two of Photoshop’s tools will be your best friends here: the dodge and burn brush, and the curves tool. Understand how both of these things work, what the dos and don’ts are, and you can work magic with any B&W conversion. A tablet is also extremely helpful for these things, as it gives you precision control and feathering over your brush application. It lets you avoid hard edges, odd abrupt transitions, and permits highly precise editing.

_5000935 desaturated grad  copy
Desaturation with grad blue filter layer in multiply mode (higher density at the bottom of the frame) to darken the bottom red sign

At this point, it’s probably worth talking about plugins and filters. The former are either a set of Photoshop actions, or a separate program, that controls the conversion – specifically the luminance translation of each colour channel into a luminance value – and the tonal map of the final file. Whilst they are extremely popular and used by many ‘internet street photographers’ either to save time or because they are unable to get their desired results from a nuts and bolts conversion, I personally avoid them because they do not give you enough fine control, and even worse, everybody’s images that were run through that filter look the same. There is no personality or skill in that.

Photography is arguably art and very much down to personal taste. If you are 100% happy with the way those results look, great; I’m jealous of the amount of time you’ve saved in your workflow. However, claiming this is art is disingenuous; it’s like finding out Ansel Adams shot BW400CN (a B&W film designed to be run through a C41 color processing machine) and developed it at the local pharmacy – instead of Tri-X or Plus-X, controlling his development time and chemical composition, and then cutting precision masks to dodge and burn portions of his subjects.

_5000935 copy
That ‘arty’ high contrast, high grain look. It’s actually what heavily pushed Tri-X used to look like, but how many people actually know that firsthand?

There’s a second type of filer that’s useful, and in either form, it performs a similar function to the channel mixer – it either admits or cuts out light that’s of a certain range of wavelengths. The most common example of this is a physical red filter that goes over the end of your lens; the effect is dark skies, because very little of the blue spectrum passes through the red filter and onto the recording medium. It works with digital too, but you have to remember to adjust exposure accordingly, and obviously not use it in color mode. You can also replicate this effect digitally. Add in a new layer, make it one color, and then select the appropriate blending mode; then only do your B&W conversion. There are interesting results obtainable through this method.

_5000935bw copy
Final image, desaturation + curves + selective dodge and burn + second round of curves + slight palladium tone layer

If you pull back the B&W conversion layer slightly – assuming you didn’t directly apply the conversion to the image – then it’s also possible to use a color layer to create a toning effect; sepia or platinum is probably the most common. You can even use a graduated fill layer to provide a variable effect; this is especially useful for increasing the density of skies, for instance.

Personally, I prefer to shoot color and then convert to B&W; not because I can’t decide upfront how a scene should be presented, but because there’s a lot of flexibility in how I want to handle the conversion later to highlight certain aspects of my subject, or achieve certain tonal looks.

I’ll go into detail on my personal B&W workflow with an end to end example in a future article. MT

This post was brought to you by Ming Thein’s Email School of Photography – learn exactly what you want to learn, when you want to learn it. Don’t forget to like us on Facebook!

Color or black and white?

In advance of tomorrow’s review of the Leica M-Monochrom, it seems that this is a an appropriate question to tackle (if a completely academic one if your camera doesn’t shoot color in the first place.) It’s actually one of the tougher problems I face on a regular basis. Does a shot work better in color or black and white? What if it’s both? There are generally a few things that I look for which help, either to define the obvious or if I’m on the fence. This article is a short distillation of that process.

1. Is it commercial? If so, then 99% of the time, the required output will be color. Especially if it’s food or product; architecture can be either.

_7059099 copy
Commercial architecture. Nikon D700, AFS 24/1.4 G

2. Are there strong dominant colors in the image? If so, then color. Generally, if the image is about strong color, monochrome almost always never works because for a color to be perceived as strong, you need to have fairly constant luminance values across the scene. And luminance variation is what you need for a good B&W. If the strong dominant color as a good range of luminance values, then either can work.

_M9P1_L1011009 copy
Offerings of strong color. Leica M9-P, 35/1.4 ASPH FLE

3. Is the image naturally washed out or low saturation because of the subject or lighting? Generally, black and white works better here; however, you’d be surprised at how different an image with subtle color and very low saturation looks vs one that is completely colorless.

_M9P1_L1006123 copy
Subtle color works well, sometimes. Prague castle. Leica M9-P, 28/2.8 ASPH

_M9P1_L1003919bw copy
But sometimes there is just no color to be had – the scene in reality was almost monochrome already due to the flat lighting and fog. Schonbrunn Palace, Vienna. Leica M9-P, 28/2.8 ASPH

4. Is the subject isolated or highlighted by the lighting of the scene? Either can work, but my personal preference is for black and white because you’ve got enough luminance isolation already without having to overdo it.

_M8_L1025558bw copy
Isolation by lighting. Note how the backlight rings the subject. Paris. Leica M8, Voigtlander 50/1.1

5. Is the subject isolated by color? Stupid question, easy answer. Go with color. If not, you risk running into the problem of small differences in luminance values again. Sometimes, color IS the subject.

_M8_L1017941 copy
Isolation by color. Goa, India. Leica M8, Voigtlander 15/4.5

6. What emotion or feeling are you trying to achieve with the image? Classical timelessness always requires B&W, otherwise, go with color and shift the white balance a little.

_M8_L1023455bw copy
Film Noir. This could have been 8 days or 80 years ago. It was neither, actually. London, Leica M8, 35/2 ASPH

7. Is the image part of a series, group or set? Whatever the answer is, be consistent. You could produce two different sets, but make sure the style (including color or lack thereof) is consistent between images in the set. If you’re only delivering or using one set, then don’t change styles halfway through. See what best fits the images and overall goal of the series.

_7007311 copy
The man behind the scenes, literally. If the backdrop was monochrome, would the blue screen effect metaphor have been as obvious? I think not. Nikon D700, Zeiss ZF 1.4/85 Planar

Of course, the easiest way to avoid all of these problems and questions it to pre visualize your shot and start with the end already in mind, so you know what you’re going to do with it. And that will be the subject of a future article 🙂 MT

This post was brought to you by Ming Thein’s Email School of Photography. Don’t forget to like us on Facebook!

POTD: After lunch

_MM1_L9995602bw%20copy
Stall owner washing and packing up utensils after the lunch rush, Kuala Lumpur. Down some grimy, dirty, little back alley whose name has been long forgotten by all except those whose lives revolve around there. Beautiful light from the holes in the roof and gaps between the buildings, though.

Leica M-Monochrom, 35/1.4 ASPH FLE. Look out for my full review (in three parts) starting from tomorrow.