Project: Creating a multispectral camera

_5015948 copy

Those of you who also follow the site’s Facebook page will have noticed some images posted of late by a mystery camera, one un-purchaseable, and un-available to the general public. (And no, it’s not the new Leica M 240 or a Hasselblad Lunar.) You’ve oohed and ahh’d at the tonality, and wondered why the output was solely monochromatic. Several people speculated that it might even be from a Phase One Achromatic medium format back! The camera is in fact a Sony NEX-5, with the kit lens. The images you saw were almost un-processed; just shot RAW and desaturated.

Sometimes, I get donated photography-related things by generous readers. One of the more generous things I’ve received was this cameras: mint, almost-new-in-the-box and hardly used. Originally, the donor suggested I run a competition to give it away; though a generous offer, I’m pretty sure the camera wouldn’t interest too many of my readers – being nearly three years old and all. So, I hatched a plan: why not make it into something a little more interesting? I’ve been paying a lot of attention to black and white tonality both in the past, and of late in conjunction with my serious re-exploration of film; there’s something about the way film responds that gives it wonderful quarter and three-quarter tones. The look is achievable in digital, but it requires a lot of post processing simply because sensors do not natively respond to light in that fashion.

_N5MT_DSC0112 copy

The why

In fact, almost all sensors are optimised for accuracy of colour reproduction in the visible spectrum; this is a quantitative, tangible thing that can be done through measurement and iteration. It’s fairly consistent: accurate colour is the way most of us perceive things, to within the limits of our output media. Black and white, on the other hand, is hugely subjective: some people like mega grain and huge contrast with no midtones, others won’t settle for anything less than an over-HDR’ed mess that’s all mid tone and not much else. Personally, I’m a big fan of Ansel; it’s just that it requires a lot of work and careful exposure to achieve. But what if you could have a camera that made wonderful B&W images without much work, and better yet, had a bit more sharpness and sensitivity to boot?

Returning once again to the rationale for me shooting film – more upfront thinking, less work, something in the tones – I decided to see if such tonality was really possible natively out of a digital camera. I recall the Leica M8 creating raw files which were excellent candidates for B&W conversion because of their luminous quarter tones – this was thanks to the camera’s weak native IR filtration. These files too required some work, but not as much as heavily-filtered cameras. I wondered if there was something of a nugget here. Not only would you get more luminous blacks, you’d probably get a bit of a sensitivity boost, too – given that the sensor would be seeing light in UV, IR and the visible spectra.
_N5MT_DSC0128 copy

The how

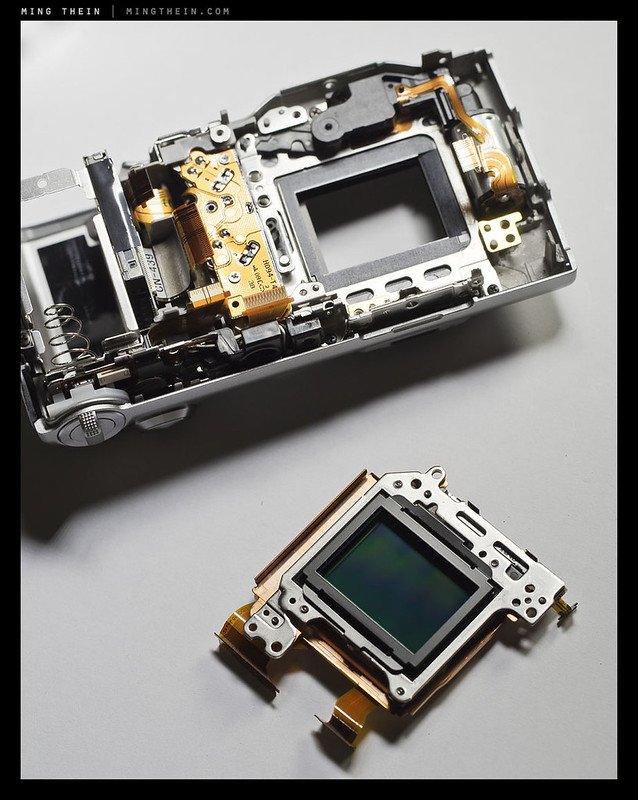
Infrared, and to a lesser extent, ultraviolet, photography have been done for some time. There are companies out there which offer (not cheap!) conversions to either or both; there are even companies which offer services removing the anti-aliasing filter – though oddly, not both. But to create what I envisioned as the ultimate black and white camera*, all of this would have to go: no UV or IR filters, no AA filter. Just bare naked sensor. After several days of monkeying around with dozens of tiny ribbon connectors, and breaking one (caveat: the camera of course still works, but that connector will never be able to be opened/ released again) and nerve-wracking moments with various sharp implements, I’m pleased to report that this particular Sony NEX-5 has no filtration at all in front of the sensor, except for the Bayer filter, which is part of the sensor itself and thus cannot be removed. It’s about as close as you’re going to get to bare silicon – in fact, what you see when you take the lens off is the bare silicon of the sensor surface. Note that silicon is a very hard material – it’s used in portions of mechanical watches that require extreme precision and zero lubrication, and move/ interact against other parts at 8Hz or higher (the escapement) – but I still wouldn’t recommend touching it. This sensor has been properly cleaned, but may have a small dust bunny or two on it from swapping lenses. Use a blower.

*I admit I was disappointed when I learned that the Leica M-Monochrom retained its UV and IR filtration, but it turns out that decision actually makes a lot of sense, as does the 50/2 APO-Summicron – I’ll explain why later.
_5015962 copy
What you don’t see in this shot are the hundreds of little screws, connectors and oddly-shaped parts that somehow go mesh together neatly to hold things in.

The NEX-5 is a very densely packed camera indeed; there isn’t a single cubic centimetre of free internal space for any additional components. For the most part, it’s quite well designed, and there are even some bits that are quite over-engineered. Some of the connectors are incredibly tiny indeed; I wonder how long it takes them to assemble one of these things. The first time I took it apart, it was a very cautious three hours – about an hour for reassembly. By the third time**, we were down to fifteen minutes in-and-out. The machining tolerances for this thing must be extremely tight indeed: not only are there no shims in the mount, but there are only (thankfully) three very small washers between the sensor board and the main frame of the camera itself, which is magnesium. The lens mount bolts directly to the other side of this – it doesn’t really get a lot more rigid.

_5015963 copy
UVIR and AA filter pack, removed. Also, damaged – they used some insane glue to stick it to the sensor frame.

**The reason why it took three tries at all was because the camera didn’t work after the first one; it turns out I forgot a very small ribbon cable that got trapped under the main board which controlled the shutter timing. The third time was to do with focusing: the rather thick (nearly 1.5mm) filter pack was glued to the sensor heat sink frame with some very tenacious adhesive. What I didn’t realise was that this component was part of the optical formula of the system, and the lenses do not have enough additional focus travel to deal with the missing bit of glass; as a result, it was impossible to achieve infinity focus. The solution was to move the sensor closer to the mount; and here I’m thankful that there were those three little washers between sensor and internal frame, because if there wasn’t, then we’d have a serious problem – the Sony engineers did not provision a way to reposition the sensor (they must have been pretty confident of alignment and machining tolerances). Curiously, those washers were precisely the optical thickness of the filter pack (it’s almost as though they intended for something like this to be done), and the camera now focuses to infinity with all lenses.

_N5MT_DSC0121 copy

Results, notes and cautions

I’m going to be blunt here: the camera doesn’t hit full marks across the board. From a tonal viewpoint, the results are fantastic – just shoot raw and desaturate, and that’s all you have to do for almost every situation. All of the images in this post have had almost no work done on them at all – just desaturate. They came out of the camera 99% there, with this wonderfully filmic quality – even at high ISO. Is the more dynamic range? Not really. Skin tones are smooth yet delicately textured; deep shadows have that glow thanks to IR reflectance; and the detail is definitely better than a standard camera – I owned one for several months, and never saw this degree of sharpness. I wouldn’t use JPEG though, simply because it doesn’t retain as much information as the RAWs, and this will certainly affect tonal subtlety and resolution, to a lesser extent.

_N5MT_DSC0100 copy

Yet where the camera falls down is also resolution: it’s not because of the sensor; in the centre of the frame, there’s clearly a great degree of fine detail. The edges, however, look like crap. (Bear in mind the only E-mount glass I have now is the kit lens that’s bundled with the camera.) This is not because of the sensor: it’s because of the lens, which although it resolves quite well in the visible spectrum, is clearly nowhere near apochromatic enough in the corners; they look like a smeary mess in some cases. The smearing is caused by UV and IR spectrum image forming rays from the subject – cut out by the filter pack, normally – being registered on the sensor at a different physical location to visible light. There is still more visible light, of course, which means that focus is mostly where autofocus puts it, but not for all subjects – warm subjects in low ambient light – people indoors, for instance – tend to be a little back-focused because of this. Outdoors, things are fine (visible light > IR again).

_N5MT_DSC0049 copy

Results are better at the telephoto end of the zoom, stopped down, and of course with better glass. I’ve got a few adaptors lying around from my NEX days; unfortunately they’re discount Chinese items off ebay, and they perform as you would expect: crap. My M-adaptor doesn’t focus close up and has planarity issues; my F adaptor won’t focus past a couple of meters. (It would seem that their tolerances aren’t enough to deal with short flange systems.)

In my preliminary testing, the Zeiss ZF.2 2/50 Makro-Planar, ZF.2 2.8/21 Distagon and ZF.2 2/28 Distagon are all excellent performers – even into the corners. Surprisingly, the old Noct-Nikkor does very, very well from f2 onwards, and is quite passable with a little IR-induced glow even at f1.2. The Nikon 85/2.8 PCE and 45/2.8 P are also excellent, even if the former is rather impractical because of its tight focusing helicoid and inability to be stopped down without electrons. You’re probably wondering about the M-mount glass: forget the wides, they’re lousy on any mirrorless camera not optimised for them (i.e. anything that isn’t a digital Leica M). I don’t have anything telephoto. I suspect the 50/2 APO ASPH would be the lens to use on this camera, with its true optical potential seen outside the visible spectrum; and now it makes perfect sense why the Leica M-Monochrom retained its UV and IR filtration: without it, the other lenses – especially older wides – would appear very soft indeed, thanks to their property of focusing non-visible light at a different distance to visible light.

_N5MT_DSC0134bw copy

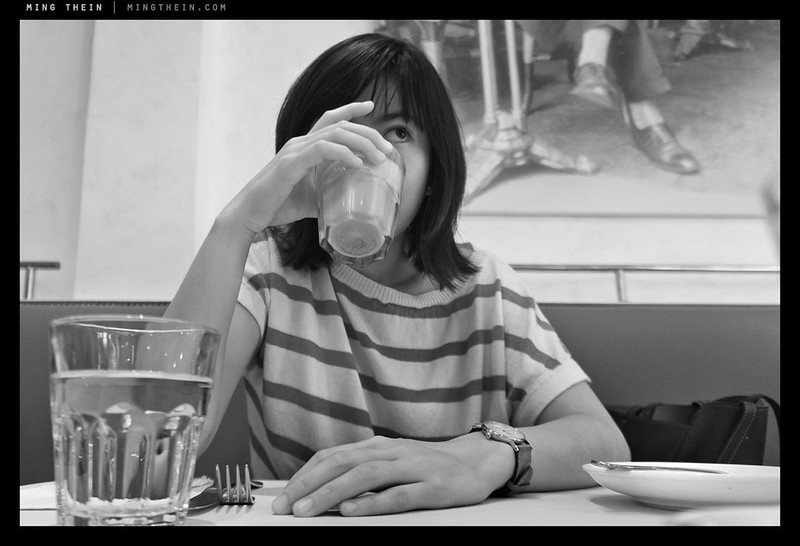
So how would I describe the tonal characteristics of this camera? In a nutshell, it produces B&Ws that are warm and rounded, if there’s such a thing. The sharpness is there but it’s not biting; the tones are rich and deep. If used with better glass, I think it would really sing – especially for portraiture. Skin looks baby-soft. Don’t use it in colour, it looks horrible due to pollution of the blue and red channels by UV and IR respectively. However, note that with a visible blocking filter over the lens, you could shoot either IR or UV without issue. The camera also gains some sensitivity – about 1-1.5 stops depending on the situation – because of the extra light it’s collecting. With the right filters, it might be an interesting tool for astrophotographers or voyeurs, for instance. Of course, you can always use one of the B&W or Leica UVIR filters and then have a regular NEX-5 again, but this time without the anti-aliasing filter.

An interesting experiment? Undoubtedly. Would I do it again, with a more interesting camera, better sensor, and something I have better glass for? Sure, why not? Though I think mirrorless makes an ideal candidate because a) you don’t have to mess around with a mechanically complex camera, and the attending realignment issues associated with disassembly (mirror, AF system etc.); b) the LCD/ EVF gives a great live B&W preview, so it makes it easier to visualise how the results will appear after conversion – the colours really are pretty funky – and c) these are just cheaper to experiment with.

Now, if somebody would like to donate a D800E to the cause, I think some very interesting results might ensue…in all seriousness though, if anybody would like to donate a camera to be experimented on (you will of course get it back afterwards, but no guarantees that it can be done) then please send me an email. MT

Note: We’re still giving this camera away. Tomorrow, I’m going to explain how – there will of course be a photographic competition involved! Update: Full details on how to enter here.

Coda: since I was asked by a couple of people over email and in the comments, here’s how the color images out of the camera look: heavy pink-magenta casts due to IR and UV pollution in the red and blue channels respectively. I suppose some (of the hipstagram persuasion) might like the look…

_N5MT_DSC0208 copy

_N5MT_DSC0128 copy

____________

Visit our Teaching Store to up your photographic game – including Photoshop Workflow DVDs and customized Email School of Photography; or go mobile with the Photography Compendium for iPad. You can also get your gear from B&H and Amazon. Prices are the same as normal, however a small portion of your purchase value is referred back to me. Thanks!

Don’t forget to like us on Facebook and join the reader Flickr group!

appstorebadge

Images and content copyright Ming Thein | mingthein.com 2012 onwards. All rights reserved

Lens review: The Olympus ZD 12/2

_8015731 copy

Although this lens is not new – in fact, it was announced back in 2011 with the second-generation E-P3, E-PL3 and E-PM1 (full review here) – it still remains ostensibly the best fast wide option for Micro Four Thirds users. (It was also recently re-released as a limited edition all-black version, which now includes the lens hood as part of the kit.) In fact, there’s been remarkably little competition in this arena – just a manual focus offering or two from SLR Magic, and the upcoming (and stratospherically priced) Schneider 14/2.0. Panasonic has the 7-14/4, and the 14/2.5; the latter which is perhaps the 12/2’s closest competition.

_8015725 copy

My initial experience with this lens and its optics on the E-P3 and E-PM1 were enough to convince me that Micro Four Thirds had come of age, and would make a worthwhile compact system without major compromises for the majority of situations in which I’d want to use a compact system camera. This impression held, wavered, and changed again – to be honest, until the last Tokyo workshop, I hadn’t had much of an opportunity to use the 12/2 on the OM-D (full review here) for a serious evaluation. The last time I used the lens on the OM-D was also the first time I’d taken out the camera for a serious bout of shooting, and definitely wasn’t a good way to benchmark performance of either camera or lens – simply too many variables and unknowns were in play here.

_pm06502 copy
Spiral. E-PM1, ZD 12/2

The lens is one of the Olympus Super High Grade line, impeccably built and finished with all-metal construction, and one unique feature (for a Micro Four Thirds Lens) – the focusing ring clutch. Sliding the focusing ring backwards a notch puts the lens in manual focus mode, and also reveals a focus distance scale: unlike every other lens in the system, the 12/2 has hard stops at each end of the range. Together with the depth of field scales, the lens should theoretically be the ideal tool for street photography – fast, wide, zone-focusable, and with more depth of field for a given aperture and field of view than its 35mm equivalent.

_8015740 copy _8015739 copy
In AF mode (left) and scale-focus MF mode (right)

Except, this isn’t quite the case. Sadly, the clutched focus system isn’t really mechanically linked to the position of the lens elements; it too is a fly-by-wire simulation – albeit a very good one, with the right amount of tactile feedback and everything. The problem is to do with the resolution of the distance scale/ mechanism: there aren’t enough divisions.

_5010912 copy
Reflections, Tokyo. OM-D, ZD 12/2 from a moving train

It seems that there are perhaps five or six discrete distances to which the focusing group moves, instead of a continuum. The only thing that could cause this is if Olympus used a form of rheostat in the construction of the the focusing ring/ clutch. Although 12mm is a very wide actual focal length with plenty of depth of field for a given aperture, f2 is fast enough that more critical control over your focus point is required. Sadly, though the idea of the ring is a good one, the execution makes it of marginal utility for the photographer in the real world – unless you are willing to use a small aperture – f4-5.6 or smaller – to use depth of field to cover the lack of manual focus precision.

_5012107 copy
Diagonals, Shibuya. OM-D, ZD 12/2

Curiously, this is most definitely not the case for either manual focus with the ring in the AF position (i.e. selecting manual focus on the camera body) or when using autofocus. Here, the lens is precise, moves in as many infinitesimally incremental steps as one could desire, and has no trouble finding critical focus. While on the subject of focusing, it’s probably a good time to talk about autofocus performance. Like all of Olympus’ other MSC designs, the 12/2 is an extremely snappy lens – even more so on any of the recent bodies. I haven’t experienced any gross focus misses, but it’s worth noting that some care is required at f2 – the plane of focus isn’t quite as deep as you’d think.

_5013681 copy
Taxi rush, Shinjuku. OM-D, ZD 12/2

The lens is not weather sealed or gasketed, and once again, Olympus has decided not to include a hood – this is excusable for a $250 economy kit item, but not on a $800 premium lens. It just smells too much like penny pinching. Perhaps it’s just as well, because the optional hood is rather cumbersome; it increases the bulk and visual size of the lens hugely, requires a thumb screw to attach, can rotate freely and requires a different cap – why can’t they just use a bayonet hood? Zeiss lenses are a great example of how bayonet hood mounts should be constructed.

_5011975bw copy
Shadows, Otemachi. OM-D, ZD 12/2

Over a good year of use with this lens on the E-PM1 and OM-D, those are my only two complaints: the inaccuracy of the pseudo-manual focus clutch, and the continued minor farce of the lens hood. If you read this carefully, it means that I don’t have any major criticisms of the optics.

The 12/2 uses a rather exotic optical design with 11 elements in 8 groups; one of these is aspherical, one is made of ED glass, and another two of exotic Super HR and DSA glasses. It’s a non-symmetric, telecentric design whose optical formula honestly doesn’t look familiar to me – the closest thing I can think of are the Zeiss Distagons, insofar as they use several extremely dome convex front elements and a rear telephoto group. The lens also employs Olympus’ ZERO coating to minimize flare and maximize contrast and transmission.

_5011948 copy
The overhang. OM-D, ZD 12/2

Let’s get the most popular question out of the way first: yes, it’s sharp. Bitingly so, at all apertures, across the entire frame in all but the most extreme corners. There appears to be a small amount of field curvature, but nothing overly serious; enough that for optimal sharpness you’ll want to move the focus point over your subject rather than using center-focus-and-recompose, though. The lens has a slightly odd MTF chart that is indicative of a significant dropoff in microcontrast about halfway to the edges; I don’t see this in practical use, which suggests that the field curvature is probably responsible – and more complex than a merely spherical surface. In the real world: sharpness will not be an issue.

_5010896bw copy
Fuji TV building, Odaiba. OM-D, ZD 12/2

Though some of you might think that a little nice bokeh might be obtainable from the 12/2, you’d be mistaken; you have to be very close indeed to throw anything significantly out of focus. Fortunately, the lens focuses down to 0.2m, so this is actually possible. If you have enough distance between subject and background, then bokeh is actually fairly pleasant; however, if there isn’t a lot of distance, and the subject is a bit farther away from the camera, nothing really gets out of focus enough to begin with – in fact, you have to be a bit careful of double images in the out of focus areas. There’s a bit of spherochromatism, too.

_5010945 copy
Star. OM-D, ZD 12/2

Although the lens in general well corrected, you do get the feeling that it’s on the extreme edges of what was possible with the design constraints put upon the optical designers: there’s visible CA against high contrast subjects, especially in the corners where you can get up to 2 pixels’ worth; there’s also very noticeable distortion. Fortunately, it’s fairly simple in nature – barrel with no sombrero/ moustache – and is easily correctable in ACR. Flare exists but the ZERO coating does a good job of keeping it to a minimum – even without the hood. Stopping down to f4 on the OM-D makes everything but the distortion go away, leaving you with an excellent optic. It doesn’t quite have the transparency of the 75/1.8 or 60/2.8 Macro, but it’s fairly close if used stopped down. It is definitely the best wide option for M4/3 users at the moment. One interesting use of the lens is for handheld long exposure photography – due to the short focal length and excellent stabilizer in the OM-D, shutter speeds of anywhere down to 1/2s (consistently) or 1s (occasionally) with critically sharp results are possible, making for some interesting photographic opportunities.

_5010920 copy
Commuters. OM-D, 12/2

As always, I suppose the litmus test for a lens is if you’d buy it a second time – I think the answer for me would be a qualified yes. I have since had the chance to shoot with the Panasonic 14/2.5; thought I prefer the 28mm field of view over 24mm, and believe that M4/3 lenses should be a compact as possible to play to the other strengths of the system, I would still pick the 12/2 as the optics are better – they simply render in a more three-dimensional way due to better microcontrast, as well as better edge sharpness. Interestingly, the Panasonic 12-35/2.8 runs it very close at f2.8; however, the T stop of that lens is about 1/3-1/2 stop slower too, for a given physical aperture. What qualifies my opinion is the upcoming Schneider 14/2; it remains to be seen if it performs as well as its price suggests it should. In the meantime, the best way to judge the 12/2 is on its pictorial results – construction, expensive accessories and the imprecise focus clutch are just distractions. And on that basis alone, I think the lens deserves a place in a serious M4/3 shooter’s bag. MT

The Olympus M.Zuiko Digital 12/2 is available here from B&H and Amazon.

____________

Visit our Teaching Store to up your photographic game – including Photoshop Workflow DVDs and customized Email School of Photography; or go mobile with the Photography Compendium for iPad. You can also get your gear from B&H and Amazon. Prices are the same as normal, however a small portion of your purchase value is referred back to me. Thanks!

Don’t forget to like us on Facebook and join the reader Flickr group!

appstorebadge

Images and content copyright Ming Thein | mingthein.com 2012 onwards. All rights reserved

Film diaries: the first roll

_6001446 copy

Some months ago, I acquired a vintage Nikon F2 Titan in the hopes of both fulfilling a longtime photographic dream, as well as perhaps shooting a little film again in the name of stimulating creativity. Many of you have been anxious to see the results; I bet none more so than myself. The trouble is, I feel that I’ve set a standard here that I must uphold; if the images from this roll don’t meet that standard, then I think there’s going to be a lot of hand-wringing, rude gestures and cries of ‘pah, amateur’. In this post follows the highlights of that first roll.

2012-12-13-F2T-D100

Before I show any images, I want to give some background: I’ve shot film creatively before. I’ve even processed it before, as part of my dissertation on improving measurement precision using short-wavelength laser holography (don’t ask, because I don’t really remember). But I’ve never done both, and my processing days predate my creative photography days by a considerable period of time. Finally, the last time I shot film was in mid 2009, with a Leica M6TTL. Before that was 2005, with another Nikon – an F2A. Note: EXIF data will say ‘D800E and 50mm’, because that’s what I used to digitize the negatives.

_8025538bw copy

This roll is both the first roll of true B&W I’ve shot*, processed and scanned entirely singlehandedly. It shows, too: it’s grainy considering it’s Ilford Delta 100 exposed at ISO 100; in places it’s uneven, and there’s a streaking problem from where I got impatient and decided to try to wipe the film dry with a microfiber cloth. In hindsight, one of those Dyson Airblade hand dryers would be awesome for the task.

*An embarrassing, dirty confession: all of my previous film B&W work was C41 process (BW400CN, XP2-400) for convenience – finding somebody to develop black and white film in Kuala Lumpur is not a trivial task because serious shooters do their own, and consumers don’t do it at all.

_8025536bw copy

The ‘scanning’ was accomplished with an interesting hack-rig: my product photography lightbox, lit by a speedlight within, film passed through a cardboard mask (to prevent scratches) and the camera resting above, spaced perfectly with the long hood from a Zeiss ZF.2 2/100 Makro-Planar but fitted to the 2/50 Makro-Planar which coincidentally has the same bayonet. Add a 20mm extension tube, and the spacing is not only perfect, but I now have a 4000+DPI scanner.

_8025550bw copy

I’ve spent some time in Photoshop to automate the conversion process as much as possible, to try and keep the character of the film intact and consistent, and minimize the amount of individual work required on each image. I can’t say I’m 100% happy with the results yet, but we’re getting there. If I can run an entire roll of RAW files as an automated action – cropping excepted – then the total scan and process time is actually about the same as a comparable number of digital files.

_8025545bw copy

Anyway, more on that in another article. For now, I just want to leave you with one thought: resolution both matters, and doesn’t – we’re seriously spoiled by the degree of image quality obtainable from the current state-of-the-art FF digitals. Enjoy! MT

These images were shot with a 1979 Nikon F2 Titan on Ilford Delta 100, with a mixture of lenses – Voigtlander 28/2.8, Nikon 58/1.2 Noct-Nikkor, Nikon 45/2.8 AI-P, Zeiss ZF.2 2.8/21 Distagon, Zeiss ZF.2 2/50 Makro-Planar, Zeiss ZF.2 2/100 Makro-Planar. Can you tell which is which, other than through perspective? I can’t.

____________

Visit our Teaching Store to up your photographic game – including Photoshop Workflow DVDs and customized Email School of Photography; or go mobile with the Photography Compendium for iPad. You can also get your gear from B&H and Amazon. Prices are the same as normal, however a small portion of your purchase value is referred back to me. Thanks!

Don’t forget to like us on Facebook and join the reader Flickr group!

appstorebadge

Images and content copyright Ming Thein | mingthein.com 2012 onwards. All rights reserved

_8025531bw copy

_8025525bw copy

_8025515bw copy

_8025508bw copy

_8025502bw copy

_8025495bw copy

_8025499bw copy

Lens review: The Voigtlander Color-Skopar 28/2.8 AI-P SLII

_5009926 copy

The small, light Nikon D600 got me thinking about full frame as a viable alternative for a lightweight travel kit again – the D700 and f1.4 primes was smaller than a D3 and pro zooms, but certainly nowhere near as convenient as Micro Four Thirds. Of course, M4/3 doesn’t give you anywhere near the same control over depth of field, and you lose out at least a stop or more in high ISO performance. The OM-D might give you back a couple of stops of hand-holdability thanks to its excellent stabilizer, but there’s nothing you can do about depth of field control short of using the manual focus Voigtlander f0.95 lenses – they certainly fit the bill, but they’re also large, heavy and somewhat defeat the point of a small, light body.

_6001758bw copy
Shadows

This is where the pancake primes and full frame come in: a D600 body and two primes make for a very light but also very competent travel kit. And if you shoot film, it makes even more sense. (And naturally, being a 28mm lens, I was curious to try it out.) The 28/2.8 has ridden shotgun in my waist pouch when I go out with the F2T and 58/1.2 Noct; sometimes you just need something wider, and it’s a handy option to have without paying too high a weight/ size penalty.

_6001755 copy
Untitled

The lens is just 24.5mm long (in Nikon F guise; it’s also available in EF mount, which is slightly larger as it has to accommodate the electronic diaphragm components) and weighs a scant 180g; it actually feels reasonably hefty as the entire lens is metal – probably anodized aluminium – and is very well constructed. It’s actually so short that it’s tricky to mount without turning the focusing or aperture rings, as the only portion of the lens that doesn’t rotate is the tiny 3mm wide section in the middle that holds the depth of field scale and index mark. It would have been great to have a locking button on the aperture ring like the ZF.2 lenses, but I suppose Cosina reserves that function for its more expensive siblings.

_6001692 copy
Urban monk

Being an AI-P spec lens, the 28/2.8 has a chip to communicate aperture and distance information to the camera; you set the lens to f22 on a Nikon body and control the aperture using the command dials as normal. It will mount and provide full metering and electronic compatibility on any Nikon body. Focusing is manual, of course; would have been nice if there was a way to AF couple the lens – a built-in motor would probably have been impossible, but screwdriver focus might have been within feasible limits. That said, you always have the built-in rangefinder and in-focus confirmation dot (or beep on Canons) to help with determining focus, and the manual focus action is nicely damped and perfectly weighted – they certainly got the feel right with this lens. Since the lens is relatively slow and wide, it isn’t always easy to judge focus by the viewfinder alone – and Nikon’s modern focusing screens don’t help much, either. Most of the time, I could get achieve focus with the viewfinder alone, but on the edges it helps to use the dot: the lens suffers from moderate field curvature.

_6001658bw copy
Shifty

The 28/2.8 is a 6-group, 7-element design; Voigtlander does not provide a block diagram or any details about the optical design, but from the way it performs and the fact that it can focus as close as 22cm from the sensor plane – yielding surprisingly high magnification – I suspect that the lens is a retrofocal but non-telecentric design to achieve this. As mentioned earlier, it displays moderate field curvature, some coma at the edges and chromatic aberration until f8 or so. (I tested the lens on the Nikon D600.) There’s also a tiny bit of purple bleeding at high contrast edges.

_6001651 copy
Through the looking glass

Sharpness is not a problem: the center is excellent at all apertures, with the border and edges lagging until about f5.6 or so; this is partially due to field curvature, and partially due to coma. Note that if you’re going to use wide apertures with this lens, you will need to use focus assist over the subject – not center focus and recompose. Edge sharpness is not too bad, but the corners never get critically sharp due to radial coma/ smearing; you always feel that things have been ‘stretched out’ a little. No problem; just make sure your subjects are within the central portion of the image circle.

_6001638 copy
Umbrellas

Not having a huge number of elements, color rendition and contrast are excellent; images are rendered with a slightly warm hue, high saturation and macrocontrast. Microcontrast still isn’t as fine as the Zeiss lenses, but it’s certainly on par with Nikon’s regular AF offerings. This would be a good lens for low contrast scenes, but care must be taken if you’re shooting around noon in the tropics – you’re going to get things blocking up to black or overexposing if you don’t pay attention to your blinking highlights warning. It makes a rather good lens for black and white work, too.

_6001609 copy
The morning after the night before

I consider myself a bit of a 28mm aficionado; perhaps fetishist is a better word. I find that it’s the widest I can go and still maintain a relatively natural look to the images without the usual wideangle geometric distortion; I feel that the focal length also matches my instinctive field of view quite well. This means that in my time I’ve owned and shot with a huge number of 28mm lenses and 28mm equivalents; the two I currently own – the Nikon AFS 28/1.8G and Zeiss ZF.2 2/28 Distagon are reviewed on their respective links, too. Aside from that, I’ve also got the Zeiss ZM 2.8/28 Biogon for my Leica M9-P, the 28/1.8 equivalent on the RX100, the iPhone 4, and an Olympus 15/8 body cap.

_6001579bw copy
Texture

So the natural question would be where does the Voigtlander 28/2.8 fit in – both in the grand hierarchy of 28mm lenses, as well as as a tool; I actually think it has a pretty well-defined niche. The Nikon 28/1.8 G is large but light, has autofocus and pretty good optics; the Zeiss 2/28 Distagon has stellar optics and a unique pictorial rendering, but is manual focus and surprisingly heavy for its size. Both have roughly the same maximum aperture and T stop. The Voigtlander is a tiny slip of a lens that’s capable of excellent results in the center, and decent results at the edges – these optical characteristics suggest it would serve as a good documentary lens (there is some distortion of straight lines which rules it out for architecture), but moreover an option where you a) need something light and small, and b) are unlikely to run out of light – though relatively low light work is still possible thanks to the high-ISO abilities of the current batch of full frame cameras. In short: this is a great lightweight travel lens, especially if paired with something a bit longer – perhaps the 40/2 or 45/2.8P. Now, if only somebody would make a decent focusing screen for the D600…MT

A big thank you to Eric Goh at Fotoman Marketing, the Malaysian distributor for Voigtlander lenses for the extended loan of the review sample.

The lens is available here from B&H in Canon and Nikon mounts.

____________

Visit our Teaching Store to up your photographic game – including Photoshop Workflow DVDs and customized Email School of Photography; or go mobile with the Photography Compendium for iPad. You can also get your gear from B&H and Amazon. Prices are the same as normal, however a small portion of your purchase value is referred back to me. Thanks!

Don’t forget to like us on Facebook and join the reader Flickr group!

appstorebadge

Images and content copyright Ming Thein | mingthein.com 2012 onwards. All rights reserved

Quick thoughts/ hands on: The Hasselblad Lunar

_RX100_DSC3413 copy

I’ll admit that I was one of the Lunar’s early detractors. There is no doubt that this is a polarizing camera; it won’t be everybody’s cup of tea. Many were left questioning Hasselblad’s decision to effectively rebody a Sony NEX-7 – in itself a competent camera – but it was likely the price and design direction that really created a bit of a tempest. There’s no question that the Leica-reshelled Panasonics do look better; the design is cleaner and less fussy. And the premium is partially explained by the extended warranty and inclusion of Lightroom with your purchase. This isn’t the case with the Lunar/NEX-7 – the price difference is several multiples, almost certainly due to the choice of materials.

_RX100_DSC3419 copy

Yesterday I met with the MD of Hasselblad’s Asia Pacific distributors, Egon Heldner of Shriro. He had with him a Lunar prototype; at some point during the conversation – initially about Zeiss – the camera magically appeared in his hands. I got to play with it a little (but not make test shots) and have a conversation to try to understand exactly what they were thinking when they decided to push the collective go button on the project. Please note that this camera is an engineering prototype, which means that electronics, fit and finish (and even some aspects of design) are not final. It was working, however, and felt remarkably well put-together for a prototype – though unfinished in some areas.

Firstly, the Lunar is not just limited to the NEX-7. As has been reported elsewhere, there will be other variants based on existing Sony cameras; to what extent the cameras are modified beyond external appearance is still not disclosed, but it’s possible – even likely – that they will have some customized processing algorithms to bring in some of the DNA from the firm’s medium format cameras. (I presume this means things like tonal response and color palette etc.)

_RX100_DSC3403 copy

Secondly, none of the photos or press images I’ve seen do the camera justice. In the metal, I won’t say it’s minimalist beautiful in the way a Leica M is, but it certainly isn’t ugly. The odd orthogonal projection for the original drawings didn’t have any sense of perspective and overemphasized the size of the grip (I do consciously think about these things, because I am a product photographer). The big surprise for me was the way it felt in the hand – it has an ergonomic ‘rightness’ to it that most cameras lack, including the original NEX-7. The grip shape is surprisingly very comfortable, and for the most part, the choice of materials is excellent. I still think the rubies are utterly pointless, and I’m undecided about the carbon fiber front plate, but the titanium top deck is utterly gorgeous. And I don’t mind the wood either, to be quite honest. As much as I like the idea of blue leather, I suspect that it’s going to be utterly impractical; I live in the tropics and cameras getting wet from rain or sweat is inevitable. Hasselblad’s designer got one thing absolutely spot on: the tactility of the object. If you spend a large number of hours every day with camera in hand, you don’t take these things for granted; the weight (yes, something can be too light); the way the controls feel in terms of dial/ button resistance etc.; the grip shape, etc. are all very, very important. It’s one of the reasons why I’m not bonding with the D600: it’s not the image quality or functionality, it’s the angular feel of the grip that just doesn’t make you want to hold it for very long. As a result, I don’t use it.

_RX100_DSC3407 copy

Again: it’s not for everybody; a lot of people think it’s a) ugly and b) pointlessly overpriced. Yet some will buy it because it’s a ‘Blad/ status symbol. I wouldn’t not buy it because it’s a rebodied Sony; the original could definitely use some improvements in the tactility department. But I’ll say two things: firstly, I strongly encourage people to pick one up and feel it before making a judgement. Secondly, it’s not going to be as expensive as expected.

Here’s an interesting thought about publicity – they say any form of it is good – at the release of most modern DSLRs/ enthusiast compacts, on forums you’ll get a whole bunch of people saying ‘I’ve preordered’, a number saying ‘if only it had XYZ’, and others saying it’s pointless. Let’s ignore the usual silent majority. With the Lunar, I think there were 500+ comments on the DPReview announcement page within a day; about 70-80% were negative. Yet there were 20% who liked the camera – given that something of this price is an emotional purchase, generally buyers tend to fall into one of two camps: you either like it, or you don’t. Sadly, most of their buyers won’t be pros or serious photographers – though that doesn’t stop them from making it a serious photographic tool. I don’t think Hasselblad will sell many of these as body-only outfits; most buyers won’t have lenses, and the obvious choice for bundling would be the new Zeiss AF series.

_RX100_DSC3411 copy

And even if Hasselblad sells 100 of these things off the mark, that will represent a significant chunk of change. I’m sure the actual number is much higher – there are apparently quite a number of pre-orders in Malaysia already – given that their target clientele generally don’t frequent forums. The difference here is whilst a lot of people on forums will coo over a D4 or 1Dx, most will not buy one for various reasons. At the other end of the market – and I know this from being involved in the high end watch business – a very different dynamic is at play.

As much as this camera is really a NEX-7 rebodied, it could be much more. Sony have already confirmed that the E mount is large enough to accept a full frame sensor; what if Hasselblad were to put a D800E sensor in it, default to DX mode when using the regular E mount/ lenses, and then include an F-E adaptor to allow the use of ZF.2 lenses? That would certainly be a very interesting option, and would at a stroke solve the shutter vibration issue. I’d definitely like to see a conventional hotshoe, though. Again, there’s a watchmaking analogy here: a lot of very high end watches use pedestrian base movements; whilst some of them really don’t do anything with a $200 movement other than put it in a case, slap a brand on it, then add a couple of zeroes at the end, there are others who consciously select the pedestrian tractor as a base to develop off because it is a) reliable and proven; b) easy to service; c) has the properties required to support complications; and c) frees up limited development funds that would otherwise have been spent on the base movement to be used in other parts of the watch. I’m sure you can see the parallel here.

_RX100_DSC3417 copy

Here’s the thought that’s been nagging at me all of this time: if you ignore the design, price etc – the positive vibe about the NEX-7 at launch was incredible. If that had been launched at the same time with a series of AF Zeiss lenses and supplied in sufficient quantity, I think Sony could have well gotten the jump on M4/3 – at least in the high end market. We have that happening now with the Lunar – yet just because it’s been rebodied doesn’t make it any less capable a photographic tool than the original camera was. Is it four, five times better like the price suggests it should be? No, but then again neither are any of the $5,000 cameras (except perhaps the D800E). Take a D4 or M9-P for example: with the former, you gain speed, high ISO capability, ergonomics and AF, but less resolution and considerably greater bulk. It’s not five times faster, nor does it shoot ISO6400 like the NEX-7’s 1600. With the latter, resolution is probably about the same given the lack of an AA filter, but it’s much, much slower, a poorer performer at high ISO, and nowhere near as reliable. Yet it doesn’t stop Leica selling in impressive numbers.

Yes, it’s not everybody’s cup of tea, but the more I think about it, the more I think the Lunar gets a surprising number of things right and actually hits a part of the market most forums don’t see – right or wrong – whether those things are important to you or not are a different matter. Taste is relative, personal and subjective. I think I now understand why this camera exists – and it’s not entirely because of marketing. Before you think I’ve gone completely crazy, I encourage you to hold one in your hands for a little while. MT

I’d be curious to hear your thoughts and open this up to a general discussion – please leave a comment below. Thanks!

____________

Visit our Teaching Store to up your photographic game – including Photoshop Workflow DVDs and customized Email School of Photography; or go mobile with the Photography Compendium for iPad. You can also get your gear from B&H and Amazon. Prices are the same as normal, however a small portion of your purchase value is referred back to me. Thanks!

Don’t forget to like us on Facebook and join the reader Flickr group!

appstorebadge

Images and content copyright Ming Thein | mingthein.com 2012 onwards. All rights reserved

Experience log: the Hasselblad H4D-40 and medium format

_8022716 copy

I shot almost only Leica M and a couple of lenses for the majority of 2009/10; it completely changed the way I approached photography. I no longer focused on getting everything – every nuance, every detail, every highlight, every shadow – instead, the limitations of the camera forcing me to focus on the moment and the subject, making them strong enough and isolated enough that the edges and everything else in the exposure were clearly of secondary importance. Every image I’ve shot thereafter has followed the same principles: the importance of subject and quality of light on the subject have become indelibly ingrained onto my visual cortex.

A6557673 copy
Night in the city. H4D-40, 80/2.8

The second shift came when I focused on both accuracy of color and its use to consciously influence perceptual impressions in the viewer of an image as part of my experiments into the cinematic style of reportage; this added another tool to my repertoire. A third, less major, shift came after the Nikon D800E forced me to shoot mostly tripod based: I would shoot with precision, with more depth of field, and even more care over lighting; control was – and is – now the aim of the game. It’s had two effects for me: I shoot less with available light, and more with constructed light; also, I’m now working slower and frequently with a tripod. It means I shoot street very differently; it’s now about people, situations and context – almost abstracted people – and less of the ‘stolen moment’ type of photography I used to practice.

A6557650 copy
Decay. H4D-40, 80/2.8

Part of the reason for this is my shifted focus towards commercial work, part of the reason is because I’ve come close to exhausting the possible available-light street/ reportage locations available to me locally. I’m hoped that by changing the way I work again, I’d once again challenge myself to add a new skill to my repertoire, and thus up my game a notch. In hindsight, the problem was that the medium format options were either too similar or too vastly different to the way I was (and am) currently working with the D800E.

I had two options: buy a V-series 500CM or 503CW, and shoot film; there was also an ex-demo CFV-39 back available to purchase, which would give me a long term digital solution if I decided it fit me. The second option was a second-hand H4D-40. Both would represent a significant investment even before counting lenses, and thus I managed to arrange an extended test drive with the local Hasselblad distributor, Shriro – for which I am extremely grateful. I want to say upfront that it was not the quest for more pixels or image quality that led me to consider medium format; if anything, my clients have been extremely happy with the quality of the files from my D800E. Anything over that would be a bonus (or a curse for some, who are already struggling in handling the enormous 36MP 16-bit TIFF files the camera produces). Rather, I was looking for something that would force me to change the way I saw the world through forcing me to change the way I worked.

A6557637bw copy
Stalls. H4D-40, 80/2.8

From the get-go, the 503CW and CFV-39 were just too different. It wasn’t the waist-level finder (though it did make it very difficult to see the frame and focus under bright situations); it wasn’t the reversed directions (the V series Hasselblad waist-level finders do not invert and correct the image like a normal SLR finder). It wasn’t the manual focusing, or the need to wind the camera to re-cock the shutter between each shot, or the shutter speeds being on the lens (leaf shutter). It wasn’t the square format. Of all things – and this might seem odd when you remember that I’m an experienced rangefinder user – it was the assortment of crop lines overlaid on top of the focusing screen. The whole screen showed the 6×6 film negative. The first set of lines showed the entire capture area of the sensor – ostensibly a 1.1x crop horizontally, but rather more vertically – and a second set showed a square crop of the sensor, which gave something along the lines of a 37x37mm sensor.

A6557667 copy
Overpass. H4D-40, 80/2.8

Ostensibly, if one used the CFV-39 as a square sensor, the way that camera was intended to be shot, you’d be looking at a 1.6 linear crop, and a sensor that was about 50% larger than the 35mm full frame. (Note that cropped square, a FX frame becomes 24x24mm, and about 40% of the area of the medium format-square sensor.) I think somewhere between the combination of the multiple crop lines, the left-right inversion and everything else that was different, my brain shut down. I just couldn’t see anything other than what should have fit into the square 6×6 frame; digital on the V series was simply not an option for me, and it wouldn’t make sense to buy one solely for use with film especially since the H series can take both film and digital backs.

A6557694 copy
Experimenting with 2.4:1 widescreen on the street, I. H4D-40, 80/2.8

That left behind the H4D. Available in multiple flavors, the 40 made the most sense to me – it balanced price, specification and resolution. And it was available second-hand, which brought the price to the same ballpark as the CFV-39 and V-seriesd combination. The 40MP, 44x33mm sensor has a crop factor of about 1.36x, giving it a little under twice the image area of a full frame DSLR, and a tiny bit more area than the Leica S2’s 45x30mm sensor. Here, we have an interesting three-way comparison on our hands: the Nikon D800E, with a 36x24mm sensor and 36MP; the Leica S2, with 45x30mm and 37MP; and finally, the Hasselblad H4D-40 with 44x33mm and 40MP. From a raw sensor resolution perspective, near enough as makes no difference. The lenses would of course be another story entirely.

A6557705 copy
Experimenting with 2.4:1 widescreen on the street, II. H4D-40, 80/2.8

I’ve used the Leica S2 in the past, and found that it handled very well indeed for a medium format camera – in fact, it handled very much like my D800E, with the exception of being a bit larger and heavier, and having an enormously better viewfinder and somewhat simplified control system. In practice though, I didn’t treat it any differently from the D800E except that it had a single center focusing point – necessitating a lot of focus-and-shift-to-recompose. Focusing was fast enough that you could still use it as a street camera in much the same fashion as a regular DSLR. The H4D-40 was a bit different, though: firstly, though it has both autofocus and a gyroscope-adjusted True Focus system (the camera uses the gyro to determine how much it was moved by, then adjust focus by an appropriate amount accordingly depending on the lens) it was a much, much slower camera to focus than either the S2 or D800E. In fact, it was so slow that you couldn’t really do any spontaneous shooting with it; prefocus was the best way to go. Part of the problem is that it wouldn’t always lock on to your intended subject, and there was no real consistency to this – there were times whens it would find focus just fine on a low contrast subject you’d expect to cause a miss, and other times when it wouldn’t lock on to something with high contrast. In that respect, it reminded me a lot of the Fuji X100 running first-generation firmware – and what made me dump that camera was the overall lack of responsiveness.

A6557627bw copy
Steamed tree. H4D-40, 80/2.8

So, the idea of using the H4D-40 as an available-light documentary camera – the majority of my personal work – was already severely handicapped from the beginning. Add to that a maximum lens speed of f2.2 (with the HC 2.2/100) and sensitivity limit of ISO 1600, and you’re going to run into trouble early with handholding and camera shake. Fortunately, it was possible to program mirror lockup onto one of the function buttons; a quick one-two to prefire the mirror then release the leaf shutter with the main shutter release solved the shake problem. In fact, the leaf shutter is so low-vibration that I found myself able to get critically sharp images handheld down to 1/50s with the standard 80mm lens.* It’s a shame that a similar system isn’t used in DSLRs; I suppose it’s understandable when the speed limits for a leaf shutter are both relatively low, and made lower as the distance it has to traverse increases – the leaf shutter is probably going to be at a huge disadvantage compared to a focal plane shutter for very fast lenses like an 85/1.4.

A6557613 copy
Building canyon shadows. H4D-40, 80/2.8

*If you fire the mirror at the same time, 1/2x focal length is about the bare minimum required for a 50% hit rate for pixel-level sharpness – similar to the D800E. I am now of the opinion that the minimum shutter speed required to handhold and achieve critical sharpness at 100% magnification is now dependent solely on the pixel density per angle of view, and independent of format and sensor size. The only thing that changes this equation is the presence or absence of image stabilisation systems. It appears that for up to about 20MP or so, 1/focal length is acceptable most of the time; anything above this requires 1/2x or even 1/3x. With non-stabilized lenses, the D800E, S2 and H4D-40 were all happiest at 1/3x and above; 1/2x still yielded visible shake on a fairly regular basis.

A6557704bw copy
Building reflections. H4D-40, 80/2.8

From a shooting experience point of view, it felt like an early-generation digital: nail the exposure and focus, and the results were surprising; you had to be patient, above all things, and finally, if you got it wrong, no amount of Photoshop was going to save the day; processing latitude – especially shadow recovery – was very low. It was slow, clunky, bulky, and a bit on the kludgy side with the UI (though I understand that many aspects have been improved substantially with the H5D series). That said, the H4D-40 had a number of big advantages in its favour.

A6557630 copy
The cloud. H4D-40, 80/2.8

Firstly, the viewfinder was absolutely fantastic. It’s bright and sharp, the focusing screen is snappy – making it easy to determine which bits of your frame are in focus – and truly enormous. It makes going back to my D800’s finder like the difference between looking out of a cardboard tube and a panoramic floor-to-ceiling window. Secondly, the image quality was bipolar in a good way: images that worked required almost zero work in Photoshop; a quick color adjustment, some very minor curves, and that was it. Native dynamic range was good (though similar to the D800E), with few scenes exhibiting blown highlights. The files are best described as natural; they render with a tonal map that I feel replicates the actual scene very closely, with punch in the midtones and beautiful rolloff in the shadows and highlights.

A6557596bw copy
Nadiah. H4D-40, 80/2.8 at ISO 800

On the high ISO front, compromised dynamic range and quite serious luminance noise started at ISO 800; I’d say at this point the H4D-40 was about a stop behind the D800E. By ISO 1600, two stops. Yet the quality of the noise was remarkably pleasant and almost completely monochromatic; the tight grain reminded me very much of a good roll of black and white film. I wouldn’t hesitate to use the camera at all sensitivities, which is probably a good thing seeing as you’d definitely have to for handheld work.

A6557638 copy
Urban camo. H4D-40, 80/2.8

Interestingly, the native tonal map means that it seems as though the dynamic range is already optimally allocated; the tonal response of the D800E’s sensor means that details are blocked up in the shadows and some recovery must be done in order to achieve pleasing tonality; similarly, there is more recoverable highlight headroom than with the H4D-40, but in the first place, you do have to recover it. If they were trying to replicate the tonal response of a good negative film, they managed admirably. Needless to say, there is no question over resolution. No medium format backs or cameras have anti-aliasing filters; as a result, the amount of detail captured is spectacular. Subjectively, I’d say the D800E and S2 are very, very close in terms of resolving power; the H4D-40’s files seem to be a slight notch above both, with a noticeable increase in acuity at the pixel level. Dynamic range on all three cameras is very similar, but the two CCD-based medium format cameras produce much more pleasing native tonality. Both of the medium format systems offer consistently better optics across the system than what’s natively available for the D800E, with the exception of the 2.2/100 for the H-system – it’s a portrait lens, and it shows.

A6557642 copy
Territoriality. H4D-40, 80/2.8

Most importantly though, the H4D-40 did make me shoot differently – slower, with an increased awareness of the quality of light; however, I was mostly drawn towards static subjects; I attempted street photography with it once and gave up; not only was it enormously conspicuous, but it simply wouldn’t focus fast enough – and I lacked the skills to do it manually. The trouble was, the kinds of things I was shooting I could do just fine with any of the cameras I currently owned – even the RX100. And at typical viewing sizes, there would not be any big differences, either. If I was that conscious of light, or constructing my own, then I could easily photograph scenes that fell within the native tonal range of the cameras I did have to hand. Perhaps the bigger problem was that I didn’t really like the kind of images I was producing; they were too static and lifeless; I didn’t really see an evolution path in there, either.

A6557640 copy
Wondering what happened to the owner of the bike? H4D-40, 80/2.8

Yet in a way, I found the whole experience far too similar to the way I shoot now with the D800E – operation of the camera was very DSLR-like, and I could do exactly the same thing, with almost identical image quality, without having to spend a single cent. Perhaps it might be different if I were to shoot landscapes more often, which would be better suited to a slow, meditative style; the trouble is, there aren’t exactly many such opportunities where I live, and the quality of light in the tropics doesn’t really lend itself to it, either. Unfortunately, after a week with the H4D-40, the only conclusion I can come to is that at this point, medium format is not for me: there is no commercial justification**, it doesn’t advance my personal work, or suit the kinds of subjects I typically encounter. The one thing that did stick in my mind, however, is how little work the files required – it makes me wonder why on earth can’t we get the same tonal quality out of our DSLRs? It certainly isn’t a dynamic range or bit depth limitation; the 16-bit native color on the H4D-40 does render slightly more pleasing colors than the 14-bit D800E, but you had to look for it. I suppose it should theoretically be possible to engineer a default tone curve or series of curves that would at least get the tonal output of the D800E to a similar baseline…food for thought. MT

**A full set of lenses to cover all of my requirements would be prohibitively expensive even after selling all of my current equipment; there would be no wideangle solution to match the Zeiss ZF.2 2.8/21 Distagon, and the maximum macro magnification would be nowhere near what I can easily achieve now with a couple of extension tubes. On top of that, I’d have to use a more powerful set of lights to deal with the smaller apertures I’d have to use to achieve equivalent depth of field on the smaller format, and I’d lose TTL flash metering and remote control. None of my clients need the extra image quality, and certainly wouldn’t pay extra for it.

The Hasselblad H4D-40 is available here from B&H

____________

Visit our Teaching Store to up your photographic game – including Photoshop Workflow DVDs and customized Email School of Photography; or go mobile with the Photography Compendium for iPad. You can also get your gear from B&H and Amazon. Prices are the same as normal, however a small portion of your purchase value is referred back to me. Thanks!

Don’t forget to like us on Facebook and join the reader Flickr group!

appstorebadge

Images and content copyright Ming Thein | mingthein.com 2012 onwards. All rights reserved

Lens review: The Nikon AF-S 85/1.8 G

_8015825 copy

The Nikon AFS 85/1.8 G (released at the start of this year) is a slightly odd product. Unusually for Nikon, the new version doesn’t cost a lot more ($50, give or take a bit) than the old one; doubly unusually, it isn’t a warmed-over cosmetically-modified version, either. (It’s also now made in China, which might have something to do with it. The old lens was made first in Japan, and then Thailand since 2010.) The 85/1.8 D was a simple double Gauss design with 6 elements in 6 groups; the new one uses a 9/9 optical formula. The elements in front of the iris ostensibly retain the double Gauss formula, but everything afterwards is new. As far as I can tell, the same basic optical principles apply, except every single element in the rear group has been replaced with an achromatic doublet of sorts; not a true achromatic doublet because there’s an air gap between neighbouring elements.


Images from Nikon USA. The D is on the left, the G is on the right. Note far more complex rear group; the pairs of lenses do effectively the same thing as the single lenses in the earlier design. The images are to scale, too – note increase in size. It doesn’t seem to be any heavier, though – and noticeably lighter than the 85/1.4 G.

This complex formula has two benefits: firstly, lower chromatic aberration because there’s that extra element there for correction; secondly, internal focusing is now possible (the previous design focused by moving the entire optical assembly back and forth, like all double-Gauss designs). As far as I can tell, the front and rear elements (possibly more than one) are fixed, and the rest move back and forth. At this point, it’s worth noting that unlike Nikon’s newer optical designs, it’s remarkably free of any exotic technology – whilst the bottom of most lenses now play host to entire essays in abbreviations about Nikon’s lensmaking prowess, the 85/1.8G is remarkably clean. All it has is internal focusing and the silent wave motor – that’s it. There’s no Nano-crystal coating, no ED glass (let alone Super ED glass) and no aspherical elements. Even the new 50/1.8 G employs asphericals!

_8021061 copy
Untitled. Nikon D800E

Regular readers of my site will know that I was originally a huge fan of the 85/1.4 G, especially on the D700 for it’s sharpness, quality of bokeh and incredible ability to shoot into direct light sources with minimal to no flare. You’ll also know that despite trying multiple samples, I was never quite happy with the performance of this lens on the D800E; mainly due to lateral chromatic aberration wide open, and so-so edge performance. It’s therefore logical to assume that there are optical quality reasons as to why I’m now using the 85/1.8 G instead. You’d be right.

_8021169 copy
Caution. Nikon D800E

In all of my A-B testing with similar subjects, several samples of both lenses – the 85/1.8 G was consistently sharper in the center at f1.8, let alone f1.4. it’s possible that real resolution was identical, however, the 85/1.4 G showed so much lateral chromatic aberration that it robbed the images of perceptual acuity. It was also sharper at the edges – markedly so, especially on the D800E. It’s worth remembering that at f1.8, the 85/1.8 G is wide open, and the 85/1.4 G is 2/3rds of a stop down. Granted, it’s easier to design a good slower lens than a faster one, but then again, the 85/1.4 G has a huge amount of technology in it – ED elements and Nano-crystal coating, for starters. Interestingly, the optical formulae for both lenses are nearly identical.

_8021175 copy
Apprehension. Nikon D800E

Bottom line: the 85/1.8 G is sharp at every aperture, across the frame, even on the D800E – providing you nail the focus, of course. There is remarkably little falloff in sharpness from center to edge; consistency and microcontrast improve marginally to f4, but it’s already outstanding by f2.8. I only shoot this lens wide open, which should give you some indication of how I feel about the optics. Chromatic aberration under normal situations is almost non-existent; a remarkable performance. Even though this lens has 7 blades instead of the 9 of its predecessor (and 85/1.4 G), bokeh remains pleasing, neutral and smooth. I’ve yet to see any odd artefacts like double imaging or nervousness, but there is a tiny bit of spherochromatism (color fringing) in the out of focus areas. In fact, it’s one of the better-rendering lenses I’ve used in this regard. Color transmission is neutral, per the current crop of Nikon lenses; though the saturation is unsurprisingly not as high as the Nano-crystal equipped optics.

_8021259 copy
Phonecall. Nikon D800E

You’re probably wondering what the tradeoff is, given the huge gulf in price between the 85/1.4 G and 85/1.8 G; the last line should have given you a clue. It has to do with contrast, saturation, transmission and flare. It seems that the Nano-crystal coating makes an enormous difference to all four; the 85/1.8 G takes a noticeable hit in every area compared to the 85/1.4 G (it still improves on the old lens in every way, however). The problem stems from flare; when you have extraneous light bouncing around inside the lens between elements – a good coating minimizes reverse reflections off air-glass surfaces – everything else suffers. The most obvious manifestation of this is under backlit conditions, of course – especially when there is a bright point light source in the frame. The 85/1.4 G shows almost zero flare; the 85/1.8 G gives an enormously spectacular trail of reflections off what appears to be every single element. This can be pleasingly cinematic for atmosphere or video work, except the lens has no hard infinity stop, which makes focus pulling challenging. For stage/ performance work, it’s a pain in the ass. Unfortunately, the supplied hood makes no difference simply because it can’t block light from entering the front of the lens – and it’s these rays that are causing the problem.

_8021761 copy
Ugly flare – and this is after correction by burning and desaturation. Nikon D800E

Internal flare also lowers contrast; macrocontrast especially. Microcontrast is a bit worse, but not by much. By f2.8 both lenses are neck and neck here. The knock on effect is a reduction in overall saturation; no surprises here. Perhaps the least obvious, and most surprising side effect is a huge reduction in transmission (read my article on the difference between T stops and f stops for more detail). At any of the wide apertures, the 85/1.8 G transmits between 1/2 and 2/3 stop less light than the 85/1.4 G; this is to say that if both are set to a physical aperture f2, then you’ll find the 85/1.8 G’s required shutter speed for a given exposure to be noticeably lower than the 85/1.4 G. In other words, if you set 1/100s f2 ISO 200 on both lenses, the 85/1.8 G photo will be underexposed by 1/2-2/3 stop. The reason is because a lot of the light entering the lens isn’t making it to the sensor plane, thanks to suboptimal coatings.

That said, it’s still better than the old lens.

_8021767bw copy
Less ugly, more cinematic flare – but still flare. Nikon D800E

The new lens gains a silent wave motor and loses an aperture ring; it’s still plastic, but now the crinkle-finish variety to match the modern bodies and lenses. The plastic type appears a lot less brittle than the 85/1.8 G, though admittedly I’ve never had issues with any of the older lenses other than a propensity to pick up scratches easily. The silent wave motor isn’t any faster than the screwdriver method; it’s about the same, actually – especially on a body with a high voltage built in motor like the D3 or D4. The difference is in precision: it’s a lot easier to move a coreless linear motor in the small increments required to adjust for small changes in focusing distance than a geartrain with associated backlash. In practical terms, you’ll find the new lens a lot more precise than the old one. (It still remains useless if you use an older camera that requires an aperture ring.) The lens also gains environmental gaskets, making it a good choice for pairing with a similarly sealed body.

_8021304 copy
Solo. Nikon D800E

I thought that it would be easy to write a conclusion to this review; it isn’t quite so straightforward. I’m going to turn it around a bit instead:

Buy the AFS 85/1.8 D if:

  • You shoot with a manual focus camera, or want to use the lens both on your Nikons and other systems via an adaptor – otherwise you’ll have no aperture control.
  • This lens is optically inferior to both of the G versions, and not much cheaper than the AFS 85/1.8 G.

Buy the AFS 85/1.8 G if:

  • Resolution at maximum aperture and CA are important, i.e. you shoot with a D800/ D800E.
  • You want lower contrast because you shoot with an older, lower dynamic range body
  • Size and weight are important; the lens is noticeably lighter and a bit smaller than the 85/1.4 G.
  • Price is important
  • You like cinematic flare.

Buy the AFS 85/1.4 G if:

  • You need as much light gathering ability as possible, or shoot frequently under very low light conditions
  • You shoot into bright point sources a lot
  • You shoot with a lower resolution body
  • Notice I haven’t mentioned bokeh yet: the 85/1.4 G is slightly better than the 85/1.8 G, but it doesn’t justify the increase in cost.

The Nikon AFS 85/1.8 G is available here from B&H and Amazon; the AFS 85/1.4 G is available here from B&H and Amazon.

____________

Visit our Teaching Store to up your photographic game – including Photoshop Workflow DVDs and customized Email School of Photography; or go mobile with the Photography Compendium for iPad. You can also get your gear from B&H and Amazon. Prices are the same as normal, however a small portion of your purchase value is referred back to me. Thanks!

Don’t forget to like us on Facebook and join the reader Flickr group!

appstorebadge

Images and content copyright Ming Thein | mingthein.com 2012 onwards. All rights reserved

Comparative lens review: The Olympus M. Zuiko Digital 17/1.8

_Z260001 copy

Advance note: Images in this review were shot with an Olympus OM-D and the ZD 17/1.8 unless marked otherwise. Please go by the commentary rather than the reduced crops; I am looking at uncompressed RAW files on a calibrated monitor, not a websize JPEG. The review was completed with a final pre-production prototype lens. I’m told that image quality and build are representative of the finished product.

_Z260004 copy With (once again) poorly designed and optional lens hood. At this price…shame on you, Olympus.

One of the first lenses released for the fledgling Micro Four Thirds system was the 17/2.8 – equivalent to 34mm in full-frame talk, and the staple walk-around lens for most photographers. I’ve personally never been a fan of this focal length – it simply doesn’t fit with the way I see – so I tried it once on the first E-P1, and never paid it much attention since. That lens was a simple 6/4 design with a single aspherical element at the rear, and notorious for managing to pack many undesirable qualities into a single lens at once – it was slow to focus, suffered from serious lateral chromatic aberration at the edges at pretty much all apertures, and was extremely noisy while hunting to boot.

_5014292 copy
Tuna.

Its sole redeeming graces were that it was sharp in the center of the frame, and very small. Most photographers ditched that lens for the Panasonic 20/1.7, which was a little longer, not much bigger, but over a stop faster and optically comparable. That lens made its way into my bag while I was shooting with the E-PM1 Pen Mini, turning the camera into a small and pocketable companion.

_5014556bw copy
Silhouette of a man

Olympus has been on a bit of a roll lately with its Micro Four Thirds lenses – first the 12/2, followed by the 45/1.8, then the 75/1.8 and 60/2.8 – the latter two of which are amongst the best lenses I’ve used for any system, period; the new M.Zuiko Digital 17mm f1.8 (hereafter known as the 17/1.8) is the latest to follow in this vein.

_5014652 copy
What lurks beneath

The lens’ construction is closer to the 75 and 12mm lenses than the 45 and 60, which is to say it follows the High Grade requirements of being all-metal in construction (champagne-colored anodized aluminum) and having the ZERO optical coating. It has the same pleasant tactility and solidity as the 75 and 12mm lenses; there’s no plastic to be seen anywhere here. Unfortunately the lens is not weather sealed and has no visible gaskets, and once again, has an optional (and expensive) lens hood that makes it very difficult to remove the lens cap. Like the 12/2, the full-time manual focus ring override clutch activated by pulling the focusing ring backwards towards the camera. In this position, the ring exposes the distance scale which works in conjunction with the depth of field scale engraved on the static outer flange, and has fixed end stops at minimum focus distance and infinity. Unlike the 12/2, the possible distances are no longer fixed to several discrete ranges – pulling back on the ring and turning it slowly through its range of travel, you can see via the LCD image that the focus distance changes continuously. If there are discrete steps, they’re very small ones. This is great news – whilst the idea was a good one for reactive documentary photography, its implementation on the 12mm made it fairly useless in practice.

_5014474 copy
Hop to rainbow row

Needless to say, autofocus speed is on par with all of the current generation of Olympus lenses – very, very fast indeed. It’s much faster than the 17/2.8 and Panasonic 20/1.7 – about the same as the 12/2, and slightly faster than the 45/1.8 (which is to be expected because that lens has a longer focus travel as required by its focal length). I did experience one or two issues with precision at longer distances wide open though – admittedly an unlikely usage scenario – the lens tended to lock at about 6-10m distance instead of infinity; as a consequence, images were borderline sharp but nowhere near what the lens can produce if focused properly. The 17/1.8 focuses down to a minimum of 25cm, which in practice means covering a 15x20cm object or thereabouts. It’s slightly less than the 20cm minimum of the 17/2.8, but curiously the real focal length of the 17/1.8 seems to be a bit longer, which lands up evening things out in the end. Close up performance wide open is not its strength; there’s a distinct loss of microcontrast that robs resolving power, that only starts to come back at f2.8 and smaller – this isn’t entirely surprising as the lens lacks any floating elements. In this area, I’d say it’s on par with the 20/1.7, and slightly worse than the 17/2.8.


Optical formulae. 17/1.8 at left, 17/2.8 at right.

The 17/1.8 is a much more complex lens than the 17/2.8 that preceded it. Firstly, focusing takes place entirely within the lens, in order to keep things fast and silent; the entire optical assembly no longer moves. It’s a complex 9/6 design that appears to have been done entirely by computer; I don’t recognize the optical formula at all. Olympus have spared no expense here – two aspherical elements, one HR element, and one DSA (double super aspherical) element go into the mix. Both front and back surfaces are flat, which presumably has a positive effect on flare; I certainly didn’t see any during my test images, which included several deliberately backlit shots and point sources within the frame. No doubt the ZERO coating helps, too.


MTF charts. 17/1.8 top, 17/2.8 bottom. Image from Olympus Malaysia

On the basis of the MTF charts alone, both lenses should perform similarly in the center, with excellent overall sharpness and contrast, and middling to good microcontrast. Towards the outer portions of the frame, the 17/2.8 drops in fine resolving power, and loses it in the corners. This is not because the lens isn’t sharp: huge amounts of chromatic aberration mixed in with field curvature rob resolving power. The 17/1.8, on the other hand, maintains its overall resolving power out much further towards the edges – remember this is at f1.8, against the 17/2.8 at f2.8 – with a dropoff only in the extreme corners. The complex wave form of the 60 lp/mm lines suggests that it’s probably due to some very odd field curvature, probably as a result of the complex optical design. The 17/2.8, on the other hand, has a simpler, less corrected, design, with resulting first- and second- order uncorrected field curvature. Geometric distortion is very low, however, and requires almost no correction in Photoshop.

_5014643 copy
In a very quiet back alley somewhere, waiting for the person to complete the shot that never arrived.

In practice, what this means for sharpness is that the 17/2.8 was good in the center, but terrible in the corners and lacking punch and transparency. From what I’ve seen, the 17/1.8 markedly improves on this in practical situations; the sweet spot extends much farther out from the centre even wide open at f1.8, and by f4 performance is uniformly excellent across the entire frame – in some ways, reminiscent of the behaviour of the 12/2. Note that this is a lens which performs best if you place the focus point over the intended subject; focus-with-the-center-point-and-recompose is not going to yield optimum results due to the nature of the 17/1.8’s field curvature profile.

_5014681 copy
Whole test scene.

17-17-20-center
3-way comparison of center resolution. 100% version here. The 20/1.7 has the highest overall scene contrast, but the 17/1.8 wins out in microcontrast and reproduction of fine detail structures – personally, I prefer this as it gives me more latitude for processing before the shadows and highlights block up. The 17/2.8 is in the middle for macro contrast and on par with the 20/1.7 for microcontrast.

17-17-20-top right
Top right. 100% version here. Note purple fringing on the 20/1.7 shots, even at 5.6. That portion of the building is not overexposed according to the histogram. The two Olympus lenses exhibit notable CA, with the 17/2.8 being the worst offender.

17-17-20-top left
Top left. 100% version here. The 20/1.7 is oddly free of both CA and purple fringing in this corner; in fact, the performance here doesn’t really match the other corners – chalk it down to sample variation. This is the 17/1.8’s worst corner.

17-17-20-bottom right
Bottom right. 100% version here. We’re now seeing CA from all three lenses, with the 17/2.8 once again faring the worst. The 17/1.8 is slightly better than the 20/1.7. Interestingly, not much changes even when you stop down.

What will affect resolution (and perceived acuity) far more is lateral chromatic aberration. The 17/2.8 was notorious for this, and to be honest, the 17/1.8 shows a notable improvement over its predecessor, but CA is still present to f4. Both lenses have visible longitudinal chromatic aberration and spherochromatism that show up as fringes in the bokeh; the new lens is slightly better but still not perfect. This does not affect microcontrast as much as you would expect as the longitudinal CA occurs only in out of focus areas, which are devoid of microcontrast and fine detail structures anyway. In the in-focus areas, microcontrast delivered by the 17/1.8 is already good wide open, improving slightly to peak at f4. The 17/1.8 has about the same global contrast as the 17/2.8 at comparable apertures, but slightly better microcontrast and the ability to render more subtle tonal gradations.

_5014354 copy
Whole test scene. Yes, that’s a Lego chess set. A custom one: goons vs. the village people.

17-17-20-LoCA
Bokeh, LoCA and spherochromatism, #1. 100% version here. I’d say the 20/1.7 looks best here, but it’s very nearly a tie with the 17/1.8.

Both lenses have surprisingly consistent color rendition despite their vastly different construction and coatings; that is to say, neutral to slightly warm, with decent (but still plausibly natural) saturation. Where they differ is in transmission: (see this article for the difference between T stops and f stops) it’s clear that the coatings used in the new lens endow it with significantly better lower internal reflection properties than the older lens. Despite having more elements and air-glass surfaces, the 17/1.8 meters with a shutter speed that’s about 1/3-1/2 stop faster than the old lens for a given fixed aperture and histogram (luminance) output. This is a useful gain in practical situations; it’s not quite see-in-the-dark territory, but good transmission characteristics combined with its relatively short focal length and the excellent stabilization system on the OM-D mean that its useability envelope is very wide indeed. Vignetting is also fairly negligible too, even wide open.

17-17-20-bokeh
Bokeh, LoCA and shperochromatism, #2. 100% version here. No prizes for guessing the 20/1.7 has the best rendition since it also has the longest focal length; this portion is a bit of a lopsided comparison.

The 17/1.8 renders out-of-focus areas with a rounded softness and lack of hard/ bright edges or double images, even against complex background textures. Whist you’re never going to get a large amount of defocus to your backgrounds with a real focal length of 17mm (that’s a property of the focal length) unless you get very close to your subject with a simultaneously distant background, what you do get with the 17/1.8 is very pleasant. I actually think the 17/1.8 delivers close to the right amount of bokeh for most situations at relatively near distance; enough to separate the subject but not so much as to completely abstract out backgrounds.

_5014429bw copy
Fear of the supervisor

Throughout this review, I’ve talked a lot about its predecessor, the 17/2.8; the other dark horse sitting in the corner is the Panasonic Lumix 20/1.7 G. It was my mainstay lens on the E-PM1 Pen Mini, though I’ve used it less since acquiring the 12/2 and 45/1.8 lenses. Though it has a slightly longer real focal length at 40mm equivalent, in practice the difference is minimal and no more than a step or two backwards or forwards. The 20/1.7 is a popular lens amongst enthusiasts because it was both fast and compact; value for money, too, if purchased with the original GF1 kit. It still retains its popularity today, because the only other fast 35-ish equivalent so far has been the Voigtlander 17.5/0.95, which is not only hideously expensive, bulky and manual focus only – all of which somewhat defeat the point of Micro Four Thirds.

_5014381 copy
Caged laundry

What I find curious is that the 20/1.7 images render as though they are a slightly cropped version of the 17/1.8 – this is a good thing, as the optics on the 20/1.7 are excellent. Sharpness/ resolution, microcontrast, color transmission and even quality of bokeh are very similar; however they have completely different optical design philosophies. Where the 17/1.8 makes significant gains over the 20/1.7 is in autofocus speed; it’s simply night and day; not to mention the usefulness of the manual focus clutch.

_5014592 copy
Hipster at sunset

For the 35mm (or therabouts) EFOV enthusiast, we now have four choices in the Micro Four Thirds mount – the Olympus 17/1.8 and 2.8; the Panasonic 20/1.7, and the Voigtlander 17.5/0.95. There are also myriad other options you could adapt from other mounts, such as the excellent Zeiss ZM 18/4. I’d consider the adapted options not viable simply because none of them were designed with telecentricity in mind, yielding poor results on M4/3 cameras – severe vignetting, color shifts in the corners and purple fringing are all common problems. The Voigtlander is an intriguing lens and a surprisingly excellent performer at f1.4 (it’s decent at f0.95) that also happens to have a very short minimum focus distance of just 15mm from the sensor, but it’s very much a special-purpose lens: you don’t buy this and shoot it at f2.8. There’s simply no point. And if you need one, I think you’ll already know it.

_5014401 copy
Waiting for the bus

That leaves us with the three native AF options. I would not buy the 17/2.8 unless size is a critical priority, or you know that you’re going to be shooting only static objects stopped down; otherwise the slow AF speed will drive you crazy. The Panasonic 20/1.7 is in a similar boat; it’s faster to focus than the 17/2.8 and optically better, but nowhere near as fast as the 17/1.8. The 20/1.7 and 17/1.8 deliver similar resolution in the center, but they render quite differently – the 20/1.7 is punchier but has slightly lower microcontrast; the 17/1.8 has lower macrocontrast but better reproduction of fine detail structures – i.e. better microcontrast. In the corners, the 20/1.7 is the highest-resolving of the three, but shows strong purple fringing on top of CA which is absent from the other lenses. Interestingly, one thing I noticed with all three lenses was that corner performance was not really consistent – i.e. there were some minor tolerance-related astigmatism effects in play. All three lenses still suffer from longitudinal CA and spherochromatism, though. Ultimately, I think your choice will boil down to three things: price (the lens is to be around US$500 when it becomes available in December), whether you prefer the 40mm FOV, or 35mm; and how critical is focusing speed? If you shoot a lot of street or documentary work, then the ability to stop down and scale focus can be an extremely valuable asset. Overall verdict: recommended. MT

Thank you to Olympus Malaysia for supplying the lens review sample.

The Olympus 17/1.8 is available here from B&H

____________

Visit our Teaching Store to up your photographic game – including Photoshop Workflow DVDs and customized Email School of Photography; or go mobile with the Photography Compendium for iPad. You can also get your gear from B&H and Amazon. Prices are the same as normal, however a small portion of your purchase value is referred back to me. Thanks!

Don’t forget to like us on Facebook and join the reader Flickr group!

appstorebadge

Images and content copyright Ming Thein | mingthein.com 2012 onwards. All rights reserved

What to look for when evaluating used and new equipment

_D90_DSC4124bw copy

Sample variation abounds in both cameras and lenses, and that’s before we even talk about the second hand markets and all of the possible complications that use can introduce. With the increasingly complex nature of cameras and optics, it’s important to know what you’re buying is going to perform the way you expect it to. It doesn’t help either that the megapixel race is pushing ever higher demands on optics, too; these levels of performance can only be reached if the manufacturing and assembly tolerances are sufficiently tight. And frankly, the more handmade a camera is, the more difficult it is to achieve these tolerances; machines are both more consistent and more precise than a human, providing of course they were set up correctly in the first place.

First note: I’ve received so many emails asking “is this a good copy of x or y” that I have to make an upfront disclaimer: there is no way for me to assess the results of a test without knowing how that test was conducted in the first place – if you didn’t focus it properly, or the camera wasn’t locked down on a tripod, etc – how am I going to know if it’s lens softness or user error? I don’t always do this myself when evaluating equipment, but knowing then precise limitations involved in the test make it easier for me to derive some form of meaning to the results.

Second note: When testing and forming an opinion on lenses, I will frequently test many copies to make sure the results I’m seeing are consistent; if the performance deviates significantly from the expected level, then I’ll make sure I test more than one. If I didn’t, I might be drawing (incorrect and unfair) conclusions based on an exception. This of course means that when I state something delivers good quality or quality at a certain level, you can be fairly sure that if you go out and buy a good sample, it will perform at the level I report.

_D90_DSC4192bw copy

Okay, that aside, there are a number of things we need to check for both lenses and bodies; some apply to both new and used gear, some apply to used gear only. Let’s begin.

Lenses
Important: don’t overlook a lens just because the external cosmetics are poor; if you only intend to shoot with it, use it and not collect it, then there are some great bargains to be had – and you’ll worry less about denting/ scratching the barrel when you do take it out. Plus it’s unlikely you’ll lose very much on it when you get bored of it. Note: this is not a guide to how to assess if a given lens is good or not optically; that’s a much more complicated topic for another day. 

Both new and used (and fixed-lens cameras)

  • Zoom/ focus rings should be smooth and not gritty or sticky
  • Hold the lens up to the light; there should be no fungus (spidery tendrils, or splotches) inside the elements
  • Coatings should appear intact (it will look like a peeling film if it isn’t)
  • No scratches on the glass
  • Optically, it should at least be sharp in the center; test with a camera that has live view AF, locked down on a tripod at base ISO. Look at the four corners and center for every major focal length, start with wide open; they should all be reasonably sharp (especially the center). Note that you must use live view AF (or magnified MF) to rule out any possible issues with the camera. And it’s also important to move the focus point to the intended corner, because the lens may not be flat-field – this means that the subject distance in the corner will have to change in order to reach optimum performance. It’s best to check this on the largest format the lens was designed to cover, i.e. if full frame, use a full frame camera and not an APS-C one.
  • The left/ right sides of the lens should be symmetrically sharp or soft (if it has field curvature, or is just a soft lens)
  • Focusing motors should not squeak or make grinding noises, this is a sign of imminent failure.
  • For CPU lenses, check the contacts – they should be clean and not corroded; and of course the lens should work properly with the intended camera!
  • A warranty of some sort. This means that the seller is confident in their product – but don’t expect it from individual private sellers.

New

  • Warranty cards, papers, manuals etc.
  • Check the mount for signs of use – there shouldn’t be any if it’s a new lens.
  • Internal dust – yes, it does happen.
  • Dry/ loose rubber parts – that means it’s been sitting on the shelf for too long.
  • Aperture rings should have clean, crisp detents
  • The point about optics applies too: there is a lot of sample variation, even in new lenses built to modern tolerances.

Used

  • Although barrel cosmetics seldom affect optics, they can sometimes serves as an indicator of more serious damage; if the barrel is dented or stiff, avoid this lens because there’s a good chance the helicoids are damaged, and the internal elements could be misaligned.
  • Oil on aperture blades – there shouldn’t be any. It could spray inside the lens as they open and close, especially at high speed with an SLR.
  • Marks on aperture blades from use are a non-issue.
  • Coatings: are they intact? Are they scratched?
  • Aperture rings should have clean, crisp detents.
  • There should be no missing screws.
  • Caps, hood, case? Especially for period lenses where these items can be difficult to find.
  • Some brassing on the mount is normal. None is a bonus.
  • Dented filter rings are a giveaway that a lens has been dropped.

Bodies
These are the opposite of lenses: hard use on the outside almost certainly means hard use on the inside. Avoid anything that looks like it spent some time in the ring with Mike Tyson.

Both new and used

  • Accessories: batteries (especially for older cameras), finders, port covers, eyepiece covers
  • Autofocus and shooting functions work properly
  • No sticky or unresponsive buttons
  • No dead pixels on the LCD
  • Scratches on optics – finder, focusing screen, mirror, eyepiece, LCD etc
  • Camera writes to card properly

New

  • Everything that should be in the box is actually in the box. Some shady dealers will try to sell you the original charger as an ‘optional accessory’ or replace it with a non-original one. Beware.
  • Since the D800/ D800E fiasco, I’ve had to check the edge AF points on all new bodies. Yes, poor focusing can be fixed, but you’d rather not have to send in a brand new camera to correct something that should have been right in the first place…

Used

  • Accurate shutter speeds – especially for film; expose a roll if they’ll let you, if not, time the slow shutter speeds with your watch.
  • Check the shutter count if you can. A JPEG file plus a program like iExif will show you the count, or alternatively, it’s often embedded as a ‘unique image ID’ hex code, which can easily be viewed with Bridge and converted.
  • Film advance is smooth
  • Dust inside the prism or finder – some can be cleaned, some can’t
  • Desilvering of the mirror (dark spots) or prism; separation of the rangefinder patch (flare, poor contrast)
  • Bent pins in the CF or SD slots
  • Peeling grips – they can frequently be replaced for little money, but it’s just annoying to have to send in the camera.
  • A warranty of some sort. This means that the seller is confident in their product – but don’t expect it from individual private sellers.
  • Mirror alignment. This is much tougher to check with film, but basically if you focus on something with manual focus through the finder, it should be in focus – this isn’t always the case as the mirror alignment or zero return position might be off.
  • Rangefinder alignment – same deal as the previous item, but for rangefinder cameras. Bottom line: with a rangefinder, if you can’t consistently focus on your intended subject, chances are the alignment is off. Watch also for vertical alignment – the RF patch should overlap perfectly vertically, and only move left to right. There should not be a vertical double image.
  • This seems obvious, but with the lens off and the mirror lifted (if applicable) the shutter curtain should appear pristine. Even on an older camera.

Accessories

  • Flashes can be very high mileage but look new. Check recycle time and power with new batteries; if it’s slow or underpowered, chances are the tube is on the way out – avoid.
  • Tripods should have smoothly operating legs and heads/ ball action; the head should not move at all once it’s locked down. Check for excessive grease; metal filings dirt etc. can easily get trapped, causing things to bind, or worse, damaging internals.

____________

Visit our Teaching Store to up your photographic game – including Photoshop Workflow DVDs and customized Email School of Photography; or go mobile with the Photography Compendium for iPad. You can also get your gear from B&H and Amazon. Prices are the same as normal, however a small portion of your purchase value is referred back to me. Thanks!

Don’t forget to like us on Facebook and join the reader Flickr group!

appstorebadge

Images and content copyright Ming Thein | mingthein.com 2012 onwards. All rights reserved

Review: The Fuji FinePix XF1

_5014249 copy

One of the more interesting compacts in recent memory is the Fuji Finepix XF1. Announced at Photokina 2012, it’s a pocketable metal-bodied camera with a moderately sized sensor – not the 1″ of the Sony RX100, but not the usual 1/1.7″ type either. It shares a sensor with the Fuji X10 – the 12MP 2.3″ EXR-CMOS, presumably it’s the updated version without the white orb issue; I certainly didn’t see any during my testing. The camera is definitely retro-styled, with a faux-leather skin covering the middle portion of the body, with warm silver metal covers top and bottom – presumably anodized aluminum. It’s certainly a pleasingly tactile object to handle. For the style conscious, the camera is available with black, tan or red pleather; I opted for red since the camera was ostensibly a present for my wife.

_5014276 copy

The camera’s biggest party trick is its lens: a 25-100/1.8-4.9 equivalent that both sports a mechanical zoom ring – slowly becoming a rarity even for M4/3 cameras – and a collapsing mechanism that lets it drop back into the camera body to keep things pocketable. Presumably it’s an evolution of the design used on the X10, though obviously not as fast due to size constraints. Again, like the X10, it also powers on the camera. One twist into standby mode puts the camera either into ‘ready’ position (if enabled, eats battery); another twist to the wide end of the zoom turns the camera on. I would love to have a separate power switch, too – this would make it a fantastically responsive camera as you could have the desired focal length preset before powering on; something I wish the otherwise very fast Sony RX100 could do.

_5014242-5 copy
Lens in a range of positions from fully retracted to fully extended.

Needless to say, zooming is quick and easy. The mechanism itself is reasonably smooth, but it could use a bit more damping to give a higher quality feel; you have the impression of a lot of light pieces of plastic or thin metal moving around inside the lens barrel as you turn it. In fact, the camera is quite light – generally a desirable quality – personally, I’d prefer a bit more heft. Finally, stiffer detents between the 25mm position, STANDBY and OFF would help avoid accidental power ups/ shut downs. The only other notable mechanical gubbin is the release lever for the dinky pop-up flash hidden in the top plate.

_5014250 copy

It would seem that the feature race hasn’t ended for the enthusiast-level compacts; the XF1 is packed with all sorts of modes and customisability; the only three that are of any real note are the dynamic range optimiser, built in level and customizable buttons. The former does some strange things with the sensor and ISO range to extend highlight and shadow dynamic range in JPEG files only; it seems to work. I’ll say more on this in the image quality section. The built in level is an unobtrusive horizon line through the middle of the frame that works for roll only, but shows a single green line when the camera is level. It’s actually quite handy on a camera of this size, because it isn’t always easy to hold it stable with one hand – not that you’re going to be shooting the XF1 singlehanded with the mechanical zoom.

DSCF0114b copy
Traffic. Fuji XF1

Finally, there are effectively no less than seven programmable buttons: pressing E-Fn brings up a virtual overlay where the user’s choice of shortcuts are assigned to the four directions of the D-pad, playback and record buttons on the back; there’s also another function button on the top plate behind the shutter. Annoyingly – perhaps out of muscle memory – it’s in exactly the same place as the power button on just about every other compact, and I find myself repeatedly hitting it and wondering why the camera won’t turn on or off, but instead bring up a menu. The only function which I’d want to assign to this direct-access key (you don’t have to press E-Fn first) would be AF area – and guess what, this also happens to be the only one of the customizable functions that’s missing from the list of possibles for this button. Grr.

DSCF0075bw copy
Yard abstract. Fuji XF1

It’s worth noting that there is no way to separate AE lock and AF lock from the shutter button – so the half-press-and-dance routine may result in some undesirable metering. The XF1 also has a lens-shift based image stabilization system that moves a group of four elements. The best word to describe it is ‘aggressive’; it reminds me of the early days of IS where the image would sway a bit as the stabilizer locked down. I’m estimating it’s probably good for 2-2.5 stops. It certainly isn’t as effective as the Panasonic OIS system, which I think is probably still the class leader for compacts.

DSCF0094b copy
Camouflage. Fuji XF1

Overall, there are a lot of things I like about the UI, and a number I don’t. Playback is done well, for a change on a compact – you can power on the camera straight into playback mode by holding down the play key; there’s no need to extend the lens. Then, press in the top command dial in to go to maximum magnification, and then you can compare images at the same zoom level and position by moving the rear dial. But this is where another issue raises its head: the camera has two command dials, which is the same number as any camera of this size and most pro DSLRs. Yet by default they seem to be dormant or redundant most of the time – only in M do the two dials do anything independently. It would be sensible to have one serve as direct acesss to exposure compensation and the other as program shift/ aperture/ shutter speed in the other modes, but no. You have to press up on the D-pad to enter exposure compensation, then use either dial to change it. And then press up again to go back to changing the main exposure setting. Still, at least it’s a shooting priority camera. It just seems that there are a lot of wasted opportunities here that would have let Fuji knock one out of the park with this little camera’s handling. There’s still hope for a firmware update, I suppose – Ricoh’s GRD series is very much the leader when it comes to compact camera handling; and it’s done with no more buttons than the XF1 has.

DSCF0105bw copy
Trash alley. Fuji XF1

Other little things – the LCD isn’t the highest resolution out there, with about 460,000 pixels; you can just about make out the pixel mask if you look closely, but most of the time it’s a non-issue. The screen gets pretty bright for daylight use, but of course that comes at the expense of battery drain. I’d like to see something a bit less contrasty, though; it doesn’t give that good an indication of overexposure – but there’s a blinking highlights warning in playback mode to get around this. Fortunately, the XF1 seems to be fairly miserly with power consumption, yielding about 300 frames on a charge of it’s quite physically small battery. The lens-based on-off switch makes it quite easy to power the camera off between frames, which of course helps with battery life. The camera also shoots full HD video at 1080p30, which is nice but not something I use – so I’ll leave it to others to test.

DSCF0053b copy
Urban geometry around dawn. Fuji XF1

I was not impressed with its predecessor’s focusing speed – despite having ostensibly the same sensor and a faster lens, the X10 is not a fast-focusing camera. This isn’t the main problem, though – it freezes between half-press and achieving focus, which means that a) if you move slightly, and you will because it’s a compact, then you won’t see it until you get a sudden jump when the camera focuses; b) the delay is annoying. In fact, this was the main reason why I didn’t buy one. I’m pleased to report the XF1 fixes this. Whilst there’s still a very tiny perceptible freeze, it’s almost negligible. I certainly don’t notice it in practical use.

DSCF0051b copy
Untitled. Fuji XF1

Overall; the XF1 is a fast camera and doesn’t keep you waiting. It shuttles around RAW or JPEG files with equal indifference, except perhaps write time is noticeably longer. That said, I wouldn’t recommend using this camera to shoot RAW even though it can; and this has a lot to do with the quality of the in-camera processing, and the absolutely crappy results obtained via ACR. This is a bit of a shame, as the lens quality is very impressive – better than the Zeiss-branded lens on the Sony RX100. It doesn’t suffer from the same flare or low contrast at wide angle and f1.8; the corners are also much sharper. More impressively, this level of optical quality is maintained through the telephoto end of the range, too. (It could also be because the lens has to cover a much smaller image circle than the RX100’s.) There is some CA in the corners, but flare is impressively low, microcontrast high, and color rendition pleasing.

DSCF0097b copy
Spot the dent. Fuji XF1

Despite Fuji’s claims about the camera’s bokeh-generating ability (and 7-bladed diaphragm) – the reality is that you’re only going to get a tiny bit of background separation if your subject is close, you’re shooting at 25mm and f1.8 equivalent, and the background is very far away. The RX100 has more potential for subject isolation through shallow(er) depth of field, and I still treat that as a program mode-hyperfocal camera. As with every small-sensored camera, don’t bother with aperture priority: you have no control over depth of field anyway. I only use program and manual – either when the built in flash triggers speedlights, or in the case of the XF1, you need exposure times longer than a second – and remember to disengage auto ISO first, otherwise you can’t go any slower.

DSCF0072bw copy
Nature outgrows us all. Fuji XF1

I find the image quality of this camera paradoxical. On one hand, the JPEG output is amongst the best I’ve ever seen from a compact – especially when using the trick DR400 mode, which supposedly extends the camera’s tonal range by two stops – on the other hand, the RAW files are amongst the worst I’ve ever seen from any camera, and far below even its own JPEGs. The RAW files are far noisier, have poorer dynamic range, less detail and acuity, and just seem very dull by comparison; it’s akin to the difference between RAW and JPEG on other cameras, except in reverse. The only conclusionS I can come to are that Fuji has some extremely sophisticated processing algorithms inside this camera, the ACR converter algorithm just doesn’t work for this sensor, or both. It is widely known that ACR doesn’t really do a good job with Fuji files, but this difference almost defies belief. Needless to say, I’m not going to be using RAW mode on the XF1 it will be set to JPEG DR400 mode for my wife to use. For the purposes of this article, I shot JPEGs and did some minor tweaking to them with Photoshop.

Fuji XF1 RAW vs JPEG
What on earth is going on here? That’s not a mistake: the DNG (converted via ACR 7.2 from the original Fuji Raw file) is on the right.   Full size file here.

All that said, the image quality of the JPEGs is superb. Noise is low, detail is high (though oddly blocky in places, somewhat reminiscent of the older SuperCCD designs) and the tonal rolloff in the highlights is outstandingly well handled. Note that you really do have to use the DR400 mode to achieve this; otherwise the highlights blow just as fast as with any other compact. The files just look natural. The files actually remind me strongly of the 6MP SuperCCD FinePix F10, F11 and F30/31fd cameras; perhaps this is their spiritual successor. Of course, if you want there are also the usual super-saturated, B&W and toned modes; Fuji labels them with the names of its film – Provia, Velvia, Astia – though I doubt any of the XF1’s buyers even know what those things are, let alone what they should look like.

Fuji XF1 noise crops-JPEG NR STD
JPEG noise crops. Full size here.

Fuji XF1 noise crops-RAW
RAW (via ACR) noise crops. They just simply look worse than the JPEGs. Full size here.

On the noise front, I would have no qualms in using this camera up to ISO 800 in JPEG mode; 1600 and 3200 are noticeably softer, but surprisingly close in terms of both noise and detail retention. Thus, 3200 is probably a viable option in emergencies. Fuji does a pretty good job balancing noise reduction and detail here. Dynamic range noticeably decreases when you increase ISO, note that in order to expand dynamic range, the camera increases the ISO. This is presumably to allow additional sensitivity in the shadows. Yet the camera is smart enough to only increase the ISO past the sensor’s base of 100 if it detects that the dynamic range of the scene exceeds the sensor’s native capabilities – neat. This is why you might see EXIF data for a photo in good light with ISO 400 – it’s a wide dynamic range scene – or ISO 100, if the contrast levels are manageable. Note that you do see a bit of noise in the shadows at DR400 mode, but at least they’re not blocked up to black.

Fuji XF1 DRO JPEG
DR modes do make a noticeable difference. Note the garlic at the bottom; the leftmost image is DR100 (i.e. standard) mode; the right, DR400. Full size crop here.

Confusingly, Fuji makes the DR AUTO, DR100, DR200 and DR400 modes available both in the full-resolution 12MP mode, as well as on a separate EXR position on the mode dial. Here you can choose for dynamic range, resolution or low light priority; I don’t see the point unless you’re not going to do any processing afterwards at all. I suppose it must be a kind of smart auto mode, though there’s also the camera position, ADV(anced) and scene modes on the dial – how on earth does this many options make things less confusing to the camera’s intended audience, or more useful to the advanced user who just wants a good compact? Personally, I’m leaving it in P mode and DR400. If I want lower noise by pixel binning, I can do that myself afterwards in Photoshop – the results between the 6MP SNR (EXR Low Noise) mode and a downsized 12MP file in P mode look pretty much the same to my eyes. What Fuji should have done is made an auto mode that maintains best perceptual image quality: in good light, shoot at 12MP, say up to ISO 800; in high contrast situations, automatically use DR400; finally, when the required ISO goes to say 1600 or above, then start binning pixels down to 6MP.

DSCF0032b copy
Bigger onions. Fuji XF1

So where does the XF1 stand against the other competition in this segment? In the same price and size bracket, we have the Panasonic LX7/ Leica D-Lux6; the Canon S110, and the Sony RX100 – though the latter is a bit more expensive. All are moderately pocketable. I’ve excluded the Nikon P7700, Canon G15 and Olympus XZ2 because I don’t think these are pocket cameras anymore. I’ve not used the Canon extensively, so I’ll refrain from commenting on that; it and the LX7 both use a smaller sensor than the XF1, and it shows. The Canon is perhaps at the greatest disadvantage because it has the slowest lens and the smallest sensor; the XF1’s image quality – certainly the JPEGs – are noticeably better. The LX7 has a lens that’s fast at both ends and optically excellent, which claws back some of the Fuji’s sensor advantage; it also has more isolation potential as the long end of the lens isn’t f4.9. I’ve always liked the LX series as macro cameras too; they focus very close throughout the entire zoom range, not just wideangle. This leaves us with the RX100: it on the other hand isn’t a very good macro camera at all because the lens performs poorly at close distances until f4 or so; and doesn’t focus close throughout the rest of the range. However, it does have the best sensor of the lot; clearly a notch above the Fuji, and challenging Micro Four Thirds. I wouldn’t use the Fuji at ISO 1600 and very low light; I’ve done higher ISOs with the Sony and still gotten pretty impressive results.

_5014272 copy
Not a lot in it, size-wise.

In my mind, the final scoring stacks up this way:

Fuji XF1 if you are a JPEG shooter and don’t plan to do much, or any, postprocessing.
Panasonic LX7/ Leica D-Lux6 if you shoot macro, or want to try and get some depth of field control.
Sony RX100 if you want the best image quality in any compact camera available, period.
Canon S110…I actually can’t think of any good reason to buy this – if you need GPS, perhaps.

The overall impression one gets of the XF1 is a positive one. It has some endearing quirks – the mechanical zoom, for the most part – some less endearing ones (control idiocy and mode confusion) – but what really impresses are the quality of the JPEGs. And if you need something pocketable that delivers great results without too much effort – albeit without as high ultimate image quality potential as something that has a malleable raw file – then this is probably the camera for you. In fact, I think it’s the perfect camera for my wife – she likes to have something responsive, compact and (sigh) stylish, can process RAW files but never bothers, yet is frustrated at the limitations of the JPEG output of most compacts. Just think of it as a tax to appease the other half before you tell them you’re buying a Hasselblad. MT

The Fuji Finepix XF1 is available here in several colors from B&H and Amazon.

____________

Visit our Teaching Store to up your photographic game – including Photoshop Workflow DVDs and customized Email School of Photography; or go mobile with the Photography Compendium for iPad. You can also get your gear from B&H and Amazon. Prices are the same as normal, however a small portion of your purchase value is referred back to me. Thanks!

Don’t forget to like us on Facebook and join the reader Flickr group!

appstorebadge

Images and content copyright Ming Thein | mingthein.com 2012 onwards. All rights reserved