10X10: 100 ways to improve your photography: Birding and Wildlife

_M215519 copy.jpg

Scarlet ibis. Nikon D200, AI 500/4 P

The focus of this post is on birding and wildlife: it’s something that every aspiring serious amateur photographer will probably try at least once, usually right after they purchase an enormous telephoto lens. Bragging rights are only good if you have the images to go along with the lens.

_3022426 copy

Cattle egret. Nikon D3, 400/2.8 VRII

10: Dress right, bring mosquito/ insect repellant, and carry a bottle of water and a hat. The environment where some animals live can be harsh and remote. You’re not going to be concentrating on the photography if you’re not comfortable.

_3020442 copy

Scarlet ibises. Nikon D3, 70-300VR

9: Pay attention to the time of day. There’s no wrong or right time to shoot, but there is good light and bad light. Bad light is flat and uninteresting, and doesn’t flatter your subject. Good light is always tangential and thus creates contrasts; better still, it can isolate your subject from the background. And if there’s plenty of it, that’s a bonus because you can use a higher shutter speed.

_D3T1396 copy.jpg

Eagle. Nikon D3, 300/2.8 VR + 1.4x

8: A sharp but noisy image is better than a noise-free but blur one. Unless your intention is to be artistic or atmospheric, it’s better to have grain than none but also no idea what the subject actually is. This goes for all subjects, and types of photography: if your subject and composition are strong enough, nobody is going to care that the shot is grainy – look at Robert Capa’s Normandy Beach landing photos.

_D3T1215 copy.jpg

Albino peacock. Nikon D3, 300/2.8 VR + 1.4x TC

7: Use single point continuous AF. Avoid the temptation to let the camera decide the AF point; it will almost never focus on the eyes, and certainly won’t be able to recognize animal faces (except perhaps some chimpanzees.) Continuous AF is necessary because your depth of field is razor thin; a little movement to and fro either by you or your subject can move focus dramatically.

_N212242bw copy.jpg

A thoughtful scratch. Nikon D200, 300/2.8 VR + 1.4x TC

6: Shoot in bursts. Two reasons for this: action usually unfolds in a sequence, and the first image may not be the most interesting; secondly, if you’re using a borderline shutter speed, then the burst helps to negate the effects of your finger pushing the shutter (and also camera). The first and last shots will usually be blur, but the middle group will be sharp because you didn’t have to move your finger in between.

_N210426 copy.jpg

Stealth duck. Nikon D200, 300/2.8 VR + 1.4x TC

5: Focus on the eyes. With all living things, the eyes are the key to the soul. I can’t explain why, but everybody knows that a portrait with the subject looking at the camera is a lot more powerful than one where you just see the back of the person’s head. The same goes for wildlife. Better yet if you can get a catchlight in the pupil, be it the sun or a very small fill flash.

_N208281 copy.jpg

Caught in the act of lunch. Nikon D200, AI 500/4 P

4: Have support. I don’t mean a sherpa team or an agony aunt. The longer the lens, the more support you’re going to need. A 0.1 degree camera movement with a wide lens covering 100 degrees horizontally is going to produce 0.1% blur, which you can probably get away with on a small print; but an 0.1 degree camera movement with a 5 degree field of view – corresponding to a 500mm lens – is equivalent to a whopping 2% blur. That shot will be so bad it might as well be completely out of focus. A gimbal head and solid tripod legs are great, but not very mobile. What I prefer to do is use a stout carbon-fiber monopod and rest my arm on the top of the lens to tension the system; if I’ve got something convenient to lean on, then I’ll use a bean bag to support the lens. This gets worse as your lenses get longer – I normally used an old manual focus 500/4 with 1.4x converter on DX, meaning 1,050mm equivalent. Handheld, this is an impossible combination to aim and hold, let alone get a steady shot with. With the monopod technique, 1/50s was routinely possible.

_7030609 copy.jpg

Angry cassowary. Olympus E-410, Nikon AI 500/4 P + 1.4x TC

3: Know our subject. Do your research, learn behavioral patterns, feeding patterns and anything else such as favorite watering spots or trees; the more you know about your subject, the easier it will be to find it and go unnoticed. Also, identify rare or unusual behavior – further adding something unique to your image.

_1D31619 copy.jpg

The bird with the sun hat. Canon 1D Mark III, 500/4 L IS

2: Patience, patience, patience. The rarer your subject, the longer it’s going to take for you to a) find it and b) get into a position where you can shoot it, or where it stays still for long enough for you to get a good image. Give up and call it a day only when you absolutely can’t stand waiting any longer; some of the most stunning wildlife images – think of the BBC Planet Earth series – were only captured after years of waiting.

_MT70034bw copy.jpg

Dancing flamingoes. Nikon D2H, 55-200/4-5.6 DX

1: Be ready and stay alert. Usually most interesting action happens in a split second; if you’re not ready with your settings fixed and your finger on the shutter, you’re going to miss it. This one seems to conflict with #2, but it really doesn’t; it’s what makes wildlife photography so difficult. Endless waiting, but the need to be vigilant. In the end though, the results pay off. MT


More of my nature and wildlife work can be seen here on flickr
POTD: For children of all ages.

_M9P1_L1005248 copy

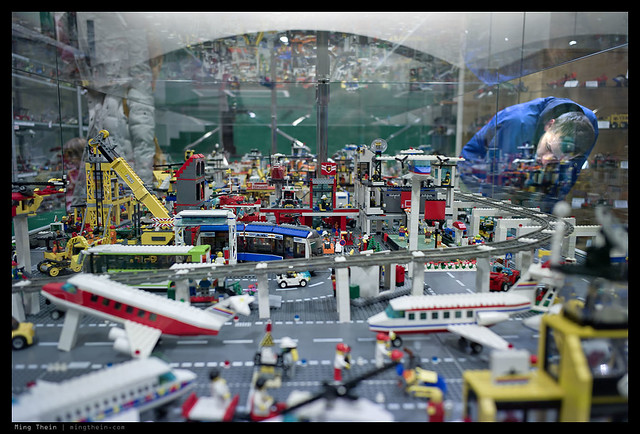
Lego Museum, Prague. Leica M9-P, 28/2.8 ASPH

I freely admit to having a fascination with Lego since a very young age. I’m pretty sure it’s because it gave the creative side of me an outlet, and the type A side of me a chance to solve problems and take on challenges which nobody else – or so I thought at the time – had done, for instance trying to build a working helicopter – which of course failed. I recently revisited it after a nearly 10 year hiatus – this time focusing on fully functional and mechanically accurate large scale cars. Part of the satisfaction for me was, and still is, being able to get around the limitations of the medium – no concentric shafts, for instance – to produce something that was still as accurate to reality as possible.

In many ways, building Lego is similar to photography. There are some technical rules and limitations, but for the most part, it’s entirely creative and up to you how you wish to follow them (or not). There are specialists, who only build one or two types of things. There are similarly dedicated online communities. It can consume a huge amount of time and money, especially if you decide to build a 12ft long aircraft carrier (I’ve seen it done) – I suppose the photographic equivalent would be going medium format digital. But above all, you get a sense of satisfaction from having created something that in all probability is both unique and will never be created again – but which still reflects your personality and personal style. (Assuming of course you’re not building a standard model from an instruction sheet).

It seems that these days, a large proportion of the sets sold are actually to adult enthusiasts. Maybe it’s because adults are wanting their childhoods back, but kids want to have Blackberries and iPads and want to grow up faster – little do they know what awaits them. Enjoy it while it lasts!

In the same way that I build very different models now to when I was five, I think I’d equip my kids with a camera as soon as they’re able to use one. It would be a very interesting exercise to see how their perspective on the world changes with age – what do they see when they’re 1 or 2 years old, vs twenty? Do I wish I’d had that opportunity? Absolutely. It’s the same reason that every year, I document life with my wife in a book – so we can look back and see how things have change twenty, thirty, forty years from now. It’s also insurance against Alzheimer’s.

I leave you with something I built a little while ago for the Porsche Club of Spain – a 917K.

_7023572 copy

For those interested, you can see some of my recent Lego Technic work here on MOCPages.

10X10: 100 ways to improve your photography: Photojournalism and Street

Photojournalism (hereafter PJ) and street photography go hand in hand: they’re about capturing a moment of life. PJ goes a bit further by adding a story to that moment; street can just be an aesthetically pleasing moment in and of itself. Both though require the photographer to be observant and ready. This is what works for me.

Disclaimer: As with every other article in this series, I’m assuming you know the basics already.

_M9P1_L1004918bw copy
Protest Kabila, Prague. Leica M9-P, 28/2.8 ASPH

10: Watch your shutter speeds. You’re going to need more than 1/focal length – maybe 1/2x to be safe, or even 1/3x if you’re running and gunning. You’re moving, your subject is moving, and nothing is steady. Remember also that the higher the resolution your camera, the less forgiving it is of focus errors and camera shake.

_0010613bw copy
Rain, London. Ricoh GRDIII

9: Small, nondescript cameras are best. They don’t draw attention to you – especially in the current day and age of everybody carrying a camera, nobody is going to take you seriously if you have a small black compact. You’d be surprised how much I get away with using the iPhone or Ricoh GR-Digital III. People simply don’t perceive it as threatening in the same way a pro DSLR and 70-200 might be. Compacts also give you more depth of field for a given aperture.

_0010654bw copy
Morning paper, London. Ricoh GRDIII

8: Shoot wide and close. The perspective produces a stronger image; wide lenses are also more forgiving to focus errors and camera shake. And as a bonus, you get context in the frame as par for the course.

_M8_L1024678bw copy
Learning English. London. Leica M8, 21/1.4

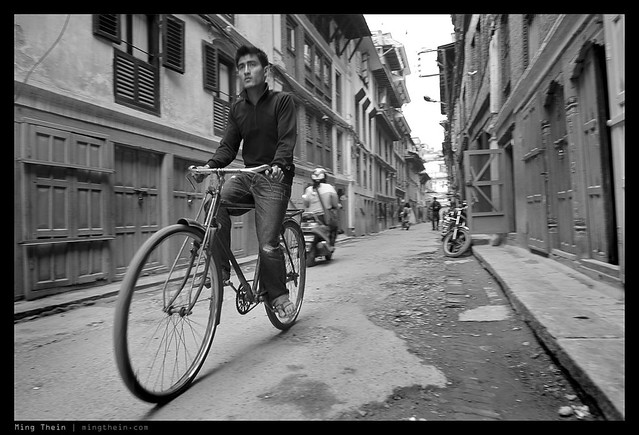
7: Anticipate and observe. To quote the Cartier-Bresson: pick the decisive moment. To do so, you need to be aware of everything around you; really look. Pay attention to the details. People are fairly predictable; it should be easy to spot if something out of the ordinary is about to happen. Anticipation of the action gives you a vital few seconds more to prepare and be in position, or have the camera out.

_7032151bw copy
Bicycle, Kathmandu. Nikon D700, 24/1.4

6: Blend in. Act like you belong, dress nondescript, and nobody will pay you a second glance. It will make your job a lot easier. If you draw attention to yourself – be it by being uncertain or provocative – then people of course notice.

_220_IMG_0251bw copy
Oblivious. I was standing 3 feet in front of them. Canon IXUS 220HS

5: Always have the camera to hand. How are you going to get a quick shot off if the camera is in your bag? You should be able to get a shot in less than 5 seconds – sometimes your window is even shorter than that.

_7030375bw copy
Trekking office, Kathmandu. Nikon D700, 85/1.4 G

4: In a real emergency, help. Yes, our duty as a PJ is to record, document, communicate and raise awareness about the events around you; you help by telling a story. But you don’t have to shoot all the time. Get your shot and then help out the people. Remember that at the end of the day, we’re all human.

_7026532 copy
Street party. They would need help the following morning. I didn’t stay that long. Nikon D700, 85/1.4 G

3: Practice, practice, practice. Use your camera until you’re fast and proficient; you should be able to visualize the frame and field of view without having to raise the camera to your eye. You should be able to set things by muscle memory and have a group of settings (if your camera supports this) that configures the camera to be ready to go.

_X1_L1000191bw copy
Reflections. Leica X1

2: If spotted, acknowledge your subject. A friendly smile, a sincere nod – all of these things make people feel comfortable with your presence and make your life easy. You don’t have to stop and talk or explain what you’re doing if nobody is asking. Smile and move one. Done.

_PM01880bw copy
Smoking break. Olympus E-PM1, 45/1.8

1: Be confident. It is better to say sorry rather than ask permission and miss the shot. With that, go out and be productive. MT

_7036946 copy
Martial law, Kathmandu. Nikon D700, 24/1.4

See more of my photojournalism work here on flickr: click here

POTD: Evening silhouette

_PM05422 copy

Because I couldn’t decide which shot I preferred, and because there are no rules saying I can’t post twice…
Evening silhouette. Olympus E-PM1, 45/1.8

POTD: Man in the middle

_PM04848 copy

Schonbrunn Palace, Vienna. Olympus E-PM1, 45/1.8

10X10: 100 ways to improve your photography: Compact point-and-shoot cameras

Pretty much everybody has a compact, even if it’s only the one built into your phone. It’s no good for serious photography. Or is it? You might find yourself using it more if you try some of these ideas…

_DL5L1000074bw copy
My favorite compact – Ricoh GR Digital III.

10: Carry spare batteries. One in the camera, one in your pocket or one charging. This lets you keep going – especially important since compact battery life is often terrible.

_0011755bw copy

Crossing thoughts. Ricoh GRDIII

9: Use the hand strap. It seems obvious, doesn’t it? But you’d be surprised how many people don’t, and then land up having to buy new cameras.

IMG_1330b copy

Car reflection. Ricoh GRDIII

8: Shoot bursts, if you have a useable buffer. Without the buffer, you’ll just have to rely on timing and counting shots – think of it as a revolver rather than a machine gun. The same rules about the middle shot being stable and sharp in a burst also apply to compacts.

_0011033bw copy

Zoom. Ricoh GRDIII

7: Keep ISO as low as possible, and make use of the stabilizer. Most good compacts have stabilizers; this is because even with the 1/focal length rule, there’ll be enough camera shake to blur things – you’re holding a light object at arms’ length and trying to keep it still. Granted, there’s no mirror slap, but there’s also nothing to brace against, either. Keeping the ISO as low as possible lets you maximize image quality. There’s usually a big difference between even base ISO and one stop up; know the limits of usability and don’t exceed them.

_0011069bw copy
Crossing, London. Ricoh GRDIII

6: Look at the whole frame. I’m not sure how to say this more succinctly: there are things compacts can do that larger sensor cameras can’t – think of telephoto/ compressed perspective shots where everything is in focus, for example – and vice versa (shallow depth of field, wide FoV). Look at the whole scene, and see how you can use these strengths to your advantage. Images shot with compacts that work actually force you to have a much stronger composition, because you cannot rely on the crutch of bokeh or let the lens do the talking.

_0011492 copy
On set in the afternoon. Ricoh GRDIII

5: Spot meter. Dynamic range on all compacts is limited because the pixels are small. This means losing the shadows or the highlights is inevitable under most situations; you need to decide which one is important. The spot meter (and a half press to lock exposure) helps you to do that. High key = keep the shadows and lose the highlights; low key = keep the highlights and lose the shadows; most important however is making sure the subject is properly exposed – use the spot meter over faces, for instance. The other alternative is to use the spot meter on highlights and add a stop of exposure compensation – the meter will try to average a middle gray exposure out of whatever you place the box over; you know the camera has a little more tonal range in it if the highlights are at middle gray, so you can safely add some positive exposure compensation. This generally makes the rest of the image a little dark – especially under harsh light – but it also has the side benefit of making the colors richer.

_0012133 copy
The fountain of capitalism. Ricoh GRDIII

4: Use P mode. I’d say leave it in full auto, except most of the time that doesn’t let you control exposure compensation and metering – those are important. Why not use aperture priority, as I’d recommend with a larger sensor camera? Simple: there’s no point. The real focal length is so wide and the lenses usually so slow that DoF is enormous, and changing the aperture isn’t going to do anything other than reduce the amount of light reaching the sensor. Great if it’s bright, but if you stop down too much, you’re going to to induce diffraction and just land up with soft images.

_0011105bw copy
Affection waiting for the bus. Ricoh GRDIII

3: Keep the lens clean. I’m constantly surprised by how many people have dirty lenses on their cameras and then complain that the images aren’t sharp, or that they can’t see anything in the finder – but there’s fingerprints all over it. It’s especially important on a compact as the small sensor and high pixel density are very demanding of lenses; the more aberrations you have on yours, the lower resolving power is going to be.

_780_IMG_1719bw copy
After prayers. Canon SD780IS

2: Prefocus. Although focusing speeds have improved dramatically, what’s really nice about most point and shoots is the half press to full press lag is actually quite low – but you need to be prefocused first. In any case, the huge DoF will cover any minor focus errors. Most fleeing moments can be captured with a compact and a little anticipation.

_0011588 copy
Break. Ricoh GRDIII

1: Set up your camera to either shoot raw, or output as neutral a jpeg as possible. If you can’t get a raw file, there’s still a lot that can be done with a good jpeg – what I usually do is reduce contrast to minimum to preserve the highlights and shadows; turn saturation down, and lower (but not zero) sharpening. Reason being that if you zero sharpening, you do generally lose some detail on compacts as this step is applied to the raw data in the imaging engine before being saved as a jpeg. You’ll be surprised how much you can do with one of these files afterwards in photoshop. Similarly, avoid those fake HDR or extended dynamic range modes; they might appear to help but what they actually do is make highlights look very unnatural because the tonal values overlap with other parts of the luminance range. MT

IMG_0861b copy
Vehicular architecture. Apple iPhone 4

See more of my small-sensor compact camera work here on flickr: click here

POTD: Industry and nature

_m9p1_l1007781 copy

Unknown power station in winter, en route from Prague to Vienna
Leica M9, 28/2.8 ASPH

10X10: 100 ways to improve your photography: Mirrorless ILC tips

Mirrorless: the middle child? Maybe. But even a diehard sceptic like me has discovered that these things have their uses –just be clear about your expectations.

Disclaimer: I’m assuming you already know the basics, but want to get serious.

_7048929 copy

10: Spare batteries are an absolute must. Due to the large sensor, LCD and high demands from lens focusing motors, stabilizers and the like, mirrorless cameras have the highest power draw of any type of camera (other than medium format digital, it seems). Make sure you have at least two to get you through a day, maybe with an additional spare.

_PM05280 copy
Moon over Prague Castle tower. Olympus E-PM1, 45/1.8

9: When selecting a camera, look at two things: useability (including lens choices) and raw sensor quality. I’ve tried the Panasonics, Sonys, Fuji and Olympus systems; of all of these, only the Olympus E-PM1 Pen Mini stayed more than a month. Why? Because it’s the most responsive and configurable of them all. The Panasonics are very configurable but not very user friendly. The Fuji X100 has the best image quality, but the firmware is a disaster and it’s slow as molasses. The Sony is reasonably responsive, but not so easily configurable and the lens choices are pretty limited. And the NEX-5 I owned had a strange color palette. And don’t pick one so big that you might as well take your DSLR.

_PM03783 copy
Lange Datograph. Olympus E-PM1, Panasonic 20/1.7

8: Use a hand strap instead of a neck strap. If it’s in your hand, you’ll be ready faster. And more likely to use it. And the weight/ size aren’t so bad you need to hang it around your neck or shoulder for relief. It also takes up less space in your bag when you have to store it.

_PM00545 copy
Reflections. Olympus E-PM1, 14-42 kit lens

7: Adaptors are useless. Although they seem like a good idea, mirrorless systems are optimized for telecentric lenses with very short back flange distances; conventional SLR or RF lenses aren’t designed like this and thus don’t work well on mirrorless cameras. It’s quite well known that RF wides have numerous issues like cyan/magenta shifted corners, increased CA and vignetting. Adapted lenses are also bulky and lacking in automation – no AF, no aperture control, no stabilizer. And accurately manually focusing something held at arms’ length is near impossible.

_PM03612 copy
Burlesque. Olympus E-PM1, Panasonic 20/1.7

6: Remember the lag. Even though release lag may be in the 30-40ms range, you’re going to have another lag induced by the LCD itself – the best models refresh at 60hz, which means you’re looking at least another 15-20ms (or more) of additional lag as the screen refreshes to show the current scene. Practice to get a feel for the rhythm of the camera.

_DSF1891bw copy
Garage classic. Fuji X100

5: Avoid continuous AF. Contrast detect AF systems still aren’t good enough to track moving subjects – with the exception of the hybrid system in the Nikon V1 that also has phase detect photosites built into the sensor – so either prefocus and anticipate, or cover with DOF.

_DSF1421 copy
After school in Kathmandu. Fuji X100

4: Carry it everywhere. No point sacrificing image quality if you’re going to leave it at home like the full size camera. This is also why I’m drawn to the smaller, more pocketable mirrorless cameras like the Olympus Pen Mini. I’ve put it on a hand strap and use a pancake lens most of the time; it’s not a lot bigger than a compact but produces vastly better image quality.

_N5_DSC0100 copy
Mosque architecture. Sony NEX-5, 18-55 kit lens.

3: Use the EVF if you’ve got one. Like any optical finder, bracing the camera against your face helps stability immensely. I’m not recommending going out and buying an add-on finder; these are usually flimsy, unwieldy and dramatically increase the size of the camera – defeating the point of mirrorless in the first place.

_N5_DSC0111 copy
Before prayers. Sony NEX-5, 18-55 kit lens.

2: 1/focal length rule doesn’t apply anymore. Why not, aside from crop factor? Because most of the time you’ll be using live view and holding the camera at arms’ length – this means increased propensity towards camera shake. Double, or even triple that for critical shots or action. Or use a flash. And while stabilizers help, they probably bring the safe speed into the 1/fl rule or maybe very slightly better.

_N5_DSC1260 copy
Arch. Sony NEX-5, 18-55 kit lens.

1: Compose like an SLR, shoot like a compact. They’re hybrids, right? Treat them as such. You get the DOF of an SLR – which means you have to watch your focus point, and take care in choosing perspectives. But you also have the limitations of a compact – so remember to watch your exposure/ highlights/ shadows; prefocus; don’t expect it to be able to track moving objects. Remember the limitations of both, and that should give you a good idea of how to get the most out of your mirrorless camera. MT

_PM04986 copy
Hitchcock scene, Vienna. Olympus E-PM1, 45/1.8

See more of my work from the various large-sensor mirrorless cameras here on flickr: Olympus Pen Mini E-PM1; Sony NEX-5; Fuji X100; Leica X1

Help me out…

Firstly, thanks for supporting my site – be it a visit, a like, a comment, or a share. Please continue to do so – bookmark and visit regularly (I’m aiming for daily content updates) and email it to your other photography friends, on your Facebook walls, and anywhere else. You’ll notice there isn’t any advertising – that’s because this site is entirely supported by me. It takes a lot of time, dedication and hard work to shoot and write, so please let me know it’s worth it by coming back. This is just the beginning, and I’ve got much more planned in future – stay tuned! MT

POTD: First train

_PM05713 copy
First train. Somewhere en-route from Prague to Vienna.
Olympus E-PM1, 45/1.8