
Offerings for sale. Sony RX100
Continuing in this mini-series on street photography, there are a number of techniques that I use while shooting. Although it’s possible to describe most of them in some detail, full understanding requires both demonstration and practice – this is where joining one of my workshops is ideal 🙂 Together with the basic principles of balance, perspective, composition and what makes a good image – these techniques may be used singly or in combination to generate strong street images. In fact, they also apply to documentary and reportage work, too; the only difference between good street photography and photojournalism is that the latter has a consistent theme and subject.
It’s important to note that not every technique is suitable for every situation, and vice versa; as always, a good portion of making a strong image is knowing what to leave out.

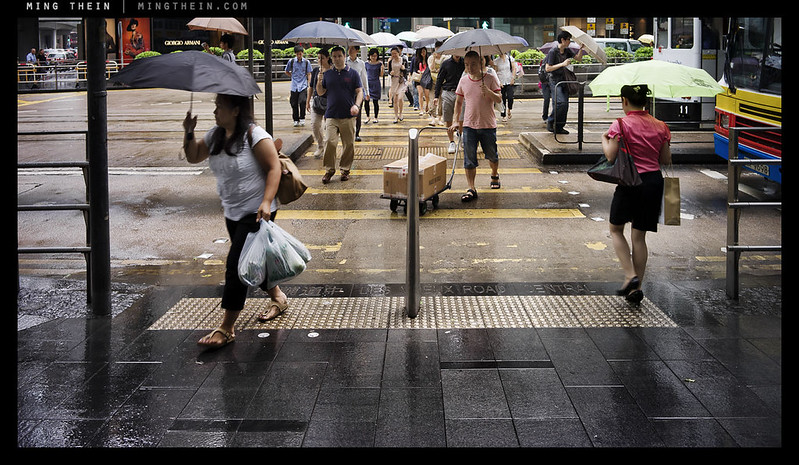
Hiding from the rain. Leica M9-P, Zeiss ZM 2.8/28
Timing and anticipation
In a photographic situation where you have effectively zero influence of any of the elements in your frame except the composition and exposure, timing is the one key bastion of control that remains in the hands of the photographer. By making a conscious choice of when you push the shutter, you decide when each and every single one of the moving elements in the frame is in the position you want them to be in. However, it is too late to react only at the exact instant you see the composition you want. It is therefore important for photographers to be able to see a scene, visualize the potential contained there, and be able to imagine what the finished frame will look like once all of the desired elements are in place. It is then a matter of simply waiting for those elements to all come together, and being ready with the camera when they are. No matter how fast reflexes, or your camera, the fact is that if you react off to you see something, it’s too late; training yourself to anticipate action is something that can give you the critical second or half-second which can make all the difference between getting the that and missing it completely.

Progression. Olympus OM-D, Panasonic 20/1.7
Shoot stopped down
A lot of these techniques are about timing. Specifically, gaining yourself a little bit of extra breathing room to react. In this case, shooting stopped down allows you to simplify the process somewhat by not having to decide what to have in focus, and what not to have in focus. If you’re shooting with an autofocus camera, it also allows a little bit of leeway for the camera to misfocus, yet still allow the final shot to be in focus thanks to extended depth of field. Note that of course this technique does not work under low-light situations, where you need every stop of aperture you can get. Compositionally, shooting with great depth of field actually forces you to create stronger images. This is because you have to think more about your subject placement, leading lines, empty spaces, etc – which all affect the overall balance of the image. If you can make interesting image without relying on the crutch of bokeh, then you will find yourself with increased compositional and artistic flexibility when you do have this option in your toolkit.
Divided. Leica M9-P, Zeiss ZM 2.8/28
Shoot wider
There are many reasons to shoot with a wider lens. First of these, is of course the enhanced foreground perspective emphasis that it provides, hopefully on your subject and not an expanse of pavement. Having a lens with a shallower and more forgiving depth of field profile both allows greater latitude for focusing errors, as well as allowing extended depth of field without having to stop down too much. There are also other non-obvious advantages of going wider – not only do you eliminate or minimize the possibility of having unwanted elements come between you and your subject due to physical distance (and you subsequently missing the shot because in the time it takes for your frame to clear, your primary subject has already moved on or changed position), but also you can get people in the periphery of the frame as edge subjects or context without them suspecting anything. In this sense it’s also about minimizing the reaction time between you visualizing the shot and executing it.

The taxi men. Sony RX100
Act as though you belong
In pretty much all situations, you will notice the confident people rarely – if ever – get challenged. This of course also applies to street photography. By acting like you belong, and you’re confident and know what you’re doing, casual observers to the scene assume that you have every right to be there and generally allow you to go about your business without interference. A subset of this is acting like a tourist. Tourists are not self-conscious and they are generally expected to take photographs of everything encountered; by doing this you’re fitting the expected stereotypes. And, as you will no doubt already know by having read my earlier articles, a large portion of photography – including the execution – is seriously influenced by human psychology at a subconscious level. Spend some time understanding how people think, and you will find that you both have more control over the way you images are interpreted, as well as how people react to you while you’re out shooting.

A glitch in the matrix. Leica M9-P, Zeiss ZM 2/50
Hyperfocal and zone focusing
One way of speeding up the shooting process is by completely eliminating focusing altogether. Hyperfocal focusing means that you have everything in focus beyond a certain point; it requires the lens to have a comprehensive depth of field scale in order to set your focus distance precisely. Manual focus lenses tend to be better for this, I suppose because manufacturers of autofocus lenses think that photographers will not use the manual option and therefore simply choose not to include proper depth of field scales. (Most of the time, they’re right.) Zone focusing is similar. What you do, is ensure that your desired subject distances fall between the two aperture markings on opposite ends of your depth of field scale. For the current bunch of high density digital sensors (anything over 12MP or so), you will need to use an aperture one stop smaller than indicated on the depth of field scale because these scales were calibrated for the circle of confusion corresponding 35mm film, and haven’t been updated since. There is a game played by rangefinder shooters that can help you improve your skills at estimating distances; pick a subject, set distance on the lens, and then check through the rangefinder to see how accurate you up. Do this often enough, and you will find that your focusing ability has magically improved. The upshot is that with sufficient practice, it is possible to estimate distances without even having to look through the viewfinder. This means that you can focus the camera and have it ready even while at waist level or in your hands, before you frame up the shot – once again, it’s all about reducing your reaction time.

Querry. Olympus OM-D, Panasonic 20/1.7
Stages
I don’t believe ‘stages’ is a commonly used terminology. I use it to refer to a setting, or scene, where the light is interesting and directional, and all it needs to complete the image is a human element of some sort to add context. I’m constantly on the lookout for these ‘stages’ when I shoot; when I find one, I will stay and work to seeing for his long as it takes for me to get an image that I’m satisfied with. Sometimes this is within seconds; sometimes it can take hours and I leave without getting the shot I wanted. But if I have a chance, and it’s a case of ‘unrequited stage’, then generally I’ll return again at some future point in time to get the shot I’d originally envisioned.

Haircut. Leica M9-P, Zeiss ZM 2.8/28
Layering
Layering is a technique that you can use to add context and depth to an image. It requires the use of a longer lens, which is ideally suited to this because it naturally separates out your scene into foreground, midground and background, all with relatively similar prominence. This allows you to place your subject in any one of these zones, and use the remaining zones to form the context and tell the story. Aside from using a longer lens, the other way to achieve layering is by the use of reflections; whether it be in a building’s glass, a puddle or perhaps some other shiny object. In this case, a wider lens is actually preferable because it allows you to capture more of the reflection. Note that when you’re composing, your reflected background is going to be further away than you think because the light has to come from the subject, to the point of reflection and then back out again to the camera; this can affect perspective in strange ways if it not consciously compensated for.

They don’t know you’re there. Leica X2
Shoot through people
The most difficult and counterintuitive technique that I use is something I call ‘shooting through’. It basically requires you to stand still in a flow of oncoming people, and just shoot into the crowd. Although this will feel strange but first because you’re pointing your lens directly in people’s faces, offer a while you get used to it. The challenge then becomes actually separating out individual frames from the general scene as a whole. This technique works better in busy spaces and thoroughfares, simply because this means people tend to be more concerned with where they are going rather than what you’re doing. In a relatively quiet space, this technique is not very effective because people can see you coming – or rather, standing there – from a mile away. It is important to note that the psychological reaction to somebody standing still with a camera held up and ready to shoot is very different to if the same person stood there and suddenly brought out the camera to shoot; the action of raising the camera draws attention to yourself. Psychologically, sudden movements also catch us unawareness and make us uncomfortable. By looking like you have been there for a while, and will continue to be there, people are put at ease which allows you to operate without drawing unnecessary attention to yourself. In fact, oncoming pedestrians will probably take pity on you (poor tourist, trying to take a photo but we’re all in his way), not knowing that they themselves are actually the subject of your image.

Garden of earthly delights. Olympus OM-D, 45/1.8
Stealth or flamboyance?
The final technique is simply being inconspicuous. This involves techniques such as not making any sudden moves, and most of the time, not even having the camera raised to your face when you take a photograph. The smaller, blacker and more nondescript the camera you use, the better, because it does not draw any attention. This is one of the reasons I like to use compact cameras for street photography – not only do I look like a tourist, but what possible threat could a small Asian man with a point and shoot pose? He’s probably just lost and on holiday. The complete opposite of this, and also viable option, is to be completely flamboyant and ridiculous. You stand out to the point that nobody takes you seriously; and this allows you to get on with your serious work in peace. I’m talking about shooting a bright pink camera dressed and perhaps being dressed red and blue; or maybe using a view camera on a tripod whilst dressed a three-piece suit and top hat. Then, you become a subject of interest and curiosity rather than the potential threat. (I have never done the latter myself, although in the interest of improvements in image quality, and perhaps the different look to my images, I am quite tempted. I plead the fifth on the former.)
Although this list is by no means exhaustive, I hope this article has given you some insights into both how I shoot when I’m on the street, and some new techniques for you to try out yourself when perhaps you see a great shot but you’re too shy to go out and get it. Bottom line is that street photography is not very different to being a Boy Scout: be prepared and confident. MT
____________
Visit our Teaching Store to up your photographic game – including Photoshop Workflow DVDs and customized Email School of Photography; or go mobile with the Photography Compendium for iPad. You can also get your gear from B&H and Amazon. Prices are the same as normal, however a small portion of your purchase value is referred back to me. Thanks!
Don’t forget to like us on Facebook and join the reader Flickr group!

Images and content copyright Ming Thein | mingthein.com 2012 onwards. All rights reserved


great article! love the bit about zone focusing and how to properly use a manual lens.
cheers from singapore!
We travel full-time by RV and sailboat, and much our travel photography is basically street photography. It almost feels like a performance art to me — noticing a great shot developing and then timing it out to click the shutter at just the right moment. Blending in and being part of the scene while capturing it is all part of the thrill. Thanks for your great tips.
Thanks for sharing your insights here, Ming. Great article.
MT, great article. Very insightful and wonderful pointers. You have a new fan.
Thanks Adrian!
I find specially interesting the use of “stages” in street photography. Do you mind if I link your article in my blog?
No problem.
Interesting photos and observations … I should go away and practice each point you make!
BTW: One sentence confuses me: “…having the camera race to your life when you take a photograph…”
I have no idea what happened there – must be the dictation software I’ve been trying out. It should say ‘raise the camera to your face’ – fixed now!
What you are saying about ‘shooting through people’ is absolutely right. Even in the Arabic world, where people usually don’t like to have their photograph taken, will ignore the photograper in a crowd as long as he does not move and remains indifferent.
I feel very impressed by your work!
Felix
Thanks Felix! Haven’t tried shooting in the Middle East, but it should be awesome given the textures and environment and characterful people…
Once you get a feel for the pace of the people, some lovely pictures can be taken. Please let me know in case I can mail you some to give you a taste.
Nice write-up. Your blog is always exquisitely written and stocked full of great shots to make your point. Kudos.
Thanks Trevor!
Good information, enjoyable reading and well written as usual. Thank you for the heads up on stopping down an additional stop for manual lenses!
No problem!
Fantastic article Ming I love the bit about anticipating the action that’s about to happen because I usually wait till it’s too late. I’m also going to try and use my Panasonic 14mm f2.5 in Manual to zone focus @2ft or thereabouts which should be beneficial where I don’t have to focus. Thanks again for the great tips and fantastic samples keep em coming 🙂 Kylie
Try 1-1.5m. 🙂
… a wonderful, informative and practical article.It all makes sense …
Thanks Sean!
I am puzzled about this statement: “For the current bunch of high density digital sensors (anything over 12MP or so), you will need to use an aperture one stop smaller than indicated on the depth of field scale because these scales were calibrated for the circle of confusion corresponding 35mm film, and haven’t been updated since.” By “smaller do you mean instead of f8 to use f5.6 for the zone? or the other way around f8 to f9? Would you illustrate this on a manual focus lens please.
If you’re shooting at f5.6, use the DOF scale for f4.
Sometimes I see photos where different elements (people, lighting, geometry etc.) are put together to achieve a unified theme, I personally find it most diffcult to manage . You have to simultaneously arrange a few elements in different part of the frame, and in the meantime show some kind of coherence or connections between these elements. And not to mention that you are doing it on the streets, where situation changes in a split of a second…
Some of the photos for example


A good portion is lies in developing your skills of observation and anticipation. Since you can’t coordinate anything, you just have to see when it’s about to happen, and be ready to shoot – if it turns out, great, if not, move on. There’s also a strong element of editing and recognizing what works and what doesn’t involved after you shoot…
I really got a lot out of this post, Ming! I will definitetly have to remember some of your techniques the next time that I go into an urban area to shoot. As usual, your photography is very interesting for me to look at and admire. Thanks!
Thank Gregg!
“..Having a lens with a shallower and more forgiving depth of field profile both allows greater latitude for focusing errors, as well as allowing extended depth of field without having to stop down too much..”
Shouldn’t that be “..a lens with a GREATER and more forgiving depth of field..”?
(Just below 4th picture: “Shoot wider”.) Lovely pictures, thank you!
Shallower depth of field PROFILE. That means the transition zone between in and out of focus. Not the amount in focus (which would be depth of field alone). Sorry, perhaps a bad choice of words on my part.
? ..A shallower, and more forgiving, ‘transition zone’? ..which “..allows greater latitude for focusing errors”?
Sorry; I still don’t understand. If the ‘transition zone’ between in-focus and out-of-focus is shallower, how is it “more forgiving”, and how does it allow “greater latitude for [disguising] focusing errors”? I’d have thought that a shallower ‘transition zone’ would highlight any focusing inaccuracy, and would thus be less forgiving.
Perhaps I’m just befuddled. I think of a ‘wider’ lens as having (a) greater depth-of-field, to cover any focusing inaccuracies, (b) a ‘deeper’ transition zone (ditto), and (c) – as you say – “allowing extended depth of field without having to stop down too much”. But a shallower depth of field profile ..? I’m still not with you, Ming. Sorry.
Sorry for the confusion. Part of the problem is that the language doesn’t really exist to describe it. A long FL has a very quick transition between clearly in focus and clearly out of focus, regardless of the aperture: the physical distance from camera to subject between in focus, acceptable (threshold dependent on camera resolution because it’s related to lens resolving power – something is perceived to being focus when lens resolving power at that point exceeds sensor resolving power) and out of focus is short. With a wide lens, this distance is long; thus the distance between in-focus and acceptable is also longer – this is the depth of field ‘profile’. The transition zone is the distance between in-focus and out of focus. Hope this helps!
Great article. Really enjoy reading it and thanks for the efforts.
Thanks Timmy!
“By acting like you belong, and you’re confident and know what you’re doing, casual observers to the scene assume that you have every right to be there […]” – i agree. I also agree with “[…] acting like a tourist. Tourists are not self-conscious and they are generally expected to take photographs of everything encountered” So basically I agree with both statements that, however, seem to be in direct contrasts. Tourists barely belong there and certainly are not confident. It would seem that two opposite behaviours can lead to the same effect. So what’s it to avoid? The middle behaviour? The not-being a tourist yet not confident either?
Both are playing to expected psychology, but the middle ground doesn’t work. Acting confident renders you transparent, to some extent. Acting like a tourist makes you appear like one, which people expect, and ignore. They don’t expect something in between, so you stand out.
I really love the colours and sharpness in your pictures, they sparkle if I may say, great!
Thanks Bernd!
Reblogged this on filmcamera999 and commented:
…hehe..in india..its virtually impossible not to be noticed taking street shots…indian people in general have very quick, roving, all-seeing eyes! its part of their culture to make eye contact at all times, unlike us in the west!
They also don’t seem to mind being photographed, too. At least in my experience.
Most Indians (read 99.99999%) don’t mind getting photographed by strangers. Some might ask you why you are taking their pictures and are you from press. Believe me any answer you give will satisfy their curiosity as long as you don’t look and act suspicious. People are likely to ask you to take more pictures of theirs with them posing in the most predictable ways, a courtesy you need to be willing to offer. It is best not to chase women for pictures as that might scare them and result in an unpleasant situation.
Ming, one problem I face in India is isolating the subject. There are just too many people on the street and too many distracting objects in the background. The wide angle lens I use (28mm) is quite unforgiving of composition. How do you handle a situation like Indian street?
Absolutely exciting to follow these thoughts about street photography. A very lively discussion.
I’m from Germany: here you must always regard the right of publicity.
Thanks MT !!!
Are there laws restricting you from photographing people in public? What if they’re small elements in a general scene? You can’t clear out everybody from the Brandenburg Gate whenever somebody wants to take a photo, yet there are clearly plenty of these around. What if you’re a tourist (and presumably ignorant of local laws)?
Hey Ming, yes there are similar laws restricting us from photographing people in public (at least in Germany and Austria). You are not allowed to photograph a person without his permission if he is either your subject or the photograph would get an entirely different meaning without the person in the photo. Also, you are allowed to take photos of events like concerts, sport events or demonstrations in general, but you are not allowed to pick a person out from the crowd.
Wow, that interpretation is pretty subjective – what if the subject was the person, but they were an unidentifiable silhouette? What if the person making the judgment call has no artistic sensibilities? Seems like a bit of a minefield to me…also, I’ve not had any issues with street photography in Austria, but perhaps it’s because I clearly look like a tourist and don’t do the Bruce Gilden style thing. It does make me reconsider using Germany as a location for next year’s workshops, though. Thanks for the heads up…
I too found out street shooting required permission from the subject in Germany, Austria and Switzerland, also in the USA and Canada.
The way I dealt with it was, if confronted, was with flattery (works especially well with women). I found it best to explain a specific feature of them that is so unique, striking or beautiful that you had to get a picture. Make them walk away feeling special, beautiful , etc. The downside is you may have to take some more direct pictures of them and be detracted from the random shooting you were enjoying. But a few minutes diverted is still better than meeting the local law enforcement 🙂 .
A glitch in the Matrix is awesome! Must try some reflection shots.
Great post MT! Insightful as always…
Thanks Jack! Reflections are great for layering.
Great text and pictures as always. And if you ever plan to pull that pink-camera-with-red-and-blue-suit stunt – please let us know where and when.
Thanks – perhaps I should get a ‘Blad and have it re-leathered in hot pink.
Would love to hear your opinion about street shooters such as Bruce Gilden, whose technique is quite different from yours.
It takes some balls to do what he does, but it also results in very similar shots stylistically. It’s very much outside my comfort zone and doesn’t work with my non-confrontational personality, so I don’t do it – but each to his own.