This article was originally posted in a series of 10 mini-exerpts back in the very early days of the site; Google Analytics tells me that it was hardly viewed, which is probably a shame – so I’ve re-packaged, updated and re-presented it again here as a monster all-in-one reference. Enjoy. MT
Disclaimer: I’m assuming you already know the basics.
Part one: Compact cameras
Pretty much everybody has a compact, even if it’s only the one built into your phone. It’s no good for serious photography. Or is it? You might find yourself using it more if you try some of these ideas…
10: Carry spare batteries. One in the camera, one in your pocket or one charging. This lets you keep going – especially important since compact battery life is often terrible.

Crossing thoughts. Ricoh GRDIII
9: Use the hand strap. It seems obvious, doesn’t it? But you’d be surprised how many people don’t, and then land up having to buy new cameras.

Car reflection. Ricoh GRDIII
8: Shoot bursts, if you have a useable buffer. Without the buffer, you’ll just have to rely on timing and counting shots – think of it as a revolver rather than a machine gun. The same rules about the middle shot being stable and sharp in a burst also apply to compacts.

Zoom. Ricoh GRDIII
7: Keep ISO as low as possible, and make use of the stabilizer. Most good compacts have stabilizers; this is because even with the 1/focal length rule, there’ll be enough camera shake to blur things – you’re holding a light object at arms’ length and trying to keep it still. Granted, there’s no mirror slap, but there’s also nothing to brace against, either. Keeping the ISO as low as possible lets you maximize image quality. There’s usually a big difference between even base ISO and one stop up; know the limits of usability and don’t exceed them.

Crossing, London. Ricoh GRDIII
6: Look at the whole frame. I’m not sure how to say this more succinctly: there are things compacts can do that larger sensor cameras can’t – think of telephoto/ compressed perspective shots where everything is in focus, for example – and vice versa (shallow depth of field, wide FoV). Look at the whole scene, and see how you can use these strengths to your advantage. Images shot with compacts that work actually force you to have a much stronger composition, because you cannot rely on the crutch of bokeh or let the lens do the talking.

On set in the afternoon. Ricoh GRDIII
5: Spot meter. Dynamic range on all compacts is limited because the pixels are small. This means losing the shadows or the highlights is inevitable under most situations; you need to decide which one is important. The spot meter (and a half press to lock exposure) helps you to do that. High key = keep the shadows and lose the highlights; low key = keep the highlights and lose the shadows; most important however is making sure the subject is properly exposed – use the spot meter over faces, for instance. The other alternative is to use the spot meter on highlights and add a stop of exposure compensation – the meter will try to average a middle gray exposure out of whatever you place the box over; you know the camera has a little more tonal range in it if the highlights are at middle gray, so you can safely add some positive exposure compensation. This generally makes the rest of the image a little dark – especially under harsh light – but it also has the side benefit of making the colors richer.

The fountain of capitalism. Ricoh GRDIII
4: Use P mode. I’d say leave it in full auto, except most of the time that doesn’t let you control exposure compensation and metering – those are important. Why not use aperture priority, as I’d recommend with a larger sensor camera? Simple: there’s no point. The real focal length is so wide and the lenses usually so slow that DoF is enormous, and changing the aperture isn’t going to do anything other than reduce the amount of light reaching the sensor. Great if it’s bright, but if you stop down too much, you’re going to to induce diffraction and just land up with soft images.

Affection waiting for the bus. Ricoh GRDIII
3: Keep the lens clean. I’m constantly surprised by how many people have dirty lenses on their cameras and then complain that the images aren’t sharp, or that they can’t see anything in the finder – but there’s fingerprints all over it. It’s especially important on a compact as the small sensor and high pixel density are very demanding of lenses; the more aberrations you have on yours, the lower resolving power is going to be.

After prayers. Canon SD780IS
2: Prefocus. Although focusing speeds have improved dramatically, what’s really nice about most point and shoots is the half press to full press lag is actually quite low – but you need to be prefocused first. In any case, the huge DoF will cover any minor focus errors. Most fleeing moments can be captured with a compact and a little anticipation.

Break. Ricoh GRDIII
1: Set up your camera to either shoot raw, or output as neutral a jpeg as possible. If you can’t get a raw file, there’s still a lot that can be done with a good jpeg – what I usually do is reduce contrast to minimum to preserve the highlights and shadows; turn saturation down, and lower (but not zero) sharpening. Reason being that if you zero sharpening, you do generally lose some detail on compacts as this step is applied to the raw data in the imaging engine before being saved as a jpeg. You’ll be surprised how much you can do with one of these files afterwards in photoshop. Similarly, avoid those fake HDR or extended dynamic range modes; they might appear to help but what they actually do is make highlights look very unnatural because the tonal values overlap with other parts of the luminance range.

Vehicular architecture. Apple iPhone 4
See more of my small-sensor compact camera work here on flickr: click here
Part two: DSLRs
Disclaimer: I’m assuming you know the basics already, but want to get serious.
10: Control your view. Use the viewfinder when you can; there’s less lag, you can brace the camera against your face to increase stability, the dynamic range and resolution are higher, it’s a more direct connection to your subject and it saves power to boot. But why not use live view if you’ve got it, especially coupled with a swiveling screen? For critical focus, odd angles, and video, it’s actually pretty handy. Though I personally avoid it like the plague unless i have no choice.

The big brass band. Not strictly an SLR shot, but live view did help me to get this angle without sticking my face on the floor. Leica X1
9: Shutter button technique matters. You’d be surprised how many people just jab the button and wonder why the camera isn’t responding. Firstly, don’t jab. Roll your finger gently to reduce camera shake. Secondly, prefocus; the shutter button has two stages – the first activating autofocus, the second, shutter release. If you have focus already going, then your lag is going to be much, much shorter than if the camera has to do all the work when you press the button – even on the fastest cameras. Finally, you’d be surprised how many people use the horizontal release in portrait orientation even if they have a vertical one – don’t. It’s less stable, and frankly you just look silly.

Night party. It looks bright, but the EXIF will tell you otherwise. I needed every single trick in the book to get this shot: stratospheric ISOs, low shutter speeds, and a fast f1.4 lens wide open. Nikon D700, 24/1.4.
8: Turn the in-camera sharpening and contrast up to maximum. What? Why? There’ll be haloes! I can hear the cries of incomprehension and derision already. First caveat: you must shoot raw. Second caveat: use a raw processor that ignores the camera’s proprietary processing tags, e.g. Adobe Camera Raw. The reason why you want to crank both of these things up is that the camera’s preview engine generates a jpeg based on these settings; if your exposure is okay with the contrast at maximum, then you know you’ll have more shadow and highlight latitude. And high sharpening accentuates the differences between in focus and out of focus.And it also accentuates noise; basically, the combination of these settings makes it easier for you to tell if you’ve nailed it or not.

Work that perspective. Nikon D3, 70-300VR
7: Don’t let zoom lenses make you lazy. Select a focal length based on perspective, not angle of view: in other words, don’t use a wide lens because you want to get more of the scenery in, or a telephoto because you want to get closer. Instead, wide is for accentuating perspective, telephoto is for compressing it.

Action. An interpretation of the famous first series of motor drive images that showed a galloping horse’s legs do in fact leave the ground simultaneously. Nikon D700, 28-300VR
6: Shoot in bursts. Events evolve. The first shot may not be the best, or you or your subject may move. A burst is insurance, and if they’re all perfectly focused and exposed, then it lets you select the best image – say for minor variations in facial expression of a portrait. Note that I don’t mean machine gunning the shutter until your buffer is full; three or four shots is usually plenty.

Fire. The balloon was firing on and off unpredictably. It would be a lot more difficult to get this shot without auto ISO. Nikon D3100, 85/1.4 G
5: Use auto-ISO, but only if it’s configurable. If the minimum shutter speed is not configurable, you don’t know at what shutter speed the camera is going to start bumping the sensitivity; if it’s too early, your images will be grainer than they need to be. If it’s too late, then you may not have enough shutter speed for a sharp shot.

Cheers. Tough lighting; how do you know what your camera is going to expose for if you haven’t tried it out? Nikon D700, 85/1.4 G
4: Know what your camera is doing: AF, metering, auto-ISO. This is actually very, very important. If you don’t know how your camera responds under a given situation, how do you know if you can get the image or not? There’s no shortcut to this other than a lot of practice and experimentation.

Alien. I prefocused on the spot where the man would be when the light was exactly behind and over him, then waited. Nikon D3, 24-70/2.8 G
3: Have some way to control your AF: either use AF-ON or AF-L, together with continuous focusing. Autofocus is an aid, not a crutch. Auto-select point systems will seldom select the point you want; they’re useful, but only in an environment where you have a lot of randomly moving subjects and need to pick the closest one. When you have something a bit more sedate, tell the camera what to focus on. Use continuous autofocus, because everything moves, if only slightly; the larger your aperture, the more this will matter because depth of field is shallower and probably won’t be sufficient to cover subject movement. I prefer to have AF activation on the shutter button and an AF-Lock button configured under my right thumb – this is so I know I can just press one button and have a high chance of getting the shot – but I also know of plenty (most sports shooters?) who configure AF-ON under the thumb, and the shutter button to capture the image only. AF Lock for that configuration is of course done by releasing the AF-ON button. Try both and see which works for you.

This was actually shot in a well lit carpark, but with a stopped down lens and fast shutter speed to eliminate ambient and have nearly 100% of the exposure provided by the flash. If I’d shot aperture priority, I’d still be able to see the surroundings. Nikon D700, 28-300VR and three SB900s.
2: Shoot aperture priority, except for flash. This is the easiest way to maximize control of your camera: aperture priority to control depth of field, manual mode if you need to balance flash and ambient lighting.
Watching the world pass by. Imagine this frame without the edge intrusions: it’d feel pretty different, wouldn’t it? Nikon D700, 85/1.4 G
1: Watch the edges of your frame. I’ll say it time and again: what usually makes or breaks a photo, or the difference between an excellent image and an outstanding one, is how well the subject stands out. This is both a function of subject lighting, positioning and focus, as well as the inverse: what other things are there in the frame that take attention away from the subject? Intrusions into edges are one of the main ones. Conversely, there are also compositions where edge intrusions are welcome, or even make the image: they suggest things that might not be there, or leave things to the imagination of the reader. Use with care!
Part three: Mirrorless cameras
Mirrorless: the middle child? Maybe. But even a diehard sceptic like me has discovered that these things have their uses –just be clear about your expectations.
10: Spare batteries are an absolute must. Due to the large sensor, LCD and high demands from lens focusing motors, stabilizers and the like, mirrorless cameras have the highest power draw of any type of camera (other than medium format digital, it seems). Make sure you have at least two to get you through a day, maybe with an additional spare.

Moon over Prague Castle tower. Olympus E-PM1, 45/1.8
9: When selecting a camera, look at two things: useability (including lens choices) and raw sensor quality. I’ve tried the Panasonics, Sonys, Fuji and Olympus systems; of all of these, only the Olympus E-PM1 Pen Mini stayed more than a month. Why? Because it’s the most responsive and configurable of them all. The Panasonics are very configurable but not very user friendly. The Fuji X100 has the best image quality, but the firmware is a disaster and it’s slow as molasses. The Sony is reasonably responsive, but not so easily configurable and the lens choices are pretty limited. And the NEX-5 I owned had a strange color palette. And don’t pick one so big that you might as well take your DSLR.

Lange Datograph. Olympus E-PM1, Panasonic 20/1.7
8: Use a hand strap instead of a neck strap. If it’s in your hand, you’ll be ready faster. And more likely to use it. And the weight/ size aren’t so bad you need to hang it around your neck or shoulder for relief. It also takes up less space in your bag when you have to store it.

Reflections. Olympus E-PM1, 14-42 kit lens
7: Adaptors are useless. Although they seem like a good idea, mirrorless systems are optimized for telecentric lenses with very short back flange distances; conventional SLR or RF lenses aren’t designed like this and thus don’t work well on mirrorless cameras. It’s quite well known that RF wides have numerous issues like cyan/magenta shifted corners, increased CA and vignetting. Adapted lenses are also bulky and lacking in automation – no AF, no aperture control, no stabilizer. And accurately manually focusing something held at arms’ length is near impossible.

Burlesque. Olympus E-PM1, Panasonic 20/1.7
6: Remember the lag. Even though release lag may be in the 30-40ms range, you’re going to have another lag induced by the LCD itself – the best models refresh at 60hz, which means you’re looking at least another 15-20ms (or more) of additional lag as the screen refreshes to show the current scene. Practice to get a feel for the rhythm of the camera.

Garage classic. Fuji X100
5: Avoid continuous AF. Contrast detect AF systems still aren’t good enough to track moving subjects – with the exception of the hybrid system in the Nikon V1 that also has phase detect photosites built into the sensor – so either prefocus and anticipate, or cover with DOF.

After school in Kathmandu. Fuji X100
4: Carry it everywhere. No point sacrificing image quality if you’re going to leave it at home like the full size camera. This is also why I’m drawn to the smaller, more pocketable mirrorless cameras like the Olympus Pen Mini. I’ve put it on a hand strap and use a pancake lens most of the time; it’s not a lot bigger than a compact but produces vastly better image quality.

Mosque architecture. Sony NEX-5, 18-55 kit lens.
3: Use the EVF if you’ve got one. Like any optical finder, bracing the camera against your face helps stability immensely. I’m not recommending going out and buying an add-on finder; these are usually flimsy, unwieldy and dramatically increase the size of the camera – defeating the point of mirrorless in the first place.

Before prayers. Sony NEX-5, 18-55 kit lens.
2: 1/focal length rule doesn’t apply anymore. Why not, aside from crop factor? Because most of the time you’ll be using live view and holding the camera at arms’ length – this means increased propensity towards camera shake. Double, or even triple that for critical shots or action. Or use a flash. And while stabilizers help, they probably bring the safe speed into the 1/fl rule or maybe very slightly better.

Arch. Sony NEX-5, 18-55 kit lens.
1: Compose like an SLR, shoot like a compact. They’re hybrids, right? Treat them as such. You get the DOF of an SLR – which means you have to watch your focus point, and take care in choosing perspectives. But you also have the limitations of a compact – so remember to watch your exposure/ highlights/ shadows; prefocus; don’t expect it to be able to track moving objects. Remember the limitations of both, and that should give you a good idea of how to get the most out of your mirrorless camera.

Hitchcock scene, Vienna. Olympus E-PM1, 45/1.8
See more of my work from the various large-sensor mirrorless cameras here on flickr: Olympus Pen Mini E-PM1; Sony NEX-5; Fuji X100; Leica X1
Part four: Rangefinders
10: Timing, timing, timing: shoot lots and get to know the lag rhythm of your camera. It might feel instant, but it isn’t. That split second can make or break the difference in a critical shot, especially during a fast-paced situation – that fleeting expression, or arrangement of people.

Entranced. Leica M9-P, 35/1.4 ASPH FLE
9: Get to know your lenses: There is no such thing as the perfect lens. All of them have idiosyncrasies, be it focus breathing, focus shift, curved focus planes, flare under certain conditions, or maybe the ability to produce brilliant 14-pointed stars from point light sources at f16. (Don’t laugh, the Leica 21 Summilux ASPH does this.) The better you know your lenses and the way they draw, the more you can exploit their properties to help your pictorial rendition of a given situation. It’s also why I’ve got eight ways to get to 28mm – there’s a huge difference between the Zeiss ZF.2 2/28 ‘Hollywood’ Distagon and the Ricoh GR-Digital III, for instance.

Gluhwein time, Vienna. Leica M9-P, 50/1.4 ASPH
8: Use a soft release and thumb grip (and maybe front grip). Anything that can make your grip more secure or comfortable, and your shutter release action more gentle, is your friend. I like the Thumbs Up, personally.

Seeing the wood from the trees. Leica M9-P, 21/3.4 Super Elmar ASPH
7: Don’t limit your subjects to the center focus point. You can focus and then recompose. But remember that most lenses aren’t flat field (especially rangefinder designs, which are usually non-retrofocus and spherical) so a little tweak to the focus ring is required for edge subjects – usually to make the focus point slightly closer, as the focal plane will be curved slightly around you. Experience is required to determine exactly how much and when to shift – this is why I also highly recommend using fewer lenses but knowing them well.

Morning mass, Stefansdom. Leica M9-P, 28/2.8 ASPH
6: Use the DoF scales to prefocus. Especially useful with wide lenses, whose large DoF means that you might even be able to shoot hyper focal and not have to focus at all: especially great for being fast and reducing time between seeing the shot and capturing it. Very important skill for street photography and photojournalism. You can practice this by estimating distances and setting your lens with the camera at waist level, then checking in the finder.

Self portraits. Leica M9, 35/1.4 ASPH FLE
5: Pay attention to the edges. The frame lines are a suggestion: there will be more included. With experience, you can push the composition a bit and still get everything in.

Color wall. Leica M9-P, 50/2 APO
4: Shoot with both eyes open. The nice, bright, high-magnification finders are great for letting you a) see what’s outside your frame and might make composition better or worse if included or excluded; and b) you can keep both eyes open to enhance your peripheral vision. It’ll also stop you from getting run over.

Tea time. Leica M9-P, 28/2.8 ASPH
3: Know the limitations of the system. By their nature, your finder will probably only cover 28-135, and not be very accurate for 90 and 135. So really, the strengths of the system lie in the 28-75mm range; don’t try and do birding with one of these things and wonder why your results aren’t up to par. (Note: I do use my M9-P for macro work, but that’s a different story entirely.)

Bangkok. Leica M9-P, 35/1.4 ASPH FLE
2: Less is more. Rangefinders are small and light: why burden yourself and turn photography into endurance sherpa-ing? Try reducing your regular kit to two, or better yet, one lens. Either something which provides to distinctly different perspectives, or perhaps something in-between. I choose 28/50, after a long time trying to make the single 35 work for me. It just didn’t agree with the way my eyes worked, which is a shame because the 35/1.4 ASPH FLE I had was easily one of the best lenses I’d ever used, period.

As above, so below. Leica M9-P, 28/2.8 ASPH
1: Check your rangefinder calibration. There’s nothing worse than shooting an entire series at f1.4 and thinking you nailed focus – or at least remembered doing so in the finder while shooting – then being horrified as you open up the set only to find your subjects’ noses in focus and their eyes a distant plane away. If you know how to calibrate your rangefinder, great; if not, it might be the subject of a future post here (but I take no responsibility if you damage something or void your warranty). If you don’t dare, send it in to your dealer. The best thing you can do is have your body calibrated to match all of your lenses – so send them all in at the same time. The next best thing is to have it calibrated for the lens with the shallowest DoF; the one exception is if the lens suffers from focus shift. Then you’ve got no choice but to calibrate for your most frequently used lens and remember which direction to adjust for later. Check calibration often and if you get a new, shallower DoF lens. One last related point: make sure all of your viewfinder windows (VF, RF patch, frame lines, front VF) are clean – you’ll be surprised how much easier it is to focus!
Bonus for Leica M8/9 users: The meter is center weighted and very heavily biased towards protecting highlights. So, for backlit subjects there are a few ways of compensating. a) Lock exposure with the camera aimed at something of roughly equal luminance but not backlit; this works on the shutter half-press position (with a little dot displayed at the top between the leftmost digits in the finder) if you’ve got the release mode set to standard. b) For M9 users, use the rear dial to activate exposure compensation. I personally don’t like this, because I have no idea if I have it set or not, and if so, how much. c) If you’re shooting with fixed and not auto-ISO, then note the shutter reading in the finder, and move the shutter dial to something appropriate. I use a slightly more complicated method, with auto-ISO: if the shutter speed displayed is over the minimum you set, then you know the camera is in base ISO. I just manually set it to something lower; the camera can’t lower the ISO any more, so it overexposes as desired. If the situation is dark and you’re above base ISO, this doesn’t work. In very dark situations, I usually just leave the camera at ISO 1250 and go manual with the exposure.
See more of my work with the Leica M9-P here on Flickr: click here And for earlier work with the M8, click here
Part five: Photojournalism and street
Photojournalism (hereafter PJ) and street photography go hand in hand: they’re about capturing a moment of life. PJ goes a bit further by adding a story to that moment; street can just be an aesthetically pleasing moment in and of itself. Both though require the photographer to be observant and ready. This is what works for me.

Protest Kabila, Prague. Leica M9-P, 28/2.8 ASPH
10: Watch your shutter speeds. You’re going to need more than 1/focal length – maybe 1/2x to be safe, or even 1/3x if you’re running and gunning. You’re moving, your subject is moving, and nothing is steady. Remember also that the higher the resolution your camera, the less forgiving it is of focus errors and camera shake.

Rain, London. Ricoh GRDIII
9: Small, nondescript cameras are best. They don’t draw attention to you – especially in the current day and age of everybody carrying a camera, nobody is going to take you seriously if you have a small black compact. You’d be surprised how much I get away with using the iPhone or Ricoh GR-Digital III. People simply don’t perceive it as threatening in the same way a pro DSLR and 70-200 might be. Compacts also give you more depth of field for a given aperture.

Morning paper, London. Ricoh GRDIII
8: Shoot wide and close. The perspective produces a stronger image; wide lenses are also more forgiving to focus errors and camera shake. And as a bonus, you get context in the frame as par for the course.

Learning English. London. Leica M8, 21/1.4
7: Anticipate and observe. To quote the Cartier-Bresson: pick the decisive moment. To do so, you need to be aware of everything around you; really look. Pay attention to the details. People are fairly predictable; it should be easy to spot if something out of the ordinary is about to happen. Anticipation of the action gives you a vital few seconds more to prepare and be in position, or have the camera out.
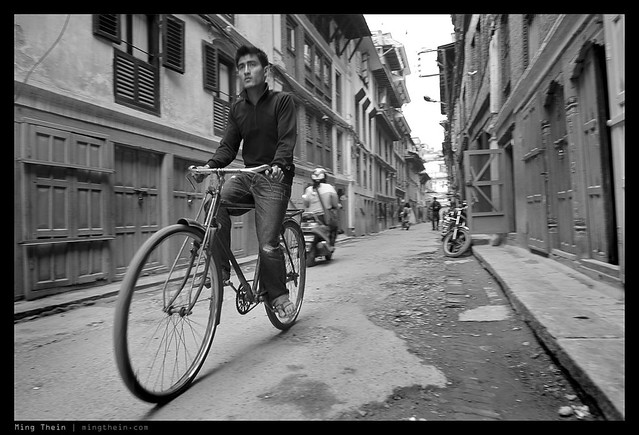
Bicycle, Kathmandu. Nikon D700, 24/1.4
6: Blend in. Act like you belong, dress nondescript, and nobody will pay you a second glance. It will make your job a lot easier. If you draw attention to yourself – be it by being uncertain or provocative – then people of course notice.

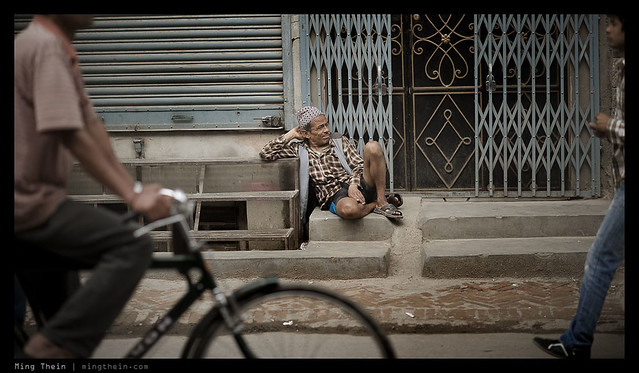
Oblivious. I was standing 3 feet in front of them. Canon IXUS 220HS
5: Always have the camera to hand. How are you going to get a quick shot off if the camera is in your bag? You should be able to get a shot in less than 5 seconds – sometimes your window is even shorter than that.

Trekking office, Kathmandu. Nikon D700, 85/1.4 G
4: In a real emergency, help. Yes, our duty as a PJ is to record, document, communicate and raise awareness about the events around you; you help by telling a story. But you don’t have to shoot all the time. Get your shot and then help out the people. Remember that at the end of the day, we’re all human.

Street party. They would need help the following morning. I didn’t stay that long. Nikon D700, 85/1.4 G
3: Practice, practice, practice. Use your camera until you’re fast and proficient; you should be able to visualize the frame and field of view without having to raise the camera to your eye. You should be able to set things by muscle memory and have a group of settings (if your camera supports this) that configures the camera to be ready to go.

Reflections. Leica X1
2: If spotted, acknowledge your subject. A friendly smile, a sincere nod – all of these things make people feel comfortable with your presence and make your life easy. You don’t have to stop and talk or explain what you’re doing if nobody is asking. Smile and move on. Done.

Smoking break. Olympus E-PM1, 45/1.8
1: Be confident. It is better to say sorry rather than ask permission and miss the shot. With that, go out and be productive.

Martial law, Kathmandu. Nikon D700, 24/1.4
See more of my photojournalism work here on flickr: click here
Part six: Lighting
This post deals with the light you create. You can’t always find what you need, so it’s important to know the dos and don’ts of off camera lighting. My tips apply to speedlight users; I’ve never been a huge fan of monoblocks, nor have I used them very much since Nikon launched their CLS system. Sure, sometimes you wish for more power, but then again you remember that you can go for hundreds, if not nearly thousands, of shots on a set or two of AAs – instead of carrying a 50kg lead acid lump around. Read on.
10: Always shoot in manual mode with flash. Otherwise, there’s no way you can balance your flash and ambient exposure; if you want all flash, then you can dial in the highest sync speed possible – this will help you avoid camera shake. If you let the camera decide, it will usually only get it right for the center portion of the frame when the flash exposure is much greater than the ambient exposure. This is to say, most camera systems are useless at daylight fill, especially under very bright conditions.

Inspector. Note how inside/ outside luminance is balanced. Nikon D3, 24-70, one SB900 in a soft box.
9: Imperfect diffusers and softboxes add character to portraits, but not product shots. Uneven lighting for most product shots just makes the object look odd. For people, it can be strangely flattering. Consider making some shoddy homemade internal baffles for your portrait soft boxes.

Shoddy baffling adds character! D200, 17-55/2.8, 2xSB600s in homemade soft boxes.
8: If you’re controlling lighting, you shouldn’t have blown highlights or blocked up shadows – unless you want them. Self-explanatory. Your lighting isn’t balanced properly. Try again.

Intentional outline. Nikon D3, 105VR, one SB900 off camera.
7: Those clip on diffusers are pointless. A small light source can never replicate a big light source unless you expand (and diffuse) it – be it bouncing off the ceiling, or a softbox. A little clip on diffuser is just going to make a small, diffuse source – which at any distance, looks like a small intense source except weaker. You’ll get the same reflections and general lighting feel. All you’ll have done is a) look stupid b) wasted your money and c) lost at least two stops of light. I’ve never even used the diffuser domes supplied with any of my flashes; they’re still in the plastic bags they came in.

Unrelated shot. Speake-Marin perpetual calendar. Nikon D700, 60/2.8 G, one SB900 and diffuser.
6: Duct tape is your friend. Use it to tape flashes in odd positions to whatever supports might be handy; sometimes you just can’t erect a flash stand in the place you want it. But you could tape the flash to the ceiling. I’ve done it before.

The Hollywood shot. Flashes duct taped to curtain poles. Seriously. D3, 24-70/2.8 and three SB900s
5: More flashes are better. I’ve got four; two primary units, one spare, and one more unit to use as a commander on cameras without a built in (Leica M9-P, I’m looking at you). Legend has it that Joe McNally travels with an entire suitcase of SB800s. I dread to think how many batteries he goes through every year.

Alfabeti. Nikon D700, 60/2.8 G 2xSB900s
4: If you’re short of lights, consider a reflector. Positioning one light directly opposite the reflector gives you another pseudo-light – depending on the reflector, it could be as little as 1 stop light loss – think of a mirror, for instance. A more diffuse reflector can provide gentle fill.

Leaf shutter benefits. Leica X1, SB900, 1/2000s.
3: Higher sync speeds are better. Pro DSLRs top out at 1/250s for full power, or less power and faster – but these are not true ‘flash speeds’, because the flash has to fire for longer but at reduced power – note how the flash no longer freezes motion at 1/8000s as much as it did at 1/250s. Leaf shutter compacts like the Ricoh GRDIII and Leica X1 both sync to 1/2000s; they’re great for capturing motion or providing balanced daylight fill, where your ambient shutter speed might be very high. You won’t lose the highlights, and you also won’t lose the shadows – thanks to your high sync speed.

Dessert. Balanced with ambient daylight in restaurant. Nikon D700, Zeiss 2/28 Distagon, 2xSB900
2: Remember the eyes. For living subjects, a little catch light reflected in the eye can make all the difference between a flat, boring shot and a portrait that looks alive. Use a reflector, or if you’re using Nikon CLS, the trigger flash on your camera works fine too.

Note the eyes. Leica X1, SB900.
1: Spare batteries are important. Never get caught short. I avoid NiMH as they tend to exhibit the memory effect, especially if not used frequently – as would be typical for your second or third spare set. The Sanyo Eneloop batteries are fantastic – they really do hold charge like alkalines, but have the reuseability and current draw properties of NiMH. I’ve got eight sets of these for my flashes, and only charge them when depleted.

Macro lighting is quite a different game entirely. There isn’t a lot of working distance, and you need a lot of diffusion to create the same apparent perceived light source size.
Part seven: Postproduction and editing
Photoshop is a fix all for everything, right? It’s also come to represent a dirty word; when something has been ‘Photoshopped’ it’s no longer authentic or original, and the skill of the photographer has been severely diminished. Wrong, think again. Photoshop is the equivalent of the darkroom from the film days: sure, you can add things to the scene, but they look odd and unnatural. The main thing you did in the darkroom was finalize the exposure: adjust the density and brightness, and fiddle with the contrast. Maybe some dodge and burn. How? Chemical mixes, timing and cutout masks. We do the same now – except the chemicals are your raw converter and curves layer, the fixer is your save button, and dodge and burn is a brush tool.
So what is editing exactly? The process of removing unwanted material – in this case photographs – to leave a more coherent story or narrative; being selective about what you show is just as important as having something to show in the first place. There’s no point in having technically brilliant but boring images – but you can make a story out of perfectly timed moments, even if they’re a little noisy or blurred.

The flying Vianney Halter for Goldpfeil. Nikon D700, 60/2.8 G
10: Keep all of your raw files. You never know when somebody might ask for a color version of a B&W image; don’t lose that sale because you were trying to be cheap on storage. Storage IS cheap.

Sinister chitty chitty bang bang. Leica M9-P, 28/2.8 ASPH
9: Sharpening should be the last step. If you sharpen too early on, you’re to end up with extra noise and less tonal information, especially for images with a lot of fine detail. Why? Because of the way sharpening works. It increases apparent acuity between adjacent areas of different luminance by increasing the difference in luminosity between them. Making something brighter or darker – with images containing a lot of fine detail, this means a change to a large area of the image – will inevitably destroy some tonal information, especially at the extreme ends of the tonal range.

If the G-P F1-047 was titanium and on a blue strap…it’s really aluminum and on a tan strap. Nikon D700, 60/2.8 G
8: Let your images mature before deleting. Look at your images immediately after a shoot and pick out your favorites. Then do this exercise again two weeks later. You’ll probably find that there’s been a big change. Why? Immediately after the shoot, you remember how difficult it was to get one shot; that effort put in affects your artistic judgment. Two weeks later, you’ll probably not remember as clearly, and you’re more likely to go with your first instincts. Go with the latter selection.


A tale of two frames. I initially preferred the first frame; but a month later, I think there’s more of a story and more contrasts in the second one. M9-P, 28/2.8 ASPH
7: Calibrate your monitor. Whether you use one of the Spyders or the built in utility in OS X, it’s important to adjust your monitor to produce as accurate color as possible – this is important for both print and screen; you want to make sure that other people see the same thing you put in so much effort to create. For print, you can attach the color profile to the file; a good printer will be able to match the print to what you see on screen. It’s also important to know the gamut of your monitor; I’ll never do any serious editing on my 11” MacBook Air because the screen has terrible color. On the other hand, the 27” iMac/ Cinema Displays are fantastic, as are the 15” and 17” MacBook Pros.

Intentional color. Leica M8, 21/1.4 ASPH
6: Do most of your adjustments in the raw converter. This is important, because the data is in its highest bitrate form – which means making large changes to the file at this stage has the least impact on image quality. If you do highlight recovery on a 16 bit raw file, you’ll probably have a decent stop or two (assuming a good sensor) before you get posterization or false color. Now try doing the same to a jpeg and you’ll see what I mean. By the same token, keep your files in the highest bitrate form until you’re absolutely sure you’re not going to change anything again – and that might be a Photoshop file in 16 bit with all layers, or it might be a quality 12 jpeg. I generally don’t edit again, so I save my finished files as a maximum quality jpeg. Remember that print doesn’t have as much dynamic range as a computer screen, so if it looks fine on a calibrated monitor, it’ll probably look fine in print.

Sunset shadow. Nikon D90, 18-200VR.
5: Buy a good tablet. I like the Wacom Intuos 4. It will help you immensely to lay precise masks and control your dodge and burn; the tip is pressure and tilt sensitive to control brush size and density. It’s much faster than doing things with the mouse, too – once you get used to how the entire tablet area maps to your screen. Get one that suits your screen size. The medium 6×9” is perfect for my 15” MacBook Pro.

The Beach. Leica M8, 50/1.4 ASPH
4: Don’t overdo anything. Turning it up to 11 works for some shots, but not most. Too much sharpening leaves haloes. Too much contrast loses tonal detail. Too much saturation makes it feel unnatural and cartoonish. Etc. And don’t even get me started on overuse of HDR; overlapping tonal values are jarring to the eyes.

Turning it up to 11. Nikon D90, 105VR
3: Always have backups of your backups. I’ve had a situation where a new OS caused some serious issues with my primary computer; the upshot was that none of the files were readable. My primary backup drive – a Maxtor; I’ll never buy one of those again, just too many have failed – started making the click of death when I connected it, and I was able to get most of my data off in time before the drive crashed and died. Good thing there was one more backup copy. My current management strategy is to keep all finished jpegs on my editing computer; there are two duplicate backups with all the raw files (in the same file structure) on external drives, one of which lives in my bag and goes with me everywhere; I also time machine the primary drive whenever I do a backup to the externals. Generally I’ll do a backup once I finish editing a batch, which might be 50 or 100 images or thereabouts. Storage is cheap. Lost files are priceless.

Blue water. Nikon D3, 24-70/2.8 G
2: Integrity matters, especially for photojournalists. Whilst I’ll have no compulsion removing dust from a watch product shot or litter from fine art street photography, I absolutely will NOT touch the content of the image for photojournalism. This is because once you do, and if you get caught, your credibility is instantly nonexistent.

Panerai Mare Nostrum, on a GuB Marine Chronometer. Clean well, because even at this relatively low magnification, it’s very visible. Nikon D700, 60/2.8 G
1: You can’t polish a turd. Don’t think that you can rescue a compositionally weak image ‘in Photoshop’. You can’t. You can’t change the lighting. If you didn’t get it mostly right in-camera, you’re not going to be able to fix it in Photoshop. You can fix exposure, color, contrast and the way the image appears; you can’t change the content. If an image is good, however, you can make it extraordinary.

Color palette and tonality hugely affects the feel of an image. But the content must be there to tone in the first place. Nikon D700, 28-300VR
Part Eight: General tips for all photographers
Here are some suggestions that apply to everybody, regardless of what or how you shoot.

Prague. Leica M9-P, 28/2.8 ASPH
10: Shoot raw and expose a little bit hot. There’s always a bit of potential to recover highlights in your raw files; some cameras more than others. Know how much yours can tolerate before blowing highlights completely. It’s not just a way to expand dynamic range; exposing hot and bringing down the exposure later actually reduces shadow noise, too. For those of you using a third party RAW converter that doesn’t read proprietary image settings, crank your sharpening in camera up to maximum – it won’t affect the raw file (only the jpeg preview), but you will be able to more easily see if things are in focus or not when using the image review screen.

But we all have favorites. Billingham Hadley Pro. Leica M8, 50/1.4 ASPH
9: There is no perfect bag. Just accept it, and move on. Buy a new one if it takes your fancy but don’t expect it to solve all of your problems. Most of the time I only use a bag if I have other non-photographic items to transport. If it’s camera-only then it just goes over my shoulder.

At the station. Note clean edges and overall feel of the image. Leica M9-P, 28/2.8 ASPH
8: Watch the edges of your frame. Your subject is identified by a) light; b) position in the composition; c) context. The edges add or remove context – and with it, distractions. Use them carefully.

Spotlight. I’d have missed this if I was fiddling with my settings. Olympus E-PM1, Panasonic 20/1.7
7: Learn your equipment. You should be able to operate your cameras like it’s second nature. Muscle memory is your friend, and can make the difference between responding instinctively and getting the shot, or missing it altogether. Practice is the only way to do this.

The ephemeral sushi. Nothing is in focus, the saturation is all over the place, there are hot spots, the color isn’t accurate…but somehow, it works. Olympus E-PM1, Panasonic 20/1.7
6: Look at lots of images. Famous works. Not so famous works. Flickr. It’s a good source of both inspiration and way of helping you to hone your sense of composition.

But surely it will make me a better photographer!
5: Don’t buy new gear unless you’re sure you’re not the limitation. Make sure you know exactly what it is that your current gear isn’t doing for you and how the new gear will solve it.

Homage a Rene Magritte. Prague. Olympus E-PM1, 45/1.8
4: Look at other mediums of art for inspiration. It could be painting, design, architecture; for instance I love the way Magritte renders clouds, and I look for that kind of light when shooting skies.

Gorilla in the shadows, Prague. Leica M9-P, 28/2.8 ASPH
3: Look for interesting light, not just interesting subjects. But of course it’s best to have both. The best photos present an unusual subject in an extraordinary way.

Precision. I waited for both the sun and the bird. Nikon D700, 24/1.4
2: Be very, very selective with your keepers. Keep only the best. I throw away 99% of what I shoot. Not because it’s bad, but because if you shoot good pictures, then keeping only excellent will make you excellent after a while; if you shoot excellent on average and keep only outstanding, then you’ll be outstanding. And so on. Continually push and challenge yourself – set assignments, practice, tasks. Go outside of your comfort zone, and the persistence will yield results.

Serendipity. Interesting things happen when you stick a compact inside a marine chronometer then do wide-angle macrophotography with it; this was my first time trying it. Ricoh GR-Digital III
1: Shoot lots. Practice, practice, practice. Experiment. If it doesn’t work, at least you’ve learned not to do it. If it does, great – another technique to add to the arsenal. I always get asked ‘how do I pick it up? How did you pick it up?’ and my answer is the same: I experimented and shot a lot. But I also made sure I made a note of what I did, so I learned something from the experience. When I started, I was probably doing a thousand frames a day – 99.9% were crap, of course – but slowly that ratio swung. Always carry a camera – even if it’s just your phone – and don’t be afraid to use it.
Part nine: Birding and wildlife
The focus of this post is on birding and wildlife: it’s something that every aspiring serious amateur photographer will probably try at least once, usually right after they purchase an enormous telephoto lens. Bragging rights are only good if you have the images to go along with the lens.

Cattle egret. Nikon D3, 400/2.8 VRII
10: Dress right, bring mosquito/ insect repellant, and carry a bottle of water and a hat. The environment where some animals live can be harsh and remote. You’re not going to be concentrating on the photography if you’re not comfortable.

Scarlet ibises. Nikon D3, 70-300VR
9: Pay attention to the time of day. There’s no wrong or right time to shoot, but there is good light and bad light. Bad light is flat and uninteresting, and doesn’t flatter your subject. Good light is always tangential and thus creates contrasts; better still, it can isolate your subject from the background. And if there’s plenty of it, that’s a bonus because you can use a higher shutter speed.

Eagle. Nikon D3, 300/2.8 VR + 1.4x
8: A sharp but noisy image is better than a noise-free but blur one. Unless your intention is to be artistic or atmospheric, it’s better to have grain than none but also no idea what the subject actually is. This goes for all subjects, and types of photography: if your subject and composition are strong enough, nobody is going to care that the shot is grainy – look at Robert Capa’s Normandy Beach landing photos.

Albino peacock. Nikon D3, 300/2.8 VR + 1.4x TC
7: Use single point continuous AF. Avoid the temptation to let the camera decide the AF point; it will almost never focus on the eyes, and certainly won’t be able to recognize animal faces (except perhaps some chimpanzees.) Continuous AF is necessary because your depth of field is razor thin; a little movement to and fro either by you or your subject can move focus dramatically.

A thoughtful scratch. Nikon D200, 300/2.8 VR + 1.4x TC
6: Shoot in bursts. Two reasons for this: action usually unfolds in a sequence, and the first image may not be the most interesting; secondly, if you’re using a borderline shutter speed, then the burst helps to negate the effects of your finger pushing the shutter (and also camera). The first and last shots will usually be blur, but the middle group will be sharp because you didn’t have to move your finger in between.

Stealth duck. Nikon D200, 300/2.8 VR + 1.4x TC
5: Focus on the eyes. With all living things, the eyes are the key to the soul. I can’t explain why, but everybody knows that a portrait with the subject looking at the camera is a lot more powerful than one where you just see the back of the person’s head. The same goes for wildlife. Better yet if you can get a catchlight in the pupil, be it the sun or a very small fill flash.

Caught in the act of lunch. Nikon D200, AI 500/4 P
4: Have support. I don’t mean a sherpa team or an agony aunt. The longer the lens, the more support you’re going to need. A 0.1 degree camera movement with a wide lens covering 100 degrees horizontally is going to produce 0.1% blur, which you can probably get away with on a small print; but an 0.1 degree camera movement with a 5 degree field of view – corresponding to a 500mm lens – is equivalent to a whopping 2% blur. That shot will be so bad it might as well be completely out of focus. A gimbal head and solid tripod legs are great, but not very mobile. What I prefer to do is use a stout carbon-fiber monopod and rest my arm on the top of the lens to tension the system; if I’ve got something convenient to lean on, then I’ll use a bean bag to support the lens. This gets worse as your lenses get longer – I normally used an old manual focus 500/4 with 1.4x converter on DX, meaning 1,050mm equivalent. Handheld, this is an impossible combination to aim and hold, let alone get a steady shot with. With the monopod technique, 1/50s was routinely possible.

Angry cassowary. Olympus E-410, Nikon AI 500/4 P + 1.4x TC
3: Know our subject. Do your research, learn behavioral patterns, feeding patterns and anything else such as favorite watering spots or trees; the more you know about your subject, the easier it will be to find it and go unnoticed. Also, identify rare or unusual behavior – further adding something unique to your image.

The bird with the sun hat. Canon 1D Mark III, 500/4 L IS
2: Patience, patience, patience. The rarer your subject, the longer it’s going to take for you to a) find it and b) get into a position where you can shoot it, or where it stays still for long enough for you to get a good image. Give up and call it a day only when you absolutely can’t stand waiting any longer; some of the most stunning wildlife images – think of the BBC Planet Earth series – were only captured after years of waiting.

Dancing flamingoes. Nikon D2H, 55-200/4-5.6 DX
1: Be ready and stay alert. Usually most interesting action happens in a split second; if you’re not ready with your settings fixed and your finger on the shutter, you’re going to miss it. This one seems to conflict with #2, but it really doesn’t; it’s what makes wildlife photography so difficult. Endless waiting, but the need to be vigilant. In the end though, the results pay off.
More of my nature and wildlife work can be seen here on flickr
Part 10: Macrophotography

Lange Datograph. Nikon D700, 60/2.8 G
10: Watch your reflections! Every time I shoot something polished and reflective, I keep thinking of this viral internet meme called reflectoporn. Don’t google it. You have been warned.

Jaeger Le-Coultre Gyrotourbillon 2 tourbillon. Nikon D700, 60/2.8 G with 72mm extension.
9: Use bellows or extension tubes to get more magnification. I’ve got both; remember you need to compensate exposure for light loss as your magnification increases. The Nikons do this automatically, but most other cameras don’t. Macro lenses and extension tubes/ bellows work great; make sure they’re high quality items because cheap ones will have non-planar mounts, and result in odd distortion. Note that some lenses won’t work with bellows or tubes because they either bring the focal point inside the rear element of the lens, or the lens design isn’t compatible because the focusing elements are internal.

There’s no way you’re getting the entire dragonfly in focus without focus stacking. And they don’t stay still for that long. Nikon D3, 105/2.8 VR + 1.4x TC
8: Diffraction vs. DoF: a tradeoff. Pick one. As you stop down more, your DoF increases; but go too far and you also start to lose resolution because of diffraction. Exactly when this kicks in depends on your focal length and the pixel pitch of your camera; on the D700 with a 60mm lens, it starts around f22 and becomes very noticeable by f32. There are a couple of solutions: use a shorter focal length – the 35 ASPH FLE gives me more DoF by f16; or use a tilt shift lens.

Ants are skittish. Don’t get too close. I’ve had bugs jump on my lens before. Nikon D200, 105/2.8 VR
7: Working distance is your friend. There’s more room for lighting, and less chance of disturbing the subject (especially for those of you who shoot small bugs or insects). For product shoots, since you’re further away, reflections are smaller – and thus require less retouching.

Speake-Marin Immortal Dragon. Nikon D700, Zeiss ZM 2.8/28 Biogon
6: Macro lenses are used for macro work for a reason. That’s because they’re optimized for near subject distances; the plane of focus is flat and they have correction for common aberrations (spherical, lateral CA, LoCA) especially close up. With a normal lens, as you get closer, the aberrations and distortions get more and more obvious – which is why you don’t want to use a normal lens and extension tubes. There are two exceptions: when you have no choice, and when using certain particular lenses. A good example is the Leica 35/1.4 Summilux-M ASPH FLE; who’d have thought a documentary/ reportage lens with a 70cm near focus limit performs spectacularly on a D700 with extension tubes?

Jaeger Le-Coultre Gyrotourbillon I. Nikon D700, Leica 35/1.4 Summilux-M ASPH FLE
5: Continuous light sources are good. Not for primary lighting, but for helping focus and composition. Better yet if you mirror your lighting position with the secondary lights. I use a pair of 120 LED video light panels.

Critical focus plane. Roger Dubuis MuchMore. Nikon D700, 60/2.8 G + 36mm extension tube.
4: Use DOF preview to check your composition. DOF preview? Composition? How are there related? Simple: as you stop down, your composition changes again. And there’s a big difference between f2.8 and f22 at macro distances.

Sinn 556. This looked very different in the finder because almost nothing was in the plane of focus. Nikon D700, 60/2.8 G
3: Clean your subject well! The better the lighting, the more uniform the subject texture, and the higher the magnification, the more dust you’re going to see. It’s much easier to clean the real object than try to do it in photoshop.

Lange Datograph. Nikon D700, 60/2.8 G. Focus stack of 20 images with bellows and extension tubes. Magnification set, then camera moved on a rail. If I didn’t, the images wouldn’t align properly because they’d all be at different magnifications. The blue screws at left are about 0.5mm across.
2: Set magnification, not focus. What’s the difference? Each lens gives a certain magnification ratio for a particular focus distance; if you focus first (or only focus) then you’ll find the composition changing – especially at the borders – as the image snaps into focus. I decide how much of the subject I want to cover, and then move the camera to focus. This is especially important at high magnifications – I work all the way up to 6:1.

Speake-Marin SM2. A short exposure time stops the balance dead – and this thing rotates through 270 degrees eight times per second. Nikon D700, 60/2.8 G + 72mm of extension tubes.
1: Keep your exposure times short. You’re going to be wondering how. I use a flash and the highest sync speed the camera supports; because you’re stopped down and at base ISO, 99.9% or more of the light comes from the flash. And flash times – even at maximum power – are less than 1/1000s usually. Lower power ratings are even faster – this is more than enough to stop camera shake even at very high magnifications. The upshot? I don’t use tripods; they’ve been relegated to holding my flashes! I value the freedom of composition given by handholding the rig. The one exception to this rule is when I need to do focus stacking.
Be creative. Girard Perregaux F1-047. Nikon D700, 60/2.8 G
More of my watch work can be seen here on flickr
____________
Visit our Teaching Store to up your photographic game – including Photoshop Workflow DVDs and customized Email School of Photography; or go mobile with the Photography Compendium for iPad. You can also get your gear from B&H and Amazon. Prices are the same as normal, however a small portion of your purchase value is referred back to me. Thanks!
Don’t forget to like us on Facebook and join the reader Flickr group!

Images and content copyright Ming Thein | mingthein.com 2012 onwards. All rights reserved


Reblogged this on idiote savante and commented:
прочитать
Just a quick question. In your focus stacked image of the Lange Datograph, what are those blurry areas in the texture at the bottom right corner and the area on the left of the blue screws? Were those smudges in the glass?
Depth of field didn’t cover the extremities, even with stacking.
Just amazing!
Bookmarked and saved for sure!
This was amazing, thank you so much for posting Ming. This is the best blog that I have come across.
This is a really nice post you made here. I’ve enjoyed and I even learnt a couple of things. However I don’t agree at all with shooting a lot of pictures. I tried to shoot at least as possible. Maybe it is the reason why you are an amazing photographer.
If you don’t practice and experiment, how will you improve?
I happened upon your website on google and check out a few of your early articles. Continue with the very good posts. Ill likely be by again to read more, thanks for the article!.
Reblogged this on Stefano Scheda and commented:
Alcuni punti sono decisamente interessanti.
Your name and site in lights: http://www.bookofjoe.com/2012/09/experts-expert-100-ways-to-improve-your-photography.html
Best,
Joe Stirt, M.D.
http://www.bookofjoe.com
Follow me on Twitter: http://twitter.com/bookofjoe
World’s most popular blogging anesthesiologist (and I do it on a treadmill)
As seen in the New York Times: http://www.nytimes.com/2008/09/18/health/nutrition/18fitness.html?_r=1&ei=5070
Soon to be on Japanese TV!
……………………………….
One of the absolutely most useful photo-blogposts ever written! Thanks a lot Ming! (even if you called my only lens an “utter dog” ;-)….17mm oly, that is.
Thanks Micke. The 17 is not the best thing in the Olympus lineup – especially with the really outstanding 75 and 45mms, but the images are 100% down to the photographer. I don’t particularly like the Zeiss ZM28/2.8 either, but it does the job, I suppose.
excelent and very interesting article.
Thanks for sharing
No problem.
You are the most versatile photographer I ever come across! Salute!!
Thanks CY!
Artikel Gila… sangat berguna Ming. Thanks 🙂
Sama Sama!
A brilliant post, and I learned a lot. Thanks for publishing it – and your blog in general is a pleasure to read and look at.
Ming, could I ask you for a bit of advice? I’ve spent the last year with a Canon G12 (my first ‘serious’ camera after I became interested in photography – I could really connect with the ‘compacts’ section of your post), and I love it, but feel I’m ready to move on to something, dunno, more serious, I guess. My two basic options are either buying a better premium compact (RX-100 most probably, though I’ll miss the articulated screen of the G12), or getting a mirrorless with a pancake lens (I thought about an OM-D with the Panasonic 20mm, or a NX20 with the 30/2) – a DSLR or a mirrorless with a larger lens are not an option: I need something reasonably light and at least coat-pocketable. What do you think is the better way to go? This is the kind of stuff I shot with the G12 (http://bgiltphotos.wordpress.com/), though it’s hard for me to say whether I shot it because the G12 is good for that kind of shots, or whether it’s my own taste (possibly both).
Any thoughts would be very much appreciated.
Thanks Boris!
The RX100 shoots much like other compacts in practice, but with better image quality. You’re not going to get true depth of field control or extreme perspectives with it. But it is pocketable. The OM-D is a good choice, because you’ll have the flexibility to get something wider or longer later on as your interests change. You might want to pick up the 45/1.8, too.
Shameless plug: please use my Amazon referral link if you do buy something in the end! 🙂 Thanks!
Thanks very much, Ming. The mirrorless option definitely seems a longer-term solution (I can absolutely imagine myself in the same situation a year from now if I buy the RX-100), it’s just that I’m anxious about losing the flexibility of a zoom lens – I’ve never shot with a prime, and have no idea whether I’ll enjoy it or not.
Anyway, I’ll keep thinking – thanks once again!
You could always go with a 12-35/2.8 and 45-175 X?
The RX100 is great, but personally I’d never buy a camera without a tilting display again (to me this is even more important than a VF). The OMD has a terrific EVF (I’d take that over an OVF any day) and a tilting display with touch-to-shoot. This is really, really versatile and great to use! If the lens has to be small there is still that Panasonic pancake zoom. It’s supposedly not all that great, but I find that in reality a lot of that technical stuff doesn’t really matter all that much. The primes are great, too. So if you have the money, I think the OMD is much more versatile and flexible.
Indeed, it’s handy for those odd angles, video, or the Rolliflex experience. I still like my eye level VFs though, they allow you to brace the camera against your body in a way that gains a notable amount of stability…
The Panasonic pancake zoom is small…and that’s about it. My problem isn’t so much the optics, it’s the speed (or lack of) of the thing. And not having a physical zoom ring is somewhat sucky too. I didn’t think I’d miss it – happily shooting compacts and all that – but the 12-50 proved otherwise.
You’re right on the money about the Rolleiflex experience, Ming – that’s more or less my preferred way of shooting, from the waist, while looking down onto the open screen (which is held in the left hand). The OVF in the G12, while useful for tracking a bird in flight or for helping squeeze a few more shots out of a dying battery, isn’t really useful for anything else.
About the zooms – I could afford either an OM-D or a 12-35/2.8 but not both… 🙂 What I could get though, is a Samsung NX20 with a kit lens (18-55/3.5-5.6), a 50-200mm f/4.0-5.6 (surprisingly good reviews) and a 30/2 pancake (one of the best lens for the NX system) for $1,400, which would get me covered for at a few years, I should think. I love the Samsung ergonomics, and the NX20 has got both a good EVF and a fully articulated screen.
I have to be honest, the kit 14-42 IIR isn’t bad optically – just slow aperture. Better than the 12-50. Might want to consider that as an option too.
Can’t say I’ve had a lot of experience with the Samsungs; what I’ve seen so far of the image quality hasn’t exactly been inspiring.
Thanks Ming,
This article really helped me wade through all the “camera philosophy” on the web. I guess my Sigma DP1 would fit in the compact camera class even with the slightly larger sensor? Your site is just a tremendous source of solid photographic information based on what a real pro does day to day, please keep writing. You and Kirk Tuck are both a must in my daily net reading. Regarding your new video will it be helpful if I only have CS4?
Thanks again!
Bruce Bodine
Thanks Bruce – the DP1 has the operational limitations of a compact, but the image quality of a much larger sensor – I don’t really know where it first.
As for the DVD – there are some fundamentals that haven’t changed since CS3 and earlier; I myself used CS3 until late last year before switching to 5.5. The only differences are a few more options in Camera Raw, but 90% of the content still applies.
Excellent, as always. 🙂 An article I’ve bookmarked and will be sure to come back to.
I have one wish for your site, which has to do with navigation. Would it be possible to have a list of all article titles, perhaps grouped by month? Does the software you use support that? The reason I ask is that before Camerapedia, if I were to search for “D700 review” on your site, I would get a listing of all articles containing either D700 or review, and I would have to scroll backwards through the entire articles to find what I was looking for, which is rather time consuming. If I could just scroll through a list of article titles instead, I think that would be much faster, and it would give me a better overview of all you’ve actually written.
Thanks for the feedback – let me see what I can do. It wasn’t an obvious option, but I’ll have a poke around under the hood later tonight.
Thanks Ming! A nice read with a lot of good tips.
Enjoyed your workflow video too!
I see a lot of turd polishing in the photo forums and a lot of overdone, unreal looking stuff with lousy composition.
Seeing and capturing interesting light is one of the joys of photography for me.
Thanks Wayne! Glad the video arrived and was useful – I did an article a while back about the importance of editing – knowing what to cull and what to keep – spend more time on your A-grade material to turn it into A+, rather than C-C+…
One word, Ming:
WOW!
Thanks Don.
One thing I’ve been curious about…surely that isn’t your real email address? 🙂
Argh, my cover is blown! 🙂
I never know what manner of spam I might receive in my inbox, so I’ve been using that as my default address when commenting on blogs that I visit. (Hope that isn’t a problem.)
I will echo what another commenter said about bookmarking this post. It’s invaluable and deserves to be read and re-read. It’s that good!
No problem. I didn’t think Donald Duck was that erudite anyway 🙂
Took some time but great read!
Really some valuable tips and guides.
I had the previous “version” of this article bookmarked but forgot to go round to read it.
Great idea to publish it again.
Thanks – the previous version was split into 10 bits, which I didn’t think was as useful (or easy to find) in hindsight. Hence one more reason for the update…
This is almost a book!
Heh. I think there may be more content in this one article than some entire sites.
When do you sleep??? F…ing increadible good!
What is this mysterious “sleep” thing you talk of, Thorsten?
Well 9.00 p.m.: brushing your theeth, then go to bed, reading a little bit Murakami or a classik book of Dostojewski (or David Foster Wallace “infinite jest” on an ipad 3 [it´s much lighter than the book]), then switching the light off at 10.30 p.m. and having sweet dreams ´till 9.30 a.m. at the next morning. Sounds like a perfect way, to avoid those dark rings under the eyes, and looking like the guys from Beagle Boys Inc., or?
Oh, that! Good choice with Murakami, by the way. One of my favorite authors.
Well, and in one novel he mentioned Dostoevsky. So I read crime and punishment first. And it´s great!
Dostoevsky (this is the cortrect english spell, I think) is the favorite author of him! But of course I wish so much to be able to go to bed so early and sleep so long (at least one or two days a week!).
http://isaiahlim.wordpress.com/2008/05/27/haruki-murakami-considers-dostoevsky-the-greatest/
In all seriousness, I think 5-6 hours a night is good for me. Anything more and I actually tend to wake up on my own accord.
Well that was epic, thoroughly enjoyed the read 🙂
Only 1/3rd the length of the Camerapedia!
Thanks for the great article. Really appreciate the effort you put into writing these posts. So much helpful information and the generosity in which you share your experiences. 🙂
Thanks!
This website is a gold mine!!
Thanks! I try.
I agree 🙂
Awesome post with a lot of invaluable tips.Thanks a lot.
I would like to add that adaptors are not always useless. The FT1 for Nikon V1/J1 is really good as you can still use AF, select aperture etc. and VR works as well. Results can be amazing on those little cameras with some high quality Nikon lenses.
Regarding monitors I would also recommend the Eizo ColorEdge series or FlexScan which is a little cheaper. Some of them (ColorEdge) even have a built-in calibration device like the CG245W which I own. It can also be set for automatic calibration like for instance every week or month and at a specific time of the day.
Thanks Anders. I mean adaptors for say M or F lenses to M43 for example; the optics are not designed for the sensor and vice versa; performance is terrible. If you’re adapting a manufacturer’s own lenses to their other bodies, chances are they’ll probably do pretty well. I wouldn’t consider these adaptors per se, but more part of the overall system.
Good tip on the monitors.
Thanks for clarifying Ming.
I still disagree with you there. Sure, the use of adapted lenses decreases somewhat on MFT cameras due to their smaller sensors and smaller pixel pitches. But still, if a specific lens has a specific characteristic, it maintains that on those cameras as well. Especially for portraits! On the OMD, these lenses are even stabilized by the IBIS. And this IBIS is so good that it doesn’t just let you shoot at 1/focal length, but even at 1/(focal length/2) and slower.
On the NEX though those lenses really shine due to the lower 1.5x crop factor and the NEX’s terrific focus peaking, which in my opinion is at least(!) on par with rangefinder focusing. Obviously, you don’t have AF – but the need for AF depends on the kind of photos you take, and people got around that in the pre-AF era just fine, didn’t they?
I believe that A) NEX + adapted lenses makes for a pretty good rangefinder alternative and B) adapted lenses can be great additions to native lenses. For example, my Minolta 58mm f/1.2 makes for a great portrait lens and has beautiful bokeh, even on MFT!
Apart from that, this is a really great and thorough guide, thank you so much! I also always love to just browse through your photos, I really like your view into the world. Are you planning to make a photo book any time soon? You know, just your best works in a centralized place. Or is this just not possible with the licenses to your commercial shoots?
For portrait lenses, yes – the longer focal lengths are closer to being telecentric and thus not affected by the sensor as much. It’s the wides that cause issues. Try anything at 35 or wider and you’ll see what I mean – the Leica 35/1.4 ASP FLE is an amazing lens on the M9, but not very good at all on the OM-D – especially in the corners.
I do actually have a few books compiled through Blurb; I didn’t think there was much of a market for them so they’ve been something I do for myself rather than for sale. The commercial work doesn’t go into it. One of the more interesting ones was shot entirely with compact cameras…if you’re interested, shoot me an email and I’ll try to dig out the details for you.
My Voigtländer 35mm f/1.2 is beautiful on my NEX and nice on my OMD, but yeah – I’ve heard about problems with wide-angle lenses, especially on the NEX-7. And there have been articles on luminous landscape and others, testing Leica lenses on MFT cameras with rather unimpressive results. Those lenses didn’t perform bad in any way, but they lost their quality advantage and were about on par with native lenses, which of course is a bummer at these prices. And the wider you go, the more glass is needed to cover the 35mm image circle, even though the FOV becomes pretty standard due to the crop factor of the smaller sensors. So native lenses perform as well or even better and are significantly smaller.
But anything from 35mm and up is really worth considering, especially on a good 1.5x crop sensor. I think this is one of the huge advantages of mirrorless: your choice isn’t limited to your camera’s native mount; you can just buy the lens that you like the best – no matter the manufacturer, mount or year (or even decade!). This works better with manual focus lenses, of course.
The mirrorless camera of my dreams therefore would have a 1.5x crop sensor, IBIS, a good EVF and focus peaking. Basically a combination of the OMD and the NEX-7!
Regarding the books: I don’t know Blurb, but I’m most interested in eBooks. And I bet I’m not the only one! I imagine converting your books to Apple’s iBooks format or Amazon’s Kindle (they may have file size restrictions though) or even simple PDF for one of the many indepentent eBook stores might not be that difficult since you’re not starting from scratch. There are no distribution costs and selling them online would be easy, so I imagine this could be a worthwhile revenue stream for you? But if Blurb is something like an on-demand printing service I’d be interested in that, too, so I’ll definitely drop you an eMail! 🙂
I should really give my ZM 2/50 another go on the OM-D, then. Just difficult to justify when there’s an excellent native 45/1.8…
As for the books – I’m very concerned about how the finish product is viewed, which hugely affects color, contrast etc – so I don’t see myself going down the e-book route anytime soon. Blurb, on the other hand, is an excellent on-demand printing service that makes physical books with a quality level I’m familiar with, so please go ahead and send that email 🙂
This is one excellent article Ming.
Thanks – it’s a repost and update of a much earlier series, before the site had any significant traffic. Seemed like a waste not to have more people see it.
Enjoyed this post very much, Ming. Thank you.
Jeffrey Sklan JD, MBA Cal. Bar # 87742 8484 Wilshire Blvd. #660 Beverly Hills, CA. 90211 323 653 1850 office phone 323 966 5850 office fax “you make the choice, and I’ll make the difference…..”
Thanks! Did you mean to put the email signature in? 😛