
Offerings for sale. Sony RX100
Following on from the previous photoessay and numerous emails, I thought it’d be useful to repost this article I wrote previously on street photography techniques. Although it’s possible to describe most of them in some detail, full understanding requires both demonstration and practice – this is where the Street Photography video comes in, or alternatively joining one of my workshops. Together with the basic principles of balance, perspective, composition and what makes a good image – these techniques may be used singly or in combination to generate strong street images. In fact, they also apply to documentary and reportage work, too; the only difference between good street photography and photojournalism is that the latter has a consistent theme and subject.
It’s important to note that not every technique is suitable for every situation, and vice versa; as always, a good portion of making a strong image is knowing what to leave out.

Hiding from the rain. Leica M9-P, Zeiss ZM 2.8/28
Timing and anticipation
In a photographic situation where you have effectively zero influence of any of the elements in your frame except the composition and exposure, timing is the one key bastion of control that remains in the hands of the photographer. By making a conscious choice of when you push the shutter, you decide when each and every single one of the moving elements in the frame is in the position you want them to be in. However, it is too late to react only at the exact instant you see the composition you want. It is therefore important for photographers to be able to see a scene, visualize the potential contained there, and be able to imagine what the finished frame will look like once all of the desired elements are in place. It is then a matter of simply waiting for those elements to all come together, and being ready with the camera when they are. No matter how fast reflexes, or your camera, the fact is that if you react off to you see something, it’s too late; training yourself to anticipate action is something that can give you the critical second or half-second which can make all the difference between getting the that and missing it completely.

Progression. Olympus OM-D, Panasonic 20/1.7
Shoot stopped down
A lot of these techniques are about timing. Specifically, gaining yourself a little bit of extra breathing room to react. In this case, shooting stopped down allows you to simplify the process somewhat by not having to decide what to have in focus, and what not to have in focus. If you’re shooting with an autofocus camera, it also allows a little bit of leeway for the camera to misfocus, yet still allow the final shot to be in focus thanks to extended depth of field. Note that of course this technique does not work under low-light situations, where you need every stop of aperture you can get. Compositionally, shooting with great depth of field actually forces you to create stronger images. This is because you have to think more about your subject placement, leading lines, empty spaces, etc – which all affect the overall balance of the image. If you can make interesting image without relying on the crutch of bokeh, then you will find yourself with increased compositional and artistic flexibility when you do have this option in your toolkit.
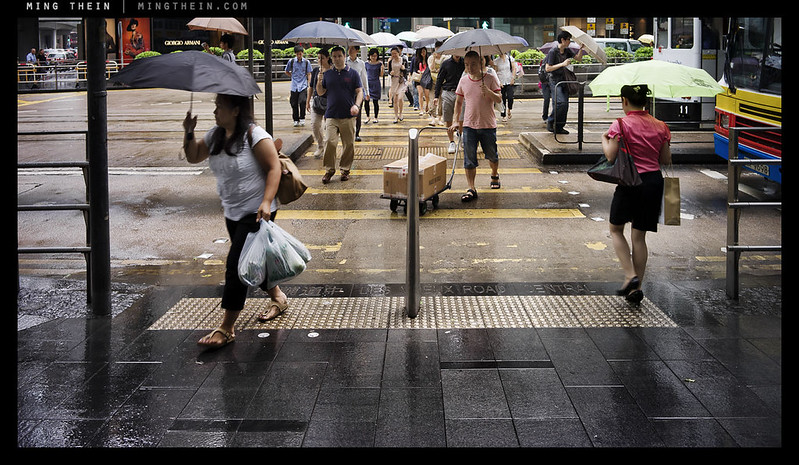
Divided. Leica M9-P, Zeiss ZM 2.8/28
Shoot wider
There are many reasons to shoot with a wider lens. First of these, is of course the enhanced foreground perspective emphasis that it provides, hopefully on your subject and not an expanse of pavement. Having a lens with a shallower and more forgiving depth of field profile both allows greater latitude for focusing errors, as well as allowing extended depth of field without having to stop down too much. There are also other non-obvious advantages of going wider – not only do you eliminate or minimize the possibility of having unwanted elements come between you and your subject due to physical distance (and you subsequently missing the shot because in the time it takes for your frame to clear, your primary subject has already moved on or changed position), but also you can get people in the periphery of the frame as edge subjects or context without them suspecting anything. In this sense it’s also about minimizing the reaction time between you visualizing the shot and executing it.
Act as though you belong
In pretty much all situations, you will notice the confident people rarely – if ever – get challenged. This of course also applies to street photography. By acting like you belong, and you’re confident and know what you’re doing, casual observers to the scene assume that you have every right to be there and generally allow you to go about your business without interference. A subset of this is acting like a tourist. Tourists are not self-conscious and they are generally expected to take photographs of everything encountered; by doing this you’re fitting the expected stereotypes. And, as you will no doubt already know by having read my earlier articles, a large portion of photography – including the execution – is seriously influenced by human psychology at a subconscious level. Spend some time understanding how people think, and you will find that you both have more control over the way you images are interpreted, as well as how people react to you while you’re out shooting.

A glitch in the matrix. Leica M9-P, Zeiss ZM 2/50
Hyperfocal and zone focusing
One way of speeding up the shooting process is by completely eliminating focusing altogether. Hyperfocal focusing means that you have everything in focus beyond a certain point; it requires the lens to have a comprehensive depth of field scale in order to set your focus distance precisely. Manual focus lenses tend to be better for this, I suppose because manufacturers of autofocus lenses think that photographers will not use the manual option and therefore simply choose not to include proper depth of field scales. (Most of the time, they’re right.) Zone focusing is similar. What you do, is ensure that your desired subject distances fall between the two aperture markings on opposite ends of your depth of field scale. For the current bunch of high density digital sensors (anything over 12MP or so), you will need to use an aperture one stop smaller than indicated on the depth of field scale because these scales were calibrated for the circle of confusion corresponding 35mm film, and haven’t been updated since. There is a game played by rangefinder shooters that can help you improve your skills at estimating distances; pick a subject, set distance on the lens, and then check through the rangefinder to see how accurate you up. Do this often enough, and you will find that your focusing ability has magically improved. The upshot is that with sufficient practice, it is possible to estimate distances without even having to look through the viewfinder. This means that you can focus the camera and have it ready even while at waist level or in your hands, before you frame up the shot – once again, it’s all about reducing your reaction time.

Querry. Olympus OM-D, Panasonic 20/1.7
Stages
I don’t believe ‘stages’ is a commonly used terminology. I use it to refer to a setting, or scene, where the light is interesting and directional, and all it needs to complete the image is a human element of some sort to add context. I’m constantly on the lookout for these ‘stages’ when I shoot; when I find one, I will stay and work to seeing for his long as it takes for me to get an image that I’m satisfied with. Sometimes this is within seconds; sometimes it can take hours and I leave without getting the shot I wanted. But if I have a chance, and it’s a case of ‘unrequited stage’, then generally I’ll return again at some future point in time to get the shot I’d originally envisioned.

Haircut. Leica M9-P, Zeiss ZM 2.8/28
Layering
Layering is a technique that you can use to add context and depth to an image. It requires the use of a longer lens, which is ideally suited to this because it naturally separates out your scene into foreground, midground and background, all with relatively similar prominence. This allows you to place your subject in any one of these zones, and use the remaining zones to form the context and tell the story. Aside from using a longer lens, the other way to achieve layering is by the use of reflections; whether it be in a building’s glass, a puddle or perhaps some other shiny object. In this case, a wider lens is actually preferable because it allows you to capture more of the reflection. Note that when you’re composing, your reflected background is going to be further away than you think because the light has to come from the subject, to the point of reflection and then back out again to the camera; this can affect perspective in strange ways if it not consciously compensated for.

They don’t know you’re there. Leica X2
Shoot through people
The most difficult and counterintuitive technique that I use is something I call ‘shooting through’. It basically requires you to stand still in a flow of oncoming people, and just shoot into the crowd. Although this will feel strange but first because you’re pointing your lens directly in people’s faces, offer a while you get used to it. The challenge then becomes actually separating out individual frames from the general scene as a whole. This technique works better in busy spaces and thoroughfares, simply because this means people tend to be more concerned with where they are going rather than what you’re doing. In a relatively quiet space, this technique is not very effective because people can see you coming – or rather, standing there – from a mile away. It is important to note that the psychological reaction to somebody standing still with a camera held up and ready to shoot is very different to if the same person stood there and suddenly brought out the camera to shoot; the action of raising the camera draws attention to yourself. Psychologically, sudden movements also catch us unawareness and make us uncomfortable. By looking like you have been there for a while, and will continue to be there, people are put at ease which allows you to operate without drawing unnecessary attention to yourself. In fact, oncoming pedestrians will probably take pity on you (poor tourist, trying to take a photo but we’re all in his way), not knowing that they themselves are actually the subject of your image.

Garden of earthly delights. Olympus OM-D, 45/1.8
Stealth or flamboyance?
The final technique is simply being inconspicuous. This involves techniques such as not making any sudden moves, and most of the time, not even having the camera raised to your face when you take a photograph. The smaller, blacker and more nondescript the camera you use, the better, because it does not draw any attention. This is one of the reasons I like to use compact cameras for street photography – not only do I look like a tourist, but what possible threat could a small Asian man with a point and shoot pose? He’s probably just lost and on holiday. The complete opposite of this, and also viable option, is to be completely flamboyant and ridiculous. You stand out to the point that nobody takes you seriously; and this allows you to get on with your serious work in peace. I’m talking about shooting a bright pink camera dressed and perhaps being dressed red and blue; or maybe using a view camera on a tripod whilst dressed a three-piece suit and top hat. Then, you become a subject of interest and curiosity rather than the potential threat. (I have never done the latter myself, although in the interest of improvements in image quality, and perhaps the different look to my images, I am quite tempted. I plead the fifth on the former.)
Although this list is by no means exhaustive, I hope this article has given you some insights into both how I shoot when I’m on the street, and some new techniques for you to try out yourself when perhaps you see a great shot but you’re too shy to go out and get it. We cover street photography in significantly more detail in the S1: Street Photography video workshop filmed in Tokyo. Bottom line is that street photography is not very different to being a Boy Scout: be prepared and confident. MT
__________________
Limited edition Ultraprints of these images and others are available from mingthein.gallery
__________________
Masterclass Venice (November 2014) now open for booking – click here to book or for more info
____________
Visit the Teaching Store to up your photographic game – including workshop and Photoshop Workflow videos and the customized Email School of Photography; or go mobile with the Photography Compendium for iPad. You can also get your gear from B&H and Amazon. Prices are the same as normal, however a small portion of your purchase value is referred back to me. Thanks!
Don’t forget to like us on Facebook and join the reader Flickr group!
Images and content copyright Ming Thein | mingthein.com 2012 onwards. All rights reserved




I would really recommend the flamboyance technique, it is quite fun. I usually use my Fuji x100s or even my big 5d MkIII and an ultra wide for street photos, but I’ve had a blast going out on little film journeys using my grandfather’s 1930s Zeiss Ikon with its fixed 80 f/2.8 and a 1950s Canon P Leica knockoff (ok knockoff is mean, it is a fantastic camera and I prefer it to the M3). Both cameras are nonthreatening to people, the Zeiss particularly so (it looks almost as ancient as a view camera). I actually have had people ask for me to take their photos, so I got in some unexpected street portraiture.
I want to do this with the white Canon Rebel and a hello kitty in the hotshoe.
Very nice and useful article for me. Thank you.
Postdate. It happens to me that when I’m trying to shoot “through people” some persons moved away to not ruin my photo, and actually they are ruining it moving out : )
Thanks!
Ming,
Thanks for reposting this nice overview of street photography. I’ve been following this recipe for a long time with everything from an ancient M3, Rollie TLR to my current X100 and Ricoh GR Digital. In my early entry to digital I discovered the Canon S60. It had the ability to set a preset user mode that included focus distance, aperture and the zoom started at 28mm (equiv). A wonderful fast startup, “sticky” hyperfocal mode.
Now the Ricoh GR Digital is a favorite with a control structure that just seems to be designed for this kind of photography.
I’m pleased you pointed out the psychology of taking street images. The degree of photographer interaction or non-interaction makes a huge difference in finding your style. One day when reviewing my images after a trip to Asia, I discovered that everything about the images from Asia was better than those taken near my home. It was easier for me to be comfortable as that “tourist” taking pictures in a foreign land than it was doing the same on my local streets “where someone might know me”. I’ve found that practicing to be a “tourist at home” has added much to my street photography. Practice never hurts, but in this case it’s done more for me than just hone technique.
Thanks again for your insights; it’s great to have a good Streets 101 course for inspiration.
Roger
No problem. Glad you found it useful.
Nice thoughts Ming. Being the joker that I am, I probably would have inverted the Leica and Olympus shot captioning. I wonder how many viewers would have commented on the great “Leica” image quality?
You’d be surprised. I’ve had that comment before on an iPhone image…
Last week I was on holiday in Japan and after a busy schedule, Saturday afternoon I got back to the hotel, tired and planning to spend a couple of hours resting and catching up on emails and blogs. This article was the first thing I read, and it inspired me to get up, pick up my camera, and go out to take some shots around Shibuya. Thank you, Ming, for taking the time to maintain this site – it helps me remember why I bought a camera in the first place!
PS: when you shoot with the 28mm, how much do you generally crop the shot to get the framing you want? I’m not great at “street” photography – at least that involving strangers – and find that the wider the lens, the harder to get the framing right in camera.
You’re welcome. 28mm: I don’t crop unless I want to go to a different aspect ratio, but generally one of the frame dimensions will remain intact.
Thanks Ming… Enjoy these articles helping me learn to see. Will be picking up the video in order to expand these thoughts and practices. Your photos and ability have constantly encouraged and gently prodded for me to want to improve…thank you!
Thanks John!
Reblogged this on This Got My Attention and commented:
Great tips!
How nice are those M9 shots
The most interesting part of this article is your reference to pleading the Fifth. Hard to imagine that such a colloquial American phrase finds its way half way across the world even in this time of globalization.
I’m probably a bit more internationalized than most.
The Leica M9-P images stand out like a sore thumb. Not just IQ, but the whole feel of involvement, of being there. Is that coincidence or the RF technique? I suspect the latter. Looking through a window and not the tunnel of an EVF just seems so much more akin to street shooting.
Just my 2 cents.
I don’t think they’re superior in IQ, sorry. You can’t use anything above ISO 400 without noise penalty. And as the previous post showed, you can’t tell anything about image quality at all from web sizes. Can’t help but wonder how much of the perceived ‘feel’ is because I noted the camera used, and the expectation that ‘Leica = street’ and nothing else.
Looking through a viewfinder window is not necessarily rangefinder technique. Millions of Instamatics were made that did that; you can still buy disposable film cameras that do that; there are still some very recent high level point and shoot cameras from Sony, Nikon, Fuji, that do that, and none of the latter have rangefinder focusing.
I learn something new every time I read this post, Ming. The zone focus, lots of depth of field approach is difficult (forces one to frame the whole picture and make it work without bokeh) but on the other hand it’s easier because going for the more cinematic approach (i.e. elements out of focus in the foreground and background) forces one to have visualized and be ready with much less focus latitude. In some ways, that seems even tougher. No?
Thanks Roger. Cinematic is MUCH tougher because you have very little margin for error with focus and timing – the hit rate for that (i.e. also meeting my usual perfect technical criteria, as well as artistic) is less than 1% for me.
“the crutch of bokeh” … ha! awesome.
🙂