
Some months ago, I acquired a vintage Nikon F2 Titan in the hopes of both fulfilling a longtime photographic dream, as well as perhaps shooting a little film again in the name of stimulating creativity. Many of you have been anxious to see the results; I bet none more so than myself. The trouble is, I feel that I’ve set a standard here that I must uphold; if the images from this roll don’t meet that standard, then I think there’s going to be a lot of hand-wringing, rude gestures and cries of ‘pah, amateur’. In this post follows the highlights of that first roll.

Before I show any images, I want to give some background: I’ve shot film creatively before. I’ve even processed it before, as part of my dissertation on improving measurement precision using short-wavelength laser holography (don’t ask, because I don’t really remember). But I’ve never done both, and my processing days predate my creative photography days by a considerable period of time. Finally, the last time I shot film was in mid 2009, with a Leica M6TTL. Before that was 2005, with another Nikon – an F2A. Note: EXIF data will say ‘D800E and 50mm’, because that’s what I used to digitize the negatives.

This roll is both the first roll of true B&W I’ve shot*, processed and scanned entirely singlehandedly. It shows, too: it’s grainy considering it’s Ilford Delta 100 exposed at ISO 100; in places it’s uneven, and there’s a streaking problem from where I got impatient and decided to try to wipe the film dry with a microfiber cloth. In hindsight, one of those Dyson Airblade hand dryers would be awesome for the task.
*An embarrassing, dirty confession: all of my previous film B&W work was C41 process (BW400CN, XP2-400) for convenience – finding somebody to develop black and white film in Kuala Lumpur is not a trivial task because serious shooters do their own, and consumers don’t do it at all.

The ‘scanning’ was accomplished with an interesting hack-rig: my product photography lightbox, lit by a speedlight within, film passed through a cardboard mask (to prevent scratches) and the camera resting above, spaced perfectly with the long hood from a Zeiss ZF.2 2/100 Makro-Planar but fitted to the 2/50 Makro-Planar which coincidentally has the same bayonet. Add a 20mm extension tube, and the spacing is not only perfect, but I now have a 4000+DPI scanner.

I’ve spent some time in Photoshop to automate the conversion process as much as possible, to try and keep the character of the film intact and consistent, and minimize the amount of individual work required on each image. I can’t say I’m 100% happy with the results yet, but we’re getting there. If I can run an entire roll of RAW files as an automated action – cropping excepted – then the total scan and process time is actually about the same as a comparable number of digital files.

Anyway, more on that in another article. For now, I just want to leave you with one thought: resolution both matters, and doesn’t – we’re seriously spoiled by the degree of image quality obtainable from the current state-of-the-art FF digitals. Enjoy! MT
These images were shot with a 1979 Nikon F2 Titan on Ilford Delta 100, with a mixture of lenses – Voigtlander 28/2.8, Nikon 58/1.2 Noct-Nikkor, Nikon 45/2.8 AI-P, Zeiss ZF.2 2.8/21 Distagon, Zeiss ZF.2 2/50 Makro-Planar, Zeiss ZF.2 2/100 Makro-Planar. Can you tell which is which, other than through perspective? I can’t.
____________
Visit our Teaching Store to up your photographic game – including Photoshop Workflow DVDs and customized Email School of Photography; or go mobile with the Photography Compendium for iPad. You can also get your gear from B&H and Amazon. Prices are the same as normal, however a small portion of your purchase value is referred back to me. Thanks!
Don’t forget to like us on Facebook and join the reader Flickr group!

Images and content copyright Ming Thein | mingthein.com 2012 onwards. All rights reserved


Hi Ming, Nice blog and photos. I was wondering what film scanner you now use. I have been using a Canoscan 9000F+Vuescan for scanning film and am not happy with the results. I’ve even tried laying the negs directly on the glass but the resolution is quite disappointing. Any tips?
Flatbeds often have focus and planarity issues. I’m using a D800E, macro lens, flash and custom alignment rig.
Ok, one photo made me smile. I wonder if it was done on purpose.
I like a good cup or two in the morning. 😉
May I ask what kind of strap is attached to the Nikon in the first picture? I really like the look. Thanks!
It’s an Artist + Artisan.
Thanks Ming!
Hi There !
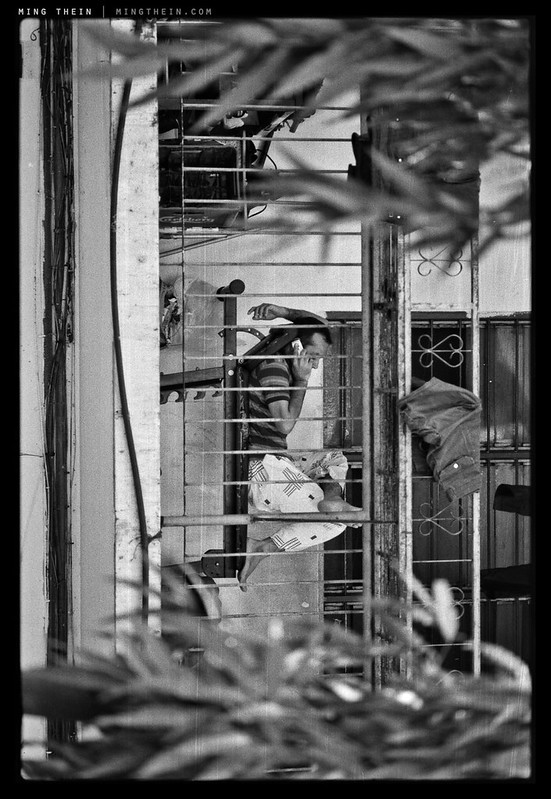
Kindly ignore me making this comment if I am wrong….. but the image number _8025525 should be in the landscape orientation to show the recumbent man using his cellfone ! [as of now he is recumbent in a vertical position which is not physically possible …:)]
kindly ignore me making this comment if I am wrong..:) [NO OFFENSE MEANT AT ALL ]
Deliberate. I preferred this orientation. 🙂
Thank u for your response 🙂
This appears to be a serious case of gear-lust to me;-)
For you or me? 🙂
Ming, your blog has become an essential read very quickly. Superb insight accompanied by excellent photographs.
Don’t know what you and others feel, but I find a character in the JPEGs posted here that tends to be absent from images created with digital cameras. I find the same in my own (inferior) work. For photographs of a family wedding or christening, I use a FF DSLR. But for my personal photography, I find no digital file from the several APS-C and FF cameras I have owned converts to B&W, using one of the many B&W convertors I have tried, with the same character that can be found from an image created from B&W 35mm film (even XP2!). Nor is the pleasure of taking (or is it making?) the photograph quite as heightened with a digital camera.
This Christmas, I’ll probably dust-off a second-hand Nikon 35mm body if I’m also going to shoot digital during the holidays or a second-hand Leica R if not (heresy I know, but I’m very fond of the R bodies, especially the R7). Certainly, the R lenses have better contrast for B&W. I’ll shoot slowly and I’ll enjoy myself. And I’ll be delighted if one or two of the images turn out to be “keepers”.
Happy holidays and I look forward to more from the blog in 2013.
Aargh. The comment was posted before I intended. I did not mean to use “l” as the nom de plume but “El Inglés” 🙂
Fixed 🙂
Thanks for your compliments. Agree with your thoughts: it’s the 3/4 shadow tones and 1/4 highlight tones: there’s a nonlinearity there that looks more realistic than the crisper (but harsher) digital images – especially noticeable in the texture in the dress in the first shot. That said, digital B&W gives me far more control. Yesterday, I borrowed a CFV-39 digital back for the Hasselblad; we’ll see if that gets close in terms of tonality – CCDs always seem to do a bit better when it comes to this than CMOS.
The R8/9 actually looked pretty interesting to me. Never shot with one, but it might be something to look at again…providing lens prices don’t get silly after the M is released.
Wonder if there will be articles in a similar vein about the dslr in ten years time…………….
What would it be replaced with?
A high mp camera incorporated in a phablet / hybrid multi function / modular (tablet/phone/pc) device with either a pull out flexible screen or some form of projection, possibly holographic, all voice activated with nfc – hows that for starters 😉
Seriously I think that there will be a demand for a single convergent technology device – there’s only so much you can build into a camera/phone/tablet/pc before you take the best features of all of them and combine into one unit.
Of course there is a ‘consumer’ issue then – your only selling one device instead of 4 separate ones with associated accessories.
I’d hate to carry that thing around. But at least the LCD/finder would probably be gorgeous.
Please do a tutorial on how to convert films to digital?
I love the black and white shots. I shoot film myself and i’m fortunate to have friends developing in B&W for me. =P
It’s in the plan once I’ve refined the process myself…
Okay! =D Buying a film scanner is quite expensive.. =P u reply so fast!
Really simple way: toilet roll tube and a point and shoot, hold it up to the light. Back it with a piece of thin white A4 paper to diffuse the background.
Less simple way: a copy stand, lightbox and DSLR. If you get this combination right, I think the results are better than film scans – I’m using the D800E, so it’s equivalent to about 4500dpi…
Fast replies if I’m online. Otherwise, not so fast. 🙂
Hello Ming,
Googling this subject, I ended up here on this page, and notice that this thread is about one year old. Have you had the chance to write the article about the process of digitizing films the best and most accurate way there is? I still have not found a process that satisfies me. For instance, once I have my films developed, what path should I take to turn these film rolls into Blurb book images? We cannot avoid the digital conversion along the way.
Great blog, thanks.
No, but I am working on a DSLR-based scanning rig that will be up for sale in a month or two. It’s been more complicated than expected – small runs of precision equipment aren’t cheap!
I wouldn’t use Blurb anymore, their print quality is a disaster. Wish I had an alternative suggestion, though.
This is really interesting. I might be interested in such a device. Nowadays, it seems that everyone with a good idea goes by the Kickstarter way. Keep us informed. A little teaser coming up?
The problem with Kickstarter is that somebody with the capital might well jump you before you get a chance to fund your idea…
Any news concerning this rig Ming?
It’s not happening. We simply can’t get the quality that I’d be happy with at a price that’s reasonable and economically feasible.
Oh – on second thought – please delete my previous comment – it could be interpreted incorrectly and veer again into the digital vs film debate which is useless.
Great photos and experiment reporting there. My understanding is that each negative emulsion has its own signature which is its “tonal curve” of sorts.
Have you ever tried DxOfim? For your next experiment it would really be interesting to shoot the same images with a FF digital and then apply the DxO film effect. As you may know, these engineers have made a lot of very careful scientific studies to do the proper film emulations, grain included, given each sensor they have analyzed. I’m sure your comparison results would be of interest to DxO (and their community of users at large).
Nothing like the real wet film, of course – but since the technology is here – good exercise and would bring you additional exposure no doubt. I’m pretty sure film and digital DxO-massaged will show nearly identical. And the differences will be only noticeable to really fine tuned viewers, also using paper prints, not LCD’s*.
A little like digital music and real wood instruments / pianos, acoustic guitars .. the medium obviously influences how you play so this is not about digi vs analog. – just another comparative experiment just because all the pieces are there.
The next fun experiment would be testing whether people can tell the difference and properly identify which is which.
As I don’t have all that much time to tweak photos, I often use DxO as my raw to B&W conversion and am generally satisfied with the results. Tweaking too much levels in photoshop/ LR I get inconsistent results, probably because of lack of expertise.
(*) DxO is what Salgado uses nowaday – he shoots digital and makes prints – so it’s got to be pretty good.
Thanks Andre. I instinctively shy away from these filter simulations because a) they don’t really take into account the structure of the source file or native tonal response of the original camera and b) every shot is different; if I’m shooting digital B&W, it’s for control, and my workflow for that is fast and gives me exactly what I need – optimized to each image. I don’t want to try and replicate film with digital; you can’t because the native tonal response of each medium is completely different. I’ll just shoot film if I do.
Are you sure about Salgado? Last I read he was shooting with a FF canon then having those files copied to MF negs, and then printed from the negs.
Ming: my impression is that DxO is far more complex than filter simulations. But you would probably be able to tell how good or bad it really is. Their product has a full version available for a 30 day period. I do remember reading this thing about Salgado, of course he may be doing many things .. I know he shot Leica before.
I’ll check it out if I have time. The trouble with these complex bits of software is that whilst they might have the potential to give better results, you have to spend so much time upfront to experiment and get familiar that the additional effort simply isn’t worth it – especially if throughput is already a limiting factor for you.
Thanks for sharing, as always! I borrowed a Nikon film scanner to digitize all my slides and negatives from the film days, and was generally pleased with the results. The Tri-X and Kodachrome captures seem to have a certain character I haven’t come close to replicating, using plug-ins and/or presets on digital captures. I even considered adopting a “hybrid” work flow (i.e. getting my own film scanner) just to explore this more.
Alas, my recent film trial with Fuji Velvia 50 did not go especially well. I was not very enamored with the detail rendering or the amount of retouching required. (At least I cooked up a nice Lightroom preset while trying to replicate those colors…) Further trials are certainly warranted, but with my current objectives, I don’t foresee film making a major comeback with me. (… at least not in small format)
No problem. It seems that keeping everything fastidiously clean is HUGELY important, and not always easy to do. Plugins/ filters will never get you the look you want, because the structure and luminance distribution/ response of the source image is always different. Even in the conversion process, film need some care, I think, otherwise we run the risk of imposing our digital ‘signatures’ on it. To be honest, whilst I was outrageously pleased I had an image at all, the quality and level of detail didn’t blow me away – far from it; in fact, it was a reminder of just how far digital has come. I don’t think there was more than 8MP of detail in those negatives. But oh, the tones…
I have been shooting film and digital both as long as there has been digital available to me (1997 or so), and shooting film and developing it myself since 1967. I have no sentimental or technical *bias*. (You have to trust me on this…I have personal text and images scattered over the internet that I am collecting into a “definitive” entry on digital vs film soon) but i want to note one thing here.
It wasn’t until I was reading the first edition of Bloch’s HDRI handbook that I had a real epiphany about this issue Until then I had lots of intuitive response to all this, as we all have. But something bugged me about digital sampling. And Bloch articulated it in his first chapter. It is sampling theorem translated into perceptual physiology, in a nutshell. Analog processes have logarithmic response curves, as we know, exactly mappable to human physiological response. Digital processes simulate these curves through mathematical tricks. Forcing the sample representation into binary number space creates a serious distortion of responsiveness between darks and lights. To oversimplify, differences in dark grey tones have many fewer bits to represent them than differences in light grey tones. Imagine you could only taste two kinds of sweetness but 150 kinds of sourness. Imagine what your cuisine would be uunder such circumstances. Well, with digital sensors you get, say, a perceptual range of say 20 darks represented by say 5 bits, while a range of 20 light tones have in theory all 24 bits of the image depth available for any nuance. Think about it. Or don’t, because the next thing you need to understand is how these sensor captures are transformed, and that is where the math and physics majors get on their bicycles and ride over the horizon, leaving us poor artists picking lint off our berets.
Old school film people are conditioned by the long grey scales of thicker and slower emulsions to expect a certain expanded transition between tone areas, which they associate with “quality”. It is in clear evidence in 4×5 studio shots from the 40s and 50s..and can be seen easily in medium format film work today. But the old papers generally don’t present more than a 6 EV range of values..And modern forms of mass production don’t significantly increase the range of extremes between darkest and lightest tones in the reproduction. It isn’t the extremes that are at issue. It is the transitions. And that is where digital is still going to be a problem. Digital will always represent low frequency (dark) transitions with far fewer bits per step (bin) than high frequency (light) transitions. The mind might not be able to articulate this sensed difference, but the eye and limbic system respond to it, and its real. It becomes exggagerated to a cartoonish level with the tricks that LightRoom and later versions of PhotoShop apply to tone boundaries, in the “Clarity” tool, for example.
I continue to straddle the gulf between digital and analog because I like the ability of digital processes to subset tonal ranges within the over-all image range and apply differential transforms just to that subrange. It is an ability that any painter or watercolorist can immediately appreciate, as they are, coming from a “subjective” position of “doing what the artist wants, not what the sensor captures.” They are thus free of the engineer’s thralldom to consistent and provable representation across the entire signal source. Engineers in the digital image field have made incredible progress in the last 20 years, to be fair. But there is a finite amount of trickery that can be applied to linear versus logarithmic media. Just a thought..
Thanks for the detailed thoughts, Jeff. I completely understand where you’re coming from, and to get the same logarithmic response – especially visible in the dark 3/4 tones, as you point out – is one of my goals with digital B&W. The only digital cameras I’ve found that get close to this are the Leica M8 (due to lack of UV/IR filtration, the blacks are brighter than you’d expect), the Nikon D800E due to its extremely clean shadows, which respond well to postprocessing with minimal noise penalty, and of course the Leica M Monochrom, which has no color filtration at all. CCDs respond better than CMOS because they natively have less linear response curves than film.
In short: I agree, we’re still not there yet. But we can get pretty close – it’s just that to close that last 5% of tonal matching means a hell of a lot of work in Photoshop.
Ming : You get great results, and I would be interested in the processes you use to keep your tones so clean and the tone scale so long. I don’t have access to Leica digitals but my Nikon D700 gives me amazingly clean shadow tones to work with and, I think, as long a tonal range as the 800e. Can’t prove it, but when I went shopping for FX recently I put my money on the larger sensors of the D700. Any sensor capture of light frequencies “filters” or biases the resulting curves with hue sensitivity, whether you call the bias a color filter or simply algorithmic choice. There isn’t anything to my knowledge that would be a pure “value” sensor, completely ignoring hue.
In any engineering solution, the digital issues will continue to rob from the darks to pay the lights, so to speak, because of the nature of binary math. We are coming into an era of more sophisticated local contrast management that might be better at chunking the whole visible range into subsets, each of which suffers their own disparity of bit representation for equal tone bins, but which recombined in the final image, will make more than passable palettes for the discerning eye. I am moving into a “hell of a lot of work in Photoshop” by starting to concentrate on luminosity masks, which is my DIY approach to manually chunked tone bins — and leaving all canned HDR algorithms behind. But i wanted to see how much quality I could get out of the off-the-shelf stuff before rolling up my sleeves.
And I am going back into the wet darkroom with 8×10 film developed one sheet at a time in HC-110 in trays, which I have to scan in a progression of density ranges per sheet. ( I don’t have an 800e to scan with: but I can use my Epson V700 with manual curves to get the data sets I need.) As I understand the use of luminosity masks better, I can adjust my sample ranges for scans better. I am just learning all this now.
I’m getting there. Still refining…once I do, expect a film workflow article/ video or something of the sort.
Tried a V700 recently – the detail is impressive, tones not quite as good as the D800E, but it takes a lot longer to scan. Of course if your overall image resolution exceeds the D800E, then it makes sense to use the Epson since it can do single-pass scanning.
Jeff: great summary of the digi conundrum. Would be interesting to know what you think of Fuji’s attempts to address this issue if you have looked at it. Clearly they did something right with their EXR technology, adding special sensors just to measure the light locally – and now they have discontinued it – so do they simply apply some dynamic range corrections “automatically” ? sort of doing a natural HDR out of one exposure..
Fuji actually seems to do the best job of the manufacturers today at this – I think theirs are the only results that actually look natural.
Andre, Fuji created a compound chip, with two sizes of sensors intercalated across the grid. Lots of serious problems with that arrangement, but they seemed to have solved most of them and created quite a fan base among the purists for the fattening up of shadow tones and extension of mid greys they achieved. It just didn’t seem to work commercially, and the tech critics didn’t really get what they were up to. I come across mention of the older cameras in street photography discussions that have a kind of cult feel to them. In addition, at the time they released this sensor (around 2006 I believe) HDR was in its Exploding Head Trick phase of cartoonish tone mappings, and the subtlety of Fuji’s solution was lost on the popular taste. Now, I thought they were bringing this back, but haven’t checked. Anyway, tone mapping and tone compression are so different in physics and physiology that they deserve different ways of describing them. My gloss on the issues above address the real fundamental issues, but not the product design problems that arise from them. Non EXR Fuji’s, as I understand it, just squeeze the same headroom out of 14 bits that Nikon and Canon proprietary software does. Anyone know different?
I like the grainy film pics – they simply look more poetic than the “realistic” digital photos. They give my mind more freedom to interpret…
And I also like the boob, äh cappuccini shot 😉
I certainly don’t find the grain objectionable. But from what I understand – and what I’ve seen at the 10x loupe level from my 6×6 negatives – I think I messed up somewhere. Delta 100 just shouldn’t be this grainy 🙂
Lovely! I’ve been really looking forward to seeing these (having followed your blog for the last six months or so). I love film; I love the aforementioned meditativeness of it, and I think the grain/streaking/borders add character that can only be faked or approximated with digital. That said, it’s heartening how similar in feel these are to your digital photos; regardless of the tool–or, now, medium–used, the idea/composition remains the star (I’d add to that the tonality). I know everyone /says/ “your camera doesn’t matter”, but only your output has convinced me that it’s true.
Question: if you don’t mind me asking, what’s your Photoshop workflow for film? I’ve just got into scanning and processing negatives, but I’m struggling to find a balance between what I think looks good and preserving the character of the film. Ideally, I want to bring out what’s there, not spend ages optimising each image individually; for me, that’s a big part of the appeal of film (raising one’s game by trashing images that aren’t 95% there in-camera).
Thanks Todd. I wasn’t so sure about the tonality; I guess that’s a consequence of my lighting and metering choices.
My PS workflow, honestly, is messy at the moment. I copy my negs with a D800E and macro lens on a lightbox, then use the NEFs; at the moment I’m still trying to figure out what series of curves/ tonal adjustments works best, preferably one that I can put into an action to batch process lots of files at a time. Like you, if I’m going to optimize each image, I might as well start from a more ‘perfect’ start point – i.e. shoot digital. Even then, it’s simply not worth the effort most of the time – either you get damn close to it, or you don’t. There’s no way to change lighting after the fact…
Mine’s messy too: scan with Plustek OpticFilm 8200i via SilverFast (no adjustments here) > import TIFF into Lightroom > apply makeshift invert by flipping curve endpoints (causing many controls to be reversed relative to their normal operation) > add basic S-curve for contrast using Parametric Curve > tweak endpoints and midtones using Point Curve. By the time you’ve done all that, it’s hard to resist taking it the rest of the way. I think film is often perceived as being more “pure” than digital–that’s certainly how I used to think of it–but, unless you get into analog printmaking too, negatives are actually a lot like RAW files.
(Have you been processing any colour negatives as part of this recent foray? I haven’t found colour correcting those intuitive or enjoyable, and the even more intensive Photoshopping required seems to make it difficult to reconcile with the “purist” vision.)
The moment you have to do digital adjustments, I think you run the risk of losing a lot of the filmic ‘signature’ because you’re playing around with the tone curve. And the reality is that the final output can be consistent this way, but you’ll still impose your own tonal signature on it to some extent. Haven’t touched color yet and doubt I will; I can get much better color from digital in every way, whereas there’s still something about the tones of a good B&W neg…
Hi Ming, I discovered your blog a few weeks ago, and have read a bit and enjoyed your work- both images and writing. This is my first post. May I say, don’t beat yourself up too much about film? I last shot and developed my own B&W work in the late 1980s – weddings mostly – a couple of magazines shoots (low quality, local stuff). At that time, the only available medium to review one’s B&W work was to print it. An 8 x 10 was large, a 11 x 14 rare, and very rare, only the best 35 mm negatives could print for exhibition at 16 x 20 – I mean 1 in 10,000 shots, in rolls of 36. As there was no pixel peeping possible, photographers put framed photos (end alliteration) on a wall and stood back the appropriate distance to view them. I assure you that if you pick your best one or two images, and spend some time printing them in a dark room instead of at 100% scan in Photoshop, you will have a very different view of your work – blown highlights, impenetrable shadows, lack of critical focus – these are the features of 35 mm film and are to be embraced. Oh yes, and manual spot retouching with that ink stuff and tiny brushes. How could I forget. That is, don’t try and make your film images look like your digital images – it can’t be done; they’re as different as wet chemicals and computer. Or put another way, you are shooting 35 mm B&W, don’t think of Ansell Adams, think of Robert Capa. Regards, Bear.
Thanks for the thoughts. I’ve solved that by going to 6×6. As for Capa – his famous Normandy landing images only look that way because of that infamous processing error…
Nice ! I want to see more film pictures in your blog. What I don’t understand is when you say “.. I feel that I’ve set a standard here that I must uphold; if the images from this roll don’t meet that standard …”, you’ve set an standard because the *content* in your pictures, not the medium, nor the technical perfection (wich is excellent), at least in my opinion, so don’t worry.
I used a film light box and my 5D in a tripod (http://coolframe.wordpress.com/2011/06/22/escaneo-de-negativos/ in spanish) it is the best method but it’s really time consuming, now I use a film scanner and mostly 120 film (less work, same fun). Nice post & nice pictures as allways 🙂
Thank you. It’s more to do with not letting the medium overpower the idea – e.g. images with a fast lens shouldn’t scream ‘BOKEH!’ first above composition, just as film shouldn’t scream, say, ‘GRAIN’. You should still see the idea/ composition first; the medium is a supporting actor rather than the star. I suppose I’m just overly conscious/ sensitive of images where this occurs, and want to avoid it like the plague…
yes, you’re right, now I understand ! you don’t want the medium or technique to be a goal by it self. I see a lot of people claming: ” I shoot only film, now look at my medicre (but in film!!) set of pictures I develop today”
Precisely – you don’t want the medium to outweigh or overpower your own style.
I’d be interested in seeing a picture of your scanning rig. I have seen (and tried) the shoebox DIY scanning method, your description and results seem interesting too.
PS: given your little film history from your post, and seeing your scientific posts on resolution and pixels and whatnot, I’d suggest sticking to medium format. There’s lots of detail, and if you use your Hasselblad, the 1:1 aspect ratio provides a lot of compositional challenges that you’d probably enjoy.
It’s a bit of a Goldberg device: Nikon D800E + 20mm extension tube + Zeiss ZF.2 2/50 MP + hood from the 100MP, placed on top of a piece of glass, on top of the negs, on top of my watch photography lightbox with the flashes inside. I can’t help but think the Nikon ES-1 slide copy adaptor would work much better, except I couldn’t find one anywhere locally. 😛
I’m inclined to agree on your second point – the 35mm negs are nice, but feel ‘limited’ – I don’t know how to describe it. The first two rolls of 6×6 really ‘breathe’, and look magnificent.
You don’t have to worry about your images. Superb as usual. Clearly you have the eye. But in my opinion so much for film nostalgia! I purchased a beautiful M4 a year ago and after 4 rolls of film quit! Why go retro other than to see if you can still take a decent picture. The quality, virtual instant gratification factor of digital compared to the headache and expense of getting someone other than yourself to process the film is immeasurable. I sold my M4 and am now lusting after an M or Monochrome, but haven’t decided yet. Keep up the wonderful work.
Thank you, Bill. Actually…I’m enjoying the slowness of the process, believe it or not. There’s something meditative about it rather than the usual instant gratification we’re used to. That said, there’s no way I’d do this for commercial work. 🙂
I’m with you Bill. I like from time to time but not too often.
I think if you shoot too much film, it becomes a chore – especially the processing and digitizing part. But a roll or two of 120 a week feels about right 🙂
Hi Ming, The pattern looks like reticulation, not grain, but hard to tell from the small images. Caused by temperature fluctuations (maybe during the wash?)
It’s definitely grain in the 100% scans. I think my developing temperature was too high to begin with – happens if you live in the tropics – though oddly the first roll of 120 I developed under the same conditions (same film emulsion, too) turned out just fine.
Hi MT, thank you for another extremely well produced article. I’m very interested to know how you’d describe the difference between these shots taken on film and similar shots from a digital source that have been processed/desaturated to B&W. Apart from the obvious appearance of grain (and in this case your wipe marks!) do you think that this “look” can be achieved regardless of origin or is there something here that can only be achieved on film? Nice shot of the Titan F2, has a 4×5 B&W look to it if not for the strap,lens bloom and a few tell tale colours.
I was looking for language to describe it, but couldn’t really find it. I don’t know if the tonal map I’m seeing is partially due to my conversion process, though. Somehow the B&W negs appear both ‘heavier’ and ‘denser’, but also smoother, and in the case of medium format – silkier. Certainly not as punchy as digital, which is a good and a bad thing.
It was my first roll – let’s just say I didn’t get the processing 100% right. I uploaded the first roll of medium format to flickr today, and yes, it’s much cleaner – both in terms of grain and overall ‘negative hygiene’.
You can certainly achieve this look digitally; it’s just not something I’ve wanted to do. I’m actually trying to retain the quarter tones of film but figure out if I can shrink the grain; that’d be the best of both worlds.
F2 shot was with the D600, I think.
hey Ming:
just FYI, most of the pics in your most recent post are still private.
matias
Sorry. Meant to fix that but the internet went down here, will get that sorted shortly…
Should be fine now.